Showing posts with label gift ideas. Show all posts

Friday, October 30, 2015

Friday Favorites ~ Howl-o-Ween Treat

It's FRIDAY!! Oh, and the day before Halloween, which means lots of candy and treats ~ oh my! I like to give a little something to the teachers each holiday. This year for Halloween I found these adorable "mummy" candy bowls at Target and thought it would be cute to put some Fall-colored candies in them and wrap them up with a fun tag attached.


Here's an up close picture of the tag. I created the tag using Happy Haunting DSP and the Triple Banner Punch. I pulled out my FAVORITE stamp set (at the moment) called Howl-o-Ween Treat (which I won while at Convention!) and stamped the owl using Basic Black Archival Ink. I thought it would be cute to have him holding a little pumpkin treat bag, so I inked that up in Tangelo Twist and cut that out, too. The "Happy Halloween" sentiment comes from the And Many More stamp set which I cut out using my Big Shot Die-Cutting Machine and the Bitty Banner Framelits. The ribbon is retired, but for these kinds of gifts it's the perfect time to use up my retired stash! :)


Isn't this set adorable? I didn't get to use it much this year since I was lacking in my Halloween inspiration (and lacking in time), but I'll hold onto it for next year! Click HERE to see what else I created using this set!


 Head on over to the Stylin' Stampin' INKspiration blog to find out what is on a few of our other designer's favorites list right now!
http://ssinkspiration.blogspot.com/2015/10/friday-favorites.html

Thursday, April 12, 2012

just a little random assortment of craftiness

This is going to be quite the random hodge-podge of projects kind of post, but I wanted to share, so here goes...short and sweet.

Valentine's Day treats for my MOPS (Mothers of Preschoolers) group
{heart shaped marshmallows with a packet of hot cocoa}

I get the pleasure of being my daughter's classroom coordinator.
This is the craft I planned for the kids to make for their Valentine's Day party.
{disclaimer: when I took the picture, I didn't realize the kitty's ear was bent back - oops!}

A little "happy baby" treat for a sweet friend of mine who had her THIRD girl in February.

I was asked to make 40th birthday party invites in Masters (golf) colors. I designed the invitation through Paint Shop Pro, printed them off, and then backed them onto coordinating colors of card stock (non-SU!). You can't tell in any of the pictures I took, but the white ball in the bottom right hand corner is textured with polka dots to represent a golf ball. I used the Junior Alphabet Sizzix dies to create the "40".

My daughter's teacher had her birthday at the end of March and I wanted to put together a little frame of a class picture as a little keepsake.

Just this past weekend, the kids had a birthday party for two little friends of ours that are sisters. I decided to make the same card in two different girly colors. The card base is made using the Top Note Die.

I am getting ready to go out of town for the weekend, so my descriptions are a little shorter than usual. If you have any questions about anything that you see, just leave me a comment and I'm happy to help!

Have a great weekend!

Tuesday, January 10, 2012

random projects

I've gotta get my groove back!! I feel like I have spent the last couple of weeks just looking at the piles of stuff I end up shifting from one room to the next! My craft room was taking a major "back seat" to all of the other projects I wanted to accomplish, but finally by Saturday night I think I actually have it cleaned and organized to be able to get back in there and start working again. I'll have to post craft room pics soon because my mom made some fun curtains for my closet (I removed the doors) and I feel like I have a great organization system going on. I purchased a 12 x 12 paper rack from a paper store closing out and snagged a card spinner, too! I still have a few more things to be hung, but I'm just waiting for my hubby on that one! ;)

So, in the meantime I thought I would share with you a few random projects I've worked on recently...

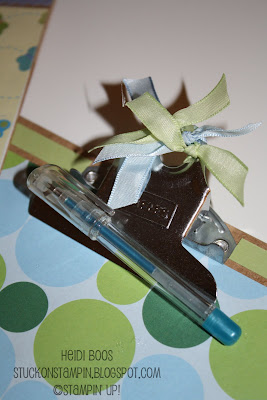
I covered these small clipboards (6x9) for the kids to keep in the car. My daughter is always wanting to write or draw on something, so I thought this would be perfect! I decided to attach the paper with adhesive and Sticky Strip instead of Mod Podge which is what I originally tried. For some reason the Mod Podge just warped the paper and I didn't like the way it looked. I was pretty proud of myself for not just scrapping the project all together, but instead I started over and tried something else. Such a concept, huh? ;)

I used the Timeless Type Alphabet Junior Sizzlits to die cut the letters for each of their names and used my "sticker maker" to add adhesive to the back of the letters. I liked the way it looked with their names on the bottom of the clipboard even though I'm sure they could guess whose belonged to who. I cut 8-1/2 x 11 white copy paper in half and a stack of paper is clipped to the clipboard ready to go. (Note: The paper is non-SU!...I have to use up some of that "contraband" paper somehow!! *wink*)


I also had in my stash (everybody has a "stash", right?) some short gel pens in different colors, so I found a gel pen that coordinated with each of the paper colors. I attached half of a Velcro circle on the clip part and the other part on the gel pen. Now they'll always have a pen to draw! I also decided to add some little bits of ribbon to each of the clipboards for an added flair.


* * * * * * * * * * * * * * * * * * * * * * * * * * *

Another little project I worked on this past weekend was making some hand sanitizer bottles. These make such great gifts! I purchased some hand sanitizers at The Dollar Tree and peeled off the front label, then added either some rub ons (retired) or a vinyl flower (which demonstrators have been able to buy in bulk in the past). Adding the ribbon finishes the project perfectly! You'll notice I also added a few pearls to some of the flowers on the front of the bottle. The bonus is that these are refillable, so you can reuse them for however long you need to!


* * * * * * * * * * * * * * * * * * * * * * * * * * *

We had MOPS (Mothers of Preschoolers) on Monday and just like each month I brought my group a little gift for January. I wanted each of them to have a little notebook to write down some of their goals for 2012...or just to use as a place to jot down anything they needed to! These are mini-composition notebooks I picked up in September on the school supplies clearance. Kind of wished I would have snagged some more! They were great quality notebooks and ended up only being $.25 a piece.

I covered each of the notebooks with retired Stampin' Up! DSP (Sweet Pea) and added some ribbon to tie around the notebook and ended it with a knot. I didn't take a picture of the back, but I also covered the back of the notebook using a coordinating color of DSP. I decided to use Mod Podge with this project and it worked great! With Mod Podge, I glued the paper to the notebook and then covered over it with another layer of Mod Podge that dried perfectly clear. This will help prolong the life of the notebook as it gets shoved in the purse or glove box of the car.


I added an initial for each of the ladies in the group using the Timeless Type Junior Alphabet Sizzlits (just as the same with the clipboards, but used the lower case this time).


* * * * * * * * * * * * * * * * * * * * * * * * * * *

I was able to spend some time in my craft room Tuesday to get ready for my upcoming card night next week, as well as to make a few cards to mail out to friends. I'm still sticking strong with my motto..."Don't over-think it. Just do it!" I found myself chanting that while in my craft room. It actually worked! ;)

Friday, December 30, 2011

l is for lemon

I am going to try to keep today's post short and sweet...

...or should I say SOUR?!

For Christmas each year on my mom's side of the family all of the aunts, uncles, and cousins get together for a fun Christmas party with lots of yummy food and a gift exchange. The kids each open a gift from their great grandparents and the adults (all 21 of us) bring a $10 gift that starts with a letter we are on for that year. For instance, we have already gone through the word Christmas and now we are onto the word Holiday, so this year's letter was L! This has been a fun way to have a "white elephant" gift exchange of sorts, but everyone is supposed to bring a good gift and not a gag gift. It's always funny to see how some people stretch the name of the gift to make it fit the letter for that year!

This year for some reason I left my decision making to the last minute (actually that's not really a surprise for me lately!). I had initially thought of bringing a candle...aka "lighted wax", but I wanted to be a little more creative. I ran across my candy stash in my craft room and found Lemonheads!! I knew right then and there I wanted my gift to be lemon-themed. So, off to the store I went! I kind of had a difficult time finding things that were lemon, especially with the $10 budget (and the time crunch!) but I came away with...Country Time Lemonade powder mix, Lemon Mentos, Raspberry Lemonade chapstick, and Lemon Ricola cough drops. I should have taken a picture!

Of course I had to add in my handmade touch, so I made...

{five 3x3 lemon cards with envelopes}
I kept them simple...which had nothing to do with crunch time! Ha!

{wrapped up in a bow}

And here is where the Lemonheads come in. I had this cute little jar (Dollar Tree!) in my craft room just waiting for it to be used! I added a little lemon accent to the top, which matched the cards and tied a few pieces of coordinating ribbon. My sister-in-law ended up opening the gift (she was #1) and at the end decided to keep it rather than trade. Made me feel good that it was going to someone who I knew appreciated it!


Some other gifts that were brought...
  • Lime green blanket with Lime soda & Lime Tortilla Chips (this is the gift that I got!)
  • Electronic "lead" sharpener...aka pencil sharpener, which we all laughed that nowadays pencils are made with graphite
  • Lights...flashlights -- lots and lots of flashlights!
  • Lights...nightlight
  • "Lincoln" - $10 in pennies
  • Levels
  • Locks
  • Lotion

I love seeing the creativity each year!! This is such a fun tradition for our family!

***********************************

Stamp Set: Tart & Tangy

Colors: Daffodil Delight, Real Red

Punches: Two-Step Owl (heart), 1-1/4" Circle, 1-3/8" Circle, Scallop Circle


Monday, December 12, 2011

12 days of Christmas {projects} - day 12...and a giveaway!!

Christmas Project #12
Jumbo Clothespin - Picture Holder

Day 12 is here! I actually can't believe that 12 days have gone by...it seemed so quick! My final project of this Christmas series is one that I made for my MOPS (Mothers of Preschoolers) group. This is my second year of being a discussion group leader and I like to do a little something for them each month. Each of the ladies will receive one of these jumbo clothespin holders that can be used as a picture holder. I have also printed a picture of our group that I will stick on the clothespin before they arrive! (Let's hope that none of my group decides to read my blog before coming to MOPS this morning and spoil the surprise!)


Let's get started!

Find yourself a jumbo clothespin (I found mine at Michaels) and get out your Mod Podge. If you don't have any...you really need to get some! I pull out my big jar of Mod Podge for little projects here and there and I am always so glad I have some on hand.

Cut two pieces of DSP (I used retired Candy Cane Christmas):
1-1/8 x 3-5/16

1-1/8 x 1-1/16
Keep in mind that the clothespins you have or find may not be the same size.
I stamped the JOY ornament from the Delightful Decorations stamp set onto Whisper White card stock using Real Red ink. I punched it out with the Ornament punch.

Using a foam paint brush, brush Mod Podge over the top of the clothespin.

Lay your two pieces of DSP over the Mod Podge, smooth with your finger, and then brush another layer of Mod Podge on top. Set aside to let dry.

Adhere Dazzling Diamonds glitter to the ornament starting with the 2-Way Glue Pen...

Then generously sprinkle on Dazzling Diamonds glitter and shake off excess. Allow to dry for a few minutes.

Punch a hole in the top of the ornament using a 1/16" hole punch.

Cut a 10" piece of white floss and break into two pieces (3 strands each).

Thread through the back of the ornament and then thread to the front 2 Mini Jingle Bells.

These mini jingle bells are only available until January 3rd out of the 2011 Holiday Mini Catalog. Aren't they so cute?

Thread a 10" piece of 5/8" Real Red Satin ribbon through the hole of the clothespin.

Tie into a double knot.

Thread the floss up through the red ribbon.

Tie the floss into a double knot and then make a bow. Trim the ends of both the floss and the satin ribbon for a completed look.

Add you favorite picture and count it all JOY!


I hope you have enjoyed these simple, but cute projects that are easy to recreate so that you are able to still do a "handmade holiday", but can also have more time during the busy Christmas season! I hope that you are able to bless someone with your talent and gift of creativity!

Now onto the GIVEAWAY!!!

One lucky reader will receive these treat from me...

You will probably recognize that many of the things pictured are items you have seen during my 12 Days of Christmas {Projects}.


To enter to win:

LEAVE A COMMENT ON THIS POST...
telling me which project of the 12
I shared with you is your FAVORITE!

{giveaway will end on Thursday, December 15th at 8:00 PM...
I will announce the winner on Friday morning!}


Please be so kind and share this giveaway with your friends and family and I would love to be able to pass these projects onto anyone who would like to use them and sharing my blog with others can help do that! It's my gift to my fellow crafters this Christmas season!

Thank you to those who come to visit me daily...I hope you continue to come by and I will continue to share more creations and inspirations! Many blessings to you and your family this Christmas!

************************

Day 1 - M & M's Skinny Bag with Matching Tag
Day 2 - Rudolph Punch Art Gift Card Holder
Day 3 - Santa Suit Jars
Day 4 - Hershey Nugget Trays
Day 5 - Holiday Hand Sanitizer Ornaments
Day 6 - Wrapped Rolos
Day 7 - Merry Trees Glass Block with Snow
Day 8 - Snowman Kisses
Day 9 - Ghiradelli Chocolate Holder
Day 10 - Jingle All the Way Shadowbox Frame
Day 11 - Candy Hugs & Kisses Treat Holder


Monday, December 5, 2011

12 days of Christmas {projects} - day 5

Christmas Project #5
Holiday Hand Sanitizer Ornaments

A little delay on today's Christmas project, but I hope this fun gift idea is worth the wait! And, as I always say...better late than never!! *wink*

I purchased at least 20 cute little reindeer mini hand sanitizers last January on the after-Christmas clearance on Bath & Body Works knowing that I would want to make some holders for them for this year's bazaar (there were so many great tutorials out there, especially this one from Erica Cerwin which I used for a stamp club hostess gift back in May). However, when it came time for me to get working on bazaar stuff, I put these holders on the bottom of the list and never got to them. I'm not sure if the work involved or if I just had too much on my plate was to blame, but it didn't happen! Fortunately I did a second bazaar a couple of weeks later and decided to go for it. However, instead of going the more difficult route I opted for something clean and simple...and quick {just my style}. I was able to create these cute little hand sanitizer holders as a result and I'm so happy with the way they turned out!

Please note: For the craft bazaars I participate in, I typically try to use up retired DSP and save the current DSP for events that I host. Therefore, this is the reason many of these projects I am posting in my 12 Days of Christmas {Projects} uses retired DSP. Any of these projects can be easily changed with current DSP, if desired!


Cut a piece of Real Red card stock 3-1/2" x 5-1/2".
Score lengthwise 2-1/4" and 3-1/4".

Turn your card stock and score again 1" and 2-1/2".

Fold each of the score lines and then using Paper Snips, snip the two inside folds on each side.

For DSP, you will need:
2 pieces - 1-3/8" x 2-1/8"
2 pieces - 7/8" x 2-1/8"

Adhere the two larger pieces to the front and the back as shown below.

Using the 1-1/4" Circle punch, line the circle on the front and center it (I just go ahead and "eyeball" it and hope for the best).

Not too bad, right?

On the inside of the box, place Sticky Strip on the outside of the two "flaps". I used SNAIL adhesive and added a strip to the inside.

Begin to fold it up like a box with the flap on the outside. In the next step it will be covered up by the last part that comes up.

On the last two flaps, put Sticky Strip on the outside and SNAIL adhesive on the inside for extra "stickiness". Fold up to make a completed box similar to the last picture.

With SNAIL adhesive, cover the two sides using the other two pieces of DSP (7/8 x 2-1/8).

Using the 1/8" hole punch, punch a hole on each side of the box

Cut an 8-1/2" piece of Real Red 1/8" Taffeta ribbon. Thread it through one of the holes and tie a double knot. (Note: the length of the ribbon depends on how big you want the loop).

Then thread the ribbon on the other side and double knot. Trim the ends, if necessary.

Decorate the front as desired.
Don't you just love how the reindeer are peeking through?!
(I used the Teeny Tiny Wishes stamp set in Real Red ink. Punched it out with the Window punch and Modern Label punch out of Real Red card stock. The snowflake is from the Northern Frost Decorative Strip die. I added a Rhinestone to the center for a little bling!)

A helpful tip when using Glimmer Paper with your Sizzlits dies. Be sure to place the "sparkly" part facing up. This will be waaaaaaaay easier to punch out. Let's just say I learned from experience. *wink*

Use a paper piercing tool to poke out the detailed parts of the snowflake.
(I don't have a clue why this picture is sideways!!)

Hang the ornament on the tree (or anywhere) for a special surprise! Wouldn't these be great little gifts for people in the health care field...or a teacher!!

Hope you have a happy and HEALTHY Christmas season!!

And, if you're curious...the reindeer mini hand sanitizers aren't available anymore, but they do have some other cute options like the ones below.


Come back tomorrow for Day 6...and definitely come back on December 12th for a giveaway!!

************************

Day 1 - M & M's Skinny Bag with Matching Tag
Day 2 - Rudolph Punch Art Gift Card Holder
Day 3 - Santa Suit Jars
Day 4 - Hershey Nugget Trays
// ADDED BY RYAN ON 1-3-14 // END ADDED BY RYAN 1-4-14