Friday, April 24, 2015

Friday Favorites - Flower Patch

It's Friday! Say what?! I guess that week went by in a flash!

Some of the designers are sharing their favorites over at the Stylin' Stampin' INKspiration blog, so come on over to take a peek at what we're loving right now!

My favorite to share with you today is the Flower Patch stamp set...and of course the coordinating framelits! I will honestly admit that this stamp set has taken awhile to "grow" on me, but after I realized that I can be as simple as I want with it...I am beginning to like it (a lot)! I haven't really played with this set much (here is the only other card I've made with it), but I am happy to see that it will be rolling over into the new catalog so I'll have more opportunities to play! I have definitely seen some beautiful inspiration with it!


This was one of the cards we made at April's Card Making Night. It was simple enough for all of my guests to create without too many steps. They had to do some die-cutting with all the flower pieces, but I let them off the hook with the leaves and pre-cut all of those for them! I love, love, love the Flower Pot DSP and how much the paper coordinates with the set.


Here are the two versions I had on display as samples...


Stamp Sets
Flower Patch
Ink
Garden Green, Tangerine Tango, Crushed Curry
Paper
Garden Green, Blushing Bride, Whisper White, Flower Pot DSP
Accessories
SNAIL Adhesive, Stampin’ Dimensionals, Rhinestone Accents
 Tools
Big Shot Die-Cutting Machine, Flower Fair Framelits

Have you checked out the retiring list yet?
{click on picture below}
http://su-media.s3.amazonaws.com/media/lastChance/2015_NA_RetiredList/US_retiredList_ENG.pdf
Easy online ordering at heidiboos.stampinup.net

Sunday, April 19, 2015

Control Freaks Tour - Let's Celebrate


I am so glad to be back hopping with the Control Freaks after a break last month! My creative juices haven't been flowing as freely as I have wanted (and needed) them to, but hopefully with the change of weather (we're seeing sunny days here in Oregon!) I can turn my inspiration into production again while the bright light shines through my window! We are so excited to CELEBRATE with you all for this month's tour as we showcase cards and projects meant for celebrating...birthdays, graduation, Mother's Day, and more!

If you've already been hopping along then you just came from the wonderful Melissa Davies' blog. If this is your first stop, then welcome, sit back, and enjoy!

I wanted to share with you a Mother's Day card I created using the Circle Card Thinlits. I love how this simple thinlit creates such a fun and unique card design lickety-split with the creases made for you and everything. With this card I wanted to go a step above and create an extended part of the card (on the right side). I'll show you a quick "how to" for that below. This is definitely not my own idea! I am so thankful for other stampers who encourage me to do things differently!

Here is the card closed (sorry, don't mind my fingers...ha! ha!)


I wanted to take a picture of the card at a different angle, so this is what it looks like propped up. You can see the middle circle start to swing open.


And this is what the card looks like when you open the flap on the right. It reveals the rest of the stamped sentiment! There is also a place for you to write a little message...or at least write who it's from! If you were to pull the left part of the card all the way open the circle in the middle swings all the way open revealing the back side of the circle and then it can lay flat.

Stamp Sets
Mother's Love
Ink
Garden Green
Paper
Pistachio Pudding, Calypso Coral, Crisp Cantaloupe, Gold Soiree Specialty DSP
Accessories
SNAIL Adhesive, Stampin’ Dimensionals, Pearl Accents, Rhinestone Accents, Candy Dots (Regals)
 Tools
Big Shot Die-Cutting Machine, Circle Card Thinlits, Bitty Butterfly Punch, Elegant Butterfly Punch

Start with a piece of cardstock that is 8-1/2" x 5-7/16" (this is just shy of 5-1/2"). This way the left side of the paper can fit just right under the left part of the thinlit and then you can slip it through the thinlit so it goes on the top on the right side. I hope that helps!

It will look like this when cut out.

Fold the left creases...

Fold the right crease...

Now design your card to your heart's content!

http://debbiesdesignsblog.blogspot.com/Thanks for stopping by today! Continue on the tour for more great ideas to help CELEBRATE all of the wonderful people in our lives! Next up is the inspiring Debbie Henderson.

Thursday, April 16, 2015

Work of Art Thank You

It was my monthly card night last night - SO. MUCH. FUN. Seriously! Each month just keeps getting better and better...and bigger! Last night there were 18 ladies who came to join in the fun!

I CASEd this card from Jen Arkfeld at Stamped Silly. I originally saw her card posted on Facebook and loved the design! As most cards I CASE I did change it up a little to work with what I had, but the idea was definitely Jen's...most importantly the color combo of Lost Lagoon, Night of Navy, and Crumb Cake.


The guests at my card night could choose whichever sentiment they wanted. Here is a sample card using the Love & Sympathy stamp set. I also reversed the order of the blues from dark to light.

Stamp Sets
Work of Art, Mother's Love, Lovely Amazing You
Ink
Lost Lagoon, Night of Navy, Crumb Cake
Paper
Whisper White, Lost Lagoon, Night of Navy, Fresh Prints DSP Stack (retired)
Accessories
SNAIL Adhesive, Stampin’ Dimensionals, Lost Lagoon 3/8" Satin Stitched Ribbon
 Tools
N/A

Click on the picture below to see more thank you card inspiration!
http://ssinkspiration.blogspot.com/2015/04/thank-you-cards.html

Monday, April 13, 2015

SSINK Card Sketch - April

Last Tuesday was one of my monthly card nights and I had some cards to plan, so I needed a little bit of inspiration. For one of the cards I used the Stylin' Stampin' INKspiration April Card Sketch to help me put together a card that the ladies would love (I know many of them love purple and butterflies!)


{Join in the fun by linking up YOUR creation using this sketch!}

And this is what came to life...


Stamp Sets
Work of Art, Papillon Potpourri, Six Sided Sampler, Hardwood Background Stamp
Ink
Blackberry Bliss, Hello Honey
Paper
Whisper White, Crumb Cake, Blackberry Bliss, Rich Razzleberry, In-Color DSP Stack (Hello Honey in polka dots)
Accessories
SNAIL Adhesive, Stampin’ Dimensionals, Pearls, Paper Doilies, Hello Honey 3/8" Satin Stitched Ribbon
 Tools
Big Shot Die-Cutting Machine, Circle Framelits, Elegant Butterfly Punch, Bitty Butterfly Punch


Friday, April 10, 2015

Storage Solutions - sneak peek of my craft room!

Back in November I decided to do a little switcheroo of my craft room. OK, let's be honest...it turned out to be a BIG switcheroo. I brought it all from an upstairs room to the downstairs office space right off the front entry. Now we have the office (and added some desks for the kids) upstairs where my old craft room used to be. It has made an AMAZING difference, especially with the events I hold in my home on a monthly basis. Having easy access to this room is so nice!

The color scheme of my new craft room is gray, aqua(ish), and yellow. Obviously you can't really see the color scheme in the picture below, but hopefully at some point I can give you a tour of the ENTIRE room, but for right now I wanted to share with you a couple of storage solutions (join us over at Stylin' Stampin' INKspiration for more storage solutions from some of the other desingers!)

One of my biggest storage solution saver has been using rods for the wall where I can store my punches on. The bottom (silver) row of rods can still be found at IKEA. The top two (black) rods have since been discontinued from IKEA. Those were my favorite ones!

You can also see to the right of the picture I have a 12x12 paper rack that holds all of my current Stampin' Up! DSP (on the top rows) and *some* of my retired DSP on the bottom rows (can't see in picture). I have another place for all the rest of my retired DSP...so don't be fooled that this is all! ;) It's hard to tell in the picture because I cropped it off, but it does go all the way to the ground. I keep the paper in the plastic to avoid any dust settling and I slip all of my loose scraps inside. I also write the name of each DSP on top of the plastic in Sharpie, so I can see it easily.

You can also see in the picture I have more of the large size punches in a shelf on the wall (on the left) and I use my ink pad carousel for all my ink pads and re-inkers.


A couple of other quick storage solutions...

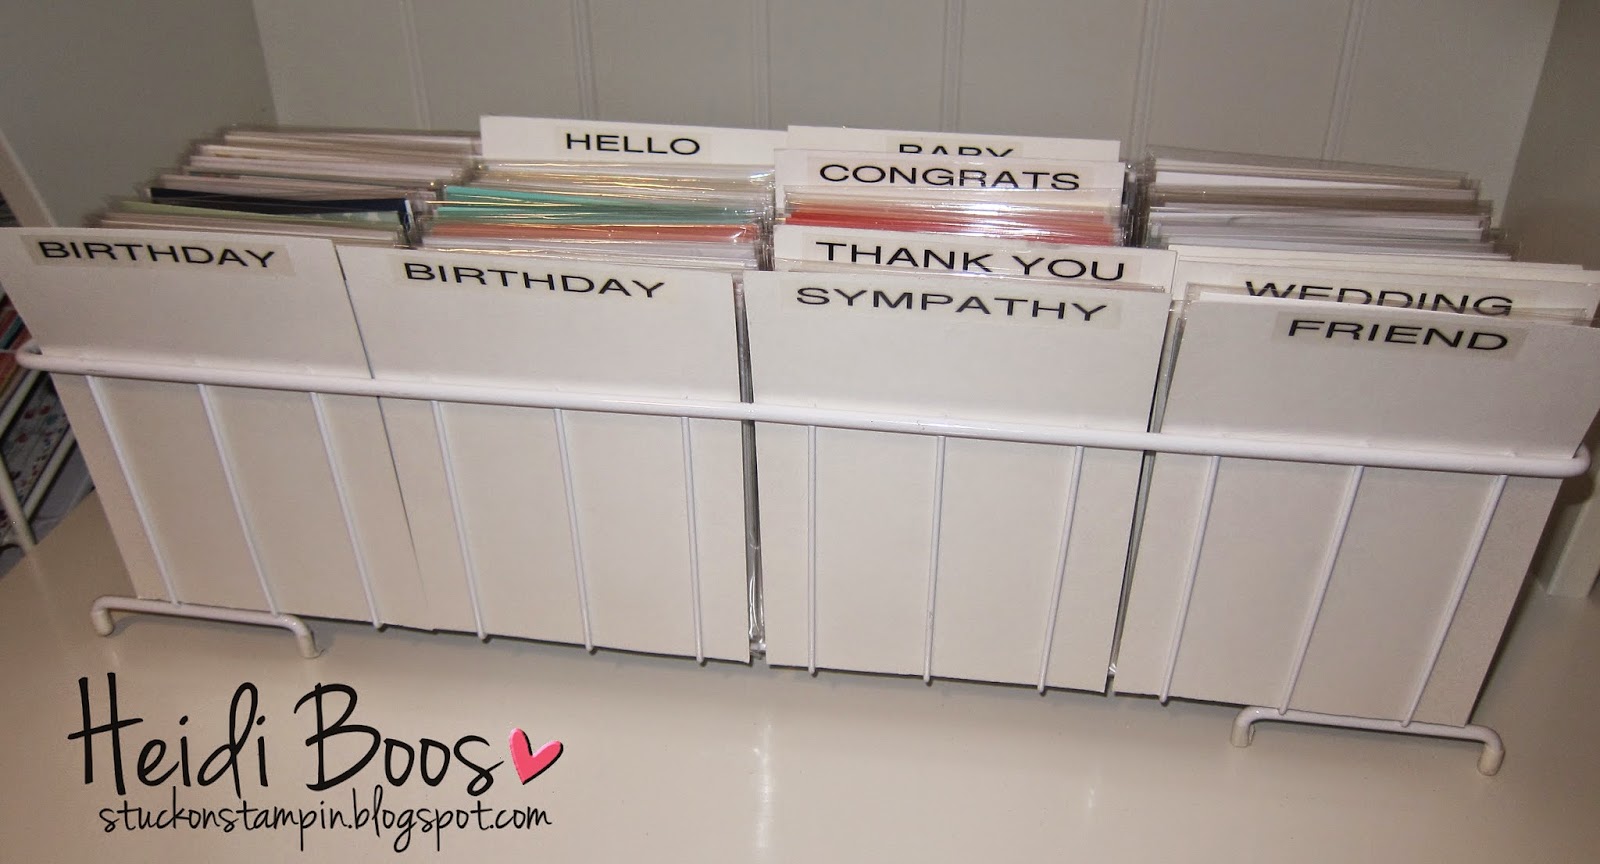
I store all of my pre-made cards in this fun wire rack that I found at a garage sale. I made labeled dividers for each kind of cards, so I can easily see which card I need (I have a separate rack for holidays). I put this out at my events and it makes it easy for my guests to look through to find just the right card if they need to buy one!


And this is how I store my Framelits. Each set is placed in Clear Mount Cases (which you can purchase empty through Stampin' Up!). I have magnets in each of them to hold the Framelits in place. To the far right you will see my embossing folders. I keep them in a holder that can be used for pamphlets and such. I originally purchased it for our mini catalogs (back in the day) when they were that size, but when we upgraded to the larger size I found a new use for the holder!


Please let me know if you have any other questions or are curious about anything you see! I hope to create another post of my craft room in much more detail...and a look at the entire room...in the future!

Free shipping ends TODAY!
Visit my website at heidiboos.stampinup.net to place your order!

Monday, April 6, 2015

WOO HOO!! FREE SHIPPING APRIL 6-10


This is awesome news, stampers!! 

Enjoy FREE SHIPPING now through April 10th!

Stock up on all your favorites...no order is too small or too big!

Order online by heading over to my website at heidiboos.stampinup.net and click on SHOP NOW. Your order will be shipped straight to your door for FREE!! It's quick, easy, painless, and rewarding!

For every $25 you spend AND for using hostess code 2HQ3TK7C during checkout you will be entered into a drawing to win a Stampin' Up! surprise pack from me ($25 value). 
(If you plan to order $150 or more, please take advantage of the free hostess rewards with your order and do not use the hostess code.)

Also don't forget to take advantage of this week's Weekly Online Deals, including the Big Shot Magnetic Platform at $10 off! (this week's deals end tonight)...a new batch of deals will come out tomorrow, so you can always order again! ;)

Send me an email if you have any questions
stuckonstampin{at}gmail{dot}com


Friday, April 3, 2015

Easter Treats - For Peeps Sake

I don't know exactly how it happened, but Easter came in a flash and I am not ready for it! I have only been able to create one card design with my new For Peeps Sake stamp set, so I decided to pull this set out one more time and make some quick treats for the kids' teachers and some others at their school. Using the Big Shot and the Fry Box Bigz Die was a fun way to pull these together! I love how the jellybeans match the polka dotted paper.

What have you been able to create?


Stamp Sets
For Peeps Sake
Ink
Blackberry Bliss, Daffodil Delight, Pacific Point, Markers - Rose Red
Paper
Whisper White, Daffodil Delight, Rose Red, Painted Blooms DSP
Accessories
SNAIL Adhesive, Stampin’ Dimensionals, Sticky Strip, Rhinestones
 Tools
Big Shot Die-Cutting Machine, Fry Box Bigz Die, Bitty Flower Punch
// ADDED BY RYAN ON 1-3-14 // END ADDED BY RYAN 1-4-14