Friday, February 27, 2015

Friday Favorites - Lovely Amazing You

http://ssinkspiration.blogspot.com/2015/02/friday-favorites.html

It's Friday Favorites at the Stylin' Stampin' INKspiration blog today and I have a new favorite to share! It's actually a stamp set that was just released last week called Lovely Amazing You.

       
I needed a simple 3x3 card to give to my club gals...in came this stamp set!

Easy peasy and can't wait to play with this set more!


Stamp Sets
Lovely Amazing You
Ink
Basic Gray, Melon Mambo, Bermuda Bay
Paper
Whisper White, Basic Gray, Melon Mambo, Irresistibly Yours DSP (SAB)
Accessories
SNAIL Adhesive, Stampin’ Dimensionals, Sponges
 Tools
1-3/4" Circle Punch, 2" Circle Punch

Thursday, February 19, 2015

Control Freaks Tour - Time to "Sale-A-Brate"

Yippee! My favorite time of the month...Control Freaks time! We are so excited to SALE-A-BRATE with you all as you hop along for some inspiration. For this month's tour, we are showcasing the amazing products you can get for FREE (with any $50 order) from the Sale-A-Bration brochure. There are definitely some must-haves that need to go on your list! Sale-A-Bration will continue all the way through March 31st, so there is still lots of time to save up to spend...and earn something FREE!

If you've already been hopping along then you just came from the talented Julie Davison's blog. If this is your first stop, then welcome and enjoy the ride! We hope that we can get your creative juices flowing!

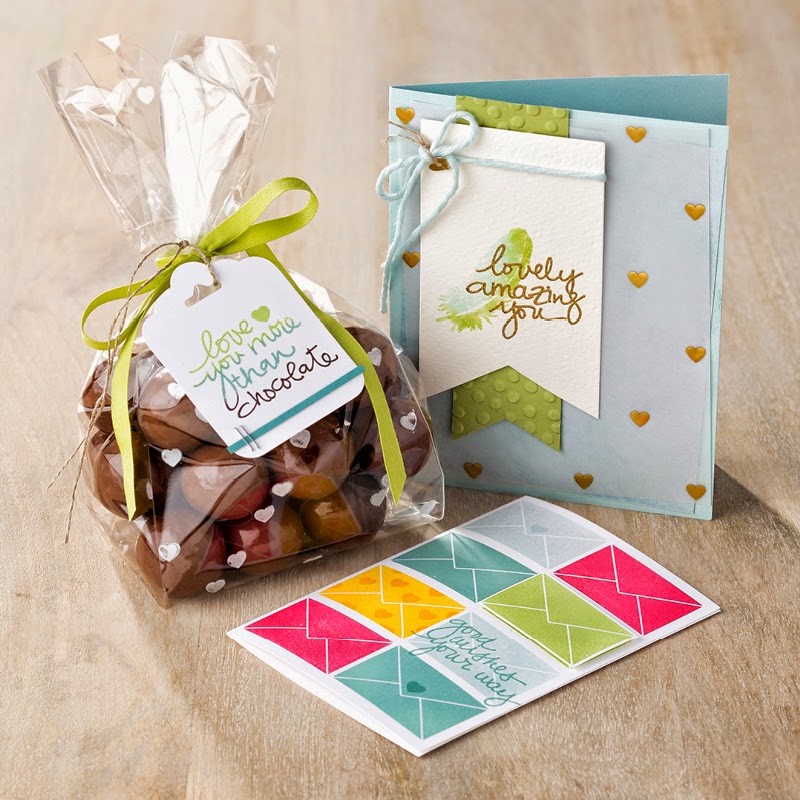
I chose two items from the Sale-A-Bration brochure to showcase today.

{Irresistibly Yours Specialty Designer Series Paper}

{Simply Wonderful Stamp Set}

I grabbed 6 note cards and decided it would be fun to take one of each print from the Specialty DSP and use each stamp in the set on each of the note cards. The great thing about the Irresistibly Yours DSP is that you get to color the background ANY WAY YOU WANT. It is white paper with a glossy white pattern, so you create the color. For each of the cards below I just used a sponge to create the look that I wanted. It was so fun to play and create!

For my first card I blended the colors into each other to show that they are going from dark to light.

Colors: Tangerine Tango, Pumpkin Pie, Daffodil Delight
Accessories: 1/8" Daffodil Delight Ribbon
Tools: Big Shot & Oval Framelits

 
This particular card I used three different shades of Pink Pirouette Blendabilities to color in each stripe.

Colors: Pink Pirouette
Accessories: 1/8" Melon Mambo Ribbon, Pearls
Tools: Big Shot & Deco Label Framelits, Owl Punch (bitty hearts)

For this card, I just tapped on the background instead of smearing to make a solid color. 

Colors: Rich Razzleberry, Old Olive
Accessories: Pearls
Tools: Big Shot & Starburst Framelits, 1-3/4" Circle Punch

I used the masking technique for this card and taped off each section to color.

Colors: Melon Mambo, Coastal Cabana
Accessories: Rhinestones
Tools: Decorative Label Punch, Banner Punch

This effect is similar to the first one, but chose to go diagonally blending three different colors together. 

Colors: Garden Green, Pear Pizzazz, Wild Wasabi, Pink Pirouette
Accessories: Pearls
Tools: Bitty Flower Punch

This simple card might actually be my favorite!! 

Colors: Bermuda Bay
Accessories: Candy Dots

What a fun group of cards to give as a gift to someone!


Leave me a comment and let me know which note card is YOUR favorite!
Keep on the tour to find even more amazing inspiration and SALE-A-BRATE with us!! Next up is the one and only Stamper Camper, Mary Brown. I'm sure you are in for a treat!

Quick & Easy with Washi Tape!

I needed one more card for my monthly card making night last night and since my first three cards had a few more extra steps, I knew that my fourth card needed to be a little more simple. So as I went into planning mode for this card I knew it needed to be QUICK & EASY

{We are sharing quick and easy cards over at the Stylin' Stampin' INKspiration, so head on over to see some more designs you can put together in a snap!}

To help with my design, I headed over to Freshly Made Sketches for their sketch of the week (FMS174). Once I saw it, I KNEW it was going to help me put together my quick and easy card!


When I saw that diagonal stripe, I instantly thought of WASHI TAPE! Washi tape is the perfect embellishment you can use to create a quick card...and it goes such a long way! The best part is that you can fold the ends of the washi tape over the edges of the card. Voila! Hidden and no need for scissors to trim off the ends!


Stamp Sets
Flower Shop, Gorgeous Grunge, Remembering Your Birthday
Ink
Crisp Cantaloupe, Pistachio Pudding, Memento Black Ink
Paper
Whisper White, Crisp Cantaloupe, Pistachio Pudding
Accessories
SNAIL Adhesive, Stampin’ Dimensionals, Pearl Accents, Sweet Sadie Washi Tape
 Tools
Pansy Punch

Tuesday, February 17, 2015

CASE the Catalog - Celebrate Today

Over at the Stylin' Stampin' INKspiration we are sharing what has inspired us from the 2015 Occasions Catalog. My inspiration came from pg. 10 (see below). It uses the Celebrate Today stamp set and this simple layout really caught my eye. Surprise, surprise!


I kept with most of the same layout, but tweaked a few things here and there. 

I decided to use some DSP from the Moonlight Paper Stack, which are the strips of paper on both sides of the card. The colors I chose were Lost Lagoon, Hello Honey, and Basic Gray. For the balloon I stamped off once on scrap paper and then stamped with full ink the stars and dots. I used the Dotty Angles stamp set for the confetti on the bottom of the card. I stapled a gold sequin trim for the balloon tail.

There are some cute epoxy stickers out of the Occasions Catalog and I added a couple of those on the balloon for an extra added effect.

Stamp Sets
Celebrate Today, Dotty Angles
Ink
Lost Lagoon, Hello Honey, Basic Gray
Paper
Whisper White, Lost Lagoon, Moonlight Paper Stack,
Accessories
SNAIL Adhesive, Stampin’ Dimensionals, Epoxy Stickers, Gold Sequin Trim
 Tools
Big Shot Die-Cutting Machine, Balloon Framelits, Stapler

Sunday, February 15, 2015

Creation Station Blog Hop - Big Day


We're excited to be back for another week of The Creation Station Blog Hop! Are you ready for some inspiration today?!

For today's hop we were able to choose from the following (any or all):
1. Theme: Birthdays
2. Celebrate Today Stamp Set
3. Big Day Sale-A-Bration Stamp Set

I decided to create some fun card samples using the Big Day Sale-A-Bration stamp set. I earned this FREE with my $50 order and YOU can, too!! I am just loving the Sale-A-Bration options this year. Have you seen them yet? Take a peek HERE at this year's Sale-A-Bration brochure

This first card is probably my favorite of the three I created to share with you today. There are actually three different images here that I put all together onto one block. Makes it easy to have it all lined up at one time.


I stamped the images with Black Memento Ink and then colored some of them in with Blendabilities (Daffodil Delight, Calypso Coral, Bermuda Bay, and Smoky Slate). I wanted the "celebrate" banner to stand out a little, so I stamped it on a scrap of paper and cut it out using Paper Snips then popped it up with some Dimensionals. The candle is an individual stamp from the set and I opted to just put one candle on the cake, but you can make your cake as candle heavy as you want! The cake has some Dazzling Diamonds glitter on the top and I attached a Bermuda Bay Baker's Twine bow on the front with a glue dot. The fun confetti paper is from the Birthday Bash Specialty Paper...a favorite of mine from the Occasions Catalog! (You'll soon see this is true!)

Next up also uses the Birthday Bash Specialty Paper. I just love those balloons. They are perfect for birthday cards! I added a strip of Gold Glimmer paper to bring in some of the gold from the balloons in the paper. I kept the image simple with just using the Happy Birthday colored in with Calypso Coral Blendabilities. I attached a {retired} arrow clip to the corner and tied a Bermuda Bay Baker's Twine bow onto it. The base of the card is Night of Navy, which pulls out the blue from the balloons on the patterned paper. Lastly, I added a trio of Calypso Coral candy dots in the right bottom corner for a finishing touch!

The last card was a simple one to pull together, as well. The base is Crushed Curry with a Bermuda Bay layer and then topped with a piece of paper from the Birthday Bash Specialty Paper. (Can you see a theme here?) I again colored in the image using both Calypso Coral and Bermuda Bay Blendabilities. I wanted some bling, so I added some rhinestones for underneath the word "cake". Did you know that with our rhinestones, there are some that come attached together as one long string? This was probably the first time I used them that way...I usually just cut them apart for individual rhinestones. The banners are cut from Mossy Meadow cardstock and I added a Crushed Curry bow for the top. It reminded me a of a bow for the top of a present.

Thank you so much for coming by for a visit today! Continue on the hop to visit the talented Jennifer Frost or hop backwards to see what Sara Levin is inspiring us with today. Click on the buttons below to take you where you want to go!

http://jenniferfrost.blogspot.com/2015/02/creation-station-big-day.html

http://theartfulinker.com/

Wednesday, February 11, 2015

SSINK Blog Hop - Hearts

It's another month for a hop with the Stylin' Stampin' INKspiration girls. With Valentine's Day just a few days away, the theme for this month is HEARTS! As you hop along, please be sure to comment and show some love on every blog! We are always excited to hear from our followers! You should have just left stop number 10 on the Stylin' Stampin' INKspiration Blog Hop - Breelin at Craft-Somnia Momma. If so, you are in the right spot. If a link doesn't work or you get off track, you will find the full blog hop lineup below.


The first card is super simple and showcases the Stacked with Love Washi Tape. I wanted to try out pairing the red and black with some gold. I plan to give this one to the hubby for Valentine's Day.

Stamp Sets
Filled with Love (from January Paper Pumpkin Kit)
Ink
Real Red
Paper
Whisper White, Real Red, Gold Glimmer Paper
Accessories
SNAIL Adhesive, Stampin’ Dimensionals, Stacked with Love Washi Tape, 1/8" Gold Trim Ribbon
 Tools
Big Shot Die-Cutting Machine, Heart Framelits, 1-1/4" Circle Punch

I haven't used the Confetti Hearts Punch yet to create a shaker card, so this hop gave me the perfect opportunity to play a little! I punched a heart from the Hearts Framelits and then added some washi tape on the top and bottom of the card with a strip of Stacked with Love DSP.

Stamp Sets
You Plus Me
Ink
Real Red
Paper
Whisper White, Basic Black, Real Red, Pink Pirouette, Stacked with Love DSP, Red Glimmer Paper, Window Sheets
Accessories
SNAIL Adhesive, Stampin’ Dimensionals, Rhinestone Accents, Stacked with Love Washi Tape
 Tools
Big Shot Die-Cutting Machine, Heart Framelits, 1-1/4" Circle Punch, Confetti Heart Punch,


http://rydenkim.blogspot.com/2015/02/ssinkspiration-february-blog-hop-hearts.htmlThanks for coming along on our HEARTS HOP today! Up next is Kim at Stamping with Kim. Head on over to take a peek at what she has in store for you!


Blog Hop Participant List:

  1. Jennifer C. at Happy 2 Scrap 4 Life
  2. Jennifer G. at Jenny G Paper Crafts
  3. Laura at Crafty Chicks Creating
  4. Diana at Stampin Fun with Diana
  5. Kathy at Katrina P's Creative Corner
  6. Darcy at Dj's Stampin Place
  7. Cynthia at Ink-A-Doodle Creations
  8. Melissa at Stamp Doc
  9. Shellie at Craft Smashup
  10. Breelin at Craft-Somnia Momma
  11. Heidi at Stuck on Stampin'
  12. Kim at Stamping with Kim
  13. Tonya at Stampin' with Tonya

2015 Class Valentines

Today my kids have their class Valentine's Day parties, so in true Heidi-fashion I waited until the last minute, so the kids and I "whipped up" their valentines just yesterday! The kids had already picked out their candy over the weekend, so it was all about figuring out what we were going to create! Once we figured out the design, it was easy to create an assembly line. And, yes...I could have just picked out some store bought valentines, but I have a whole room of fun supplies just waiting to be used and couldn't resist getting a little creative with my kids!

My little first grader lasted through punching all the hearts, attaching the Airheads to the cards, and writing "from Austin" on all 25 valentines! Then it was off to play and I finished the rest after he went to bed. :)

I combined some old products with new to create these valentines. I used a Marina Mist cardstock and used the Cloudy Day embossing folder from last Spring's Occasions Catalog. I used Celebrate Today to stamp the balloon using Tangerine Tango ink (his color choice!) and die cut them out with the coordinating balloon framelits. "You send me soaring!" was from a stamp set a couple of years ago. The little hearts are from the itty bitty punch pack. We attached the Airheads with glue dots. I added a little bit of white cotton twine for the balloon string.


The next group of valentines were made by my sweet little 3rd grader! She LOVES to create with me, so she pretty much took care of everything. Together we decided on what she wanted her valentines to look like (something to go with the Starburst candies she chose!) After I created and printed off the words and cut them into the right measurements, she did all the rest! I didn't snap a picture of her until she was pretty much done with her assembly line.

This idea is not originally mine (hello, Pinterest!) I loved the design idea of THIS VALENTINE I found online, but figured I could create it Stampin' Up! style. The black and white stripes is from the Stacked with Love Washi Tape from the Occasions Catalog. For the words, I just got on the computer and created it in Word. The star is punched out using a retired star punch (but you could always use the Star Framelits!) Mikayla and I both loved how these turned out!

Another fun year of creating valentines with my kids!

Tuesday, February 10, 2015

Weekly Deals + the NEW Lovely Amazing You photopolymer stamp set


Look at all the great deals this week!! Visit my online store at heidiboos.stampinup.net to take advantage of these fun savings! And, don't forget to check out the clearance rack while you are there! Create your $50 order to take advantage of a Sale-A-Bration freebie!


 Stampin' Up! has also come out with a new photopolymer stamp set...available starting today!! The Lovely Amazing You photopolymer set is $14.95 and full of adorable sentiments!

Here are some adorable samples Stampin' Up! has created to inspire!


Sunday, February 8, 2015

Creation Station Blog Hop - Irresistibly Yours


It's another fun Creation Station hop this week! Many of our group were at Stampin' Up! Leadership last week, so we postponed our "1st Sunday" hop for this Sunday instead, so that you could have a little more inspiration! Because of this you'll get back-to-back weeks of The Creation Station, so be sure to come back and join us next Sunday, too!

For today's hop we were able to choose from the following (any or all):
1. Sheltering Tree (Occasions Catalog)
2. Irresistibly Yours DSP (Sale-A-Bration)
3. Theme: Spritzing Technique

When I received my Sale-A-Bration freebies, I was very much intrigued by the Irresistibly Yours DSP. You can earn this pack of 12x12 DSP (6 sheets, 2 designs of each) for FREE with a $50 order. This paper is fantastic! It is all white paper with glossy white patterns and it is perfect for a variety of coloring techniques. Coloring reveals the pattern!


There are a variety of ways to color this paper, but today I am showcasing using the method of sponge daubing and sponging. I started with wiping with a sponge a layer of Wild Wasabi ink over the entire piece of DSP. This gave it a "base layer" of ink.

I wanted some accents of Garden Green ink, so I used my sponge daubers to also wipe over the DSP until I got the look I wanted. You could also just use a sponge again if you wanted to!

After inking the DSP, I used a tissue to wipe off the glossy leaves of the paper. I really didn't need to do this step for these particular colors, but sometimes you will need to wipe clean the white glossy part of the paper to get rid of the ink. Most of it was already gone anyway.

This picture shows you a better view of the glossy leaves. It's so beautiful in person!

My finished card! I paired up the Hello You Thinlits with the Crazy About You stamp set. I am loving the combination of Pink Pirouette, Melon Mambo, and Garden Green together!! The flower from the Crazy About You set was stamped in both Melon Mambo and Pink Pirouette on scraps of Whisper White and then I used my Paper Snips to cut them apart and then layered them on top of each other, ending with a Pink Pirouette candy dot in the middle. To add dimension, each layer is popped up with a Dimensional.

Stamp Sets
Crazy About You
Ink
Wild Wasabi, Garden Green, Pink Pirouette, Melon Mambo
Paper
Whisper White, Melon Mambo, Pink Pirouette, Melon Mambo, Irresistibly Yours DSP (SAB)
Accessories
SNAIL Adhesive, Stampin’ Dimensionals, Glue Pen, Pink Pirouette Candy Dot, Sponges, Sponge Daubers
Tools
Big Shot Die-Cutting Machine, Hello You Thinlits, Paper Snips

With my next card I used the painter's tape technique to color stripes onto the polka dotted Irresistibly Yours DSP. First I masked up the card with 5 different lines of tape, leaving just a little bit in between each one. I left the bottom stripe unmasked and then sponged/wiped with my first color (Bermuda Bay).

After that I moved the second piece of tape down to the bottom and then sponged/wiped with my second color...and so on.

Here is the fun effect it made! After all the colors were sponged, I stamped a giant image in the middle (with an extra "celebrate" banner that I stamped and cut out separately). I did have to wipe the black ink from the sentiment away from the glossy dots. I added some random rhinestones for some extra bling! I have a friend who should be getting this card in the mail soon! I used Bermuda Bay, Pistachio Pudding, Coastal Cabana, So Saffron, and Calypso Coral.
Stamp Sets
Balloon Bash
Ink (see above)
Paper
Whisper White, Coastal Cabana, Basic Black, Irresistibly Yours DSP (SAB)
Accessories
SNAIL Adhesive, Stampin’ Dimensionals, Rhinestones, Sponges,
Tools
Paper Snips

My last card I didn't take a picture of my process, but after seeing the first two cards you can kind of get the idea of how this sponging/wiping technique works. I think this is my favorite of the three! I used 4 different shades of blue and wiped the sponge diagonally across the card color after color so the blended with each other. I used Softy Sky, Marina Mist, Island Indigo, and Night of Navy. I just kept sponging and wiping until I got the desired look I was hoping for. It really looks like a starry night. I finished the card off with a simple balloon from the Celebrate Today stamp set. I tied a piece of Soft Sky Cotton Twine around the card and tied a bow at the base of the balloon. Perfect for a masculine birthday card!
Stamp Sets
Celebrate Today
Ink
Night of Navy, Island Indigo, Marina Mist, Soft Sky
Paper
Whisper White, Night of Navy, Irresistibly Yours DSP (SAB)
Accessories
SNAIL Adhesive, Stampin’ Dimensionals, Sponges, Soft Sky Cotton Twine
Tools
Big Shot Die-Cutting Machine, Balloon Framelits

Thank you so much for coming by for a visit today! Continue on the hop to visit the talented Jennifer Frost or hop backwards to see what Sara Levin is inspiring us with today. Click on the buttons below to take you where you want to go!

http://jenniferfrost.blogspot.com/2015/02/creation-station-irresistibly-yours.html

http://theartfulinker.com/sheltering-tree-for-creation-station-blog-hop

// ADDED BY RYAN ON 1-3-14 // END ADDED BY RYAN 1-4-14