Friday, February 28, 2014

SSINK - Occasions Catalog Card Swap Blog Hop


This past month, many of the Stylin' Stampin' INKspiration designers participated in an Occasions Catalog Card Swap. Instead of keeping all of these beautiful card samples to ourselves, we wanted to share them with you, too! Today's blog hop will spotlight a handful of Stampin' Up's Occasions Catalog products as each of us who participated chose a different stamp set to showcase.

As you hop along, please be sure to comment and show some love on every blog...and be sure to pin it, too! We are always excited to hear from our followers! You should have just left stop number 5 on the SSINK Occasions Catalog Blog Hop – Bree st Craft-Somnia. If so, you are in the right spot. If a link doesn’t work or you get off track, you will find the full blog hop lineup below. And, be sure to come visit us at Stylin' Stampin' INKspiration where we 'inkspire' you 5 days a week, 52 weeks a year!

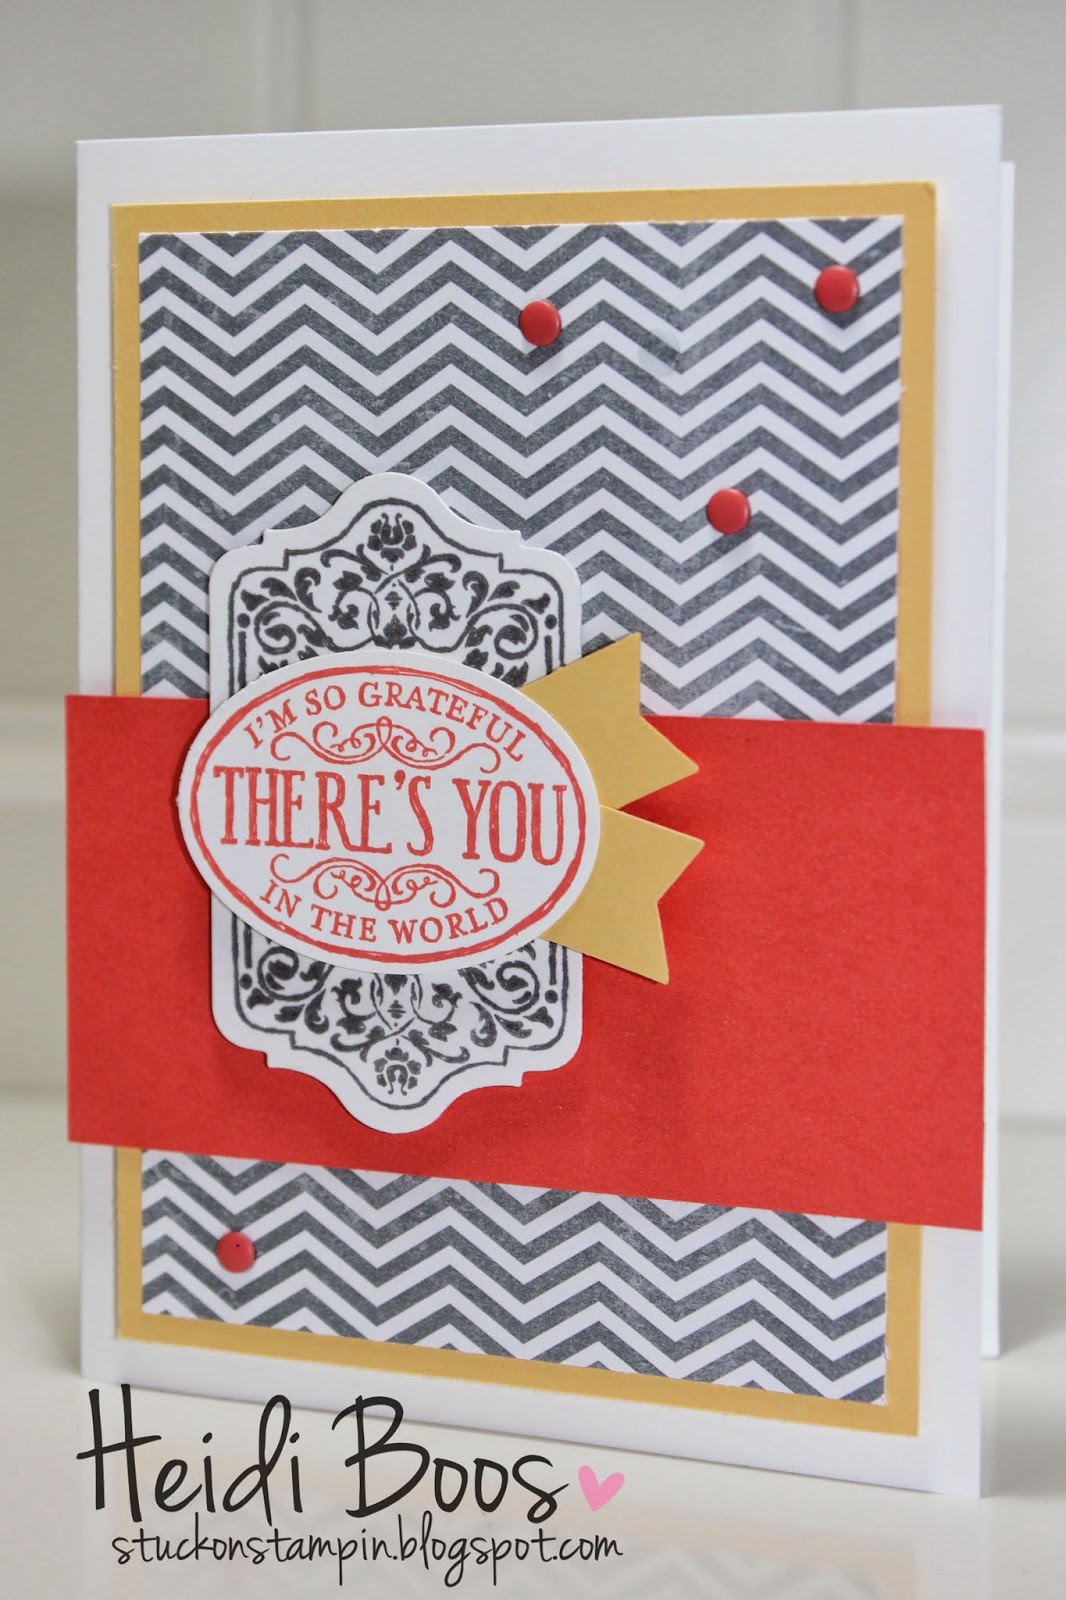
The stamp set I chose to showcase is called Starburst Sayings. You can buy the set separately (clear mount or wood mount) or as a bundle...which of course saves you 15%!


Stamp Sets
Starburst Sayings, Gorgeous Grunge
Ink
Bermuda Bay, Strawberry Slush, Daffodil Delight
Paper
Whisper White, Silver Glimmer Paper, Kaleidoscope DSP
Accessories
SNAIL Adheisve, Stampin’ Dimensionals, Pearls, Strawberry Slush Ruffled Trim, Rhinestones
Tools
Big Shot Die-Cutting Machine, Starburst Framelits Dies

Hop along to Cynthia's blog!!
http://inkadoodlecreations.blogspot.com/2014/03/peaceful-petals-occasions-catalog-swap.html

Blog Hop Participants
  1. Darla R. of Stampin with Darla and Sisters
  2. Kim R. of Stamping with Kim
  3. Pam S. of Stampin' in the Sun 
  4. Erica B. of Stamping Starlette
  5. Bree R. of Craft-Somnia
  6. Heidi B. of Stuck on Stampin'
  7. Cynthia R. of Ink-a-Doodle Creations 
  8. Diana E. of Stampin' Fun with Diana
  9. Donna S. of Organized Chaos
  10. Kathy P. of Katrina P's Creative Corner
  11. Tonya B. of Stampin' with Tonya 

SSINK - friday favorites (ruffled ribbon)

Today at Stylin' Stampin' INKspiration some of the designers are sharing their favorites!! Of course with Stampin' Up! product I have A LOT of favorites, but right now I am really enjoying the Ruffled Trim, available in the 2013-2015 In Colors (Baked Brown Sugar, Coastal Cabana, Crisp Cantaloupe, Pistachio Pudding, and Strawberry Slush).

These two cards use Baked Brown Sugar trim.


Stamp Sets
Cycle Celebration
Ink
Baked Brown Sugar, markers - Crisp Cantaloupe, Pistachio Pudding
Paper
Whisper White, Crisp Cantaloupe, Pistachio Pudding, 2013-2015 In-Color Designer Paper Pack (Pistachio Pudding)
Accessories
SNAIL Adheisve, Stampin’ Dimensionals, Pearls, Baked Brown Sugar Ruffled Trim
Tools
Small Heart Punch, Decorative Label Punch, Oval Punch


Stamp Sets
Tag It!
Ink
Markers - Coastal Cabana, So Saffron, Tangerine Tango
Paper
Very Vanilla, Tangerine Tango, Coastal Cabana, Retro Fresh DSP
Accessories
SNAIL Adheisve, Stampin’ Dimensionals, Baked Brown Sugar Ruffled Trim
Tools
Big Shot Die-Cutting Machine, Polka Dot Embossing Folder (SAB)


Come on by to see more Friday Favorites!
http://ssinkspiration.blogspot.com/2014/02/ssinkspiration-friday-favorites.html

Friday, February 21, 2014

SS INK - quick and easy retro fresh

We're sharing quick and easy cards today over at the Stylin' Stampin' INKspiration blog and I wanted to share with you a card that you can put together in a snap with some coordinating colors and product! This was one of the cards we made at last night's monthly card making night. Super fun. Super simple.

And, OH HAPPY DAY ~ it's my birthday today!! ;)


Stamp Sets
Starburst Sayings
Ink
Coastal Cabana, Tangerine Tango
Paper
Very Vanilla, Tangerine Tango, Retro Fresh DSP
Accessories
SNAIL Adheisve, Stampin’ Dimensionals, Retro Fresh Washi Tape, Jewel Rhinestones
Tools
Big Shot Die-Cutting Machine, Starburst Framelits, Scallops Embossing Folder

Thursday, February 20, 2014

case myself

My monthly card making night is tonight and I wanted to use a couple of card designs I had already designed. There's no problem with casing yourself, especially if it makes things easier to plan! When I plan my card nights, I need to think about 15-20 stampers reproducing the card, so it's important I make it easy and reproducible with the amount of supplies I have on hand, so I changed these two cards up just a bit.

Here is a card I created a couple of weeks ago...

*Added an embossed background instead of stamping a chevron.
*Left off the pearls, but added some ribbon.
*Added Dazzling Diamonds Glitter on the top of the cupcake for a little sparkle.
*Used a different sentiment - short and sweet and to the point.

 Here is a card I created for last week's blog hop...
 

 I kept it pretty much the same, but...
*I added rhinestones instead of candy dots (I have more of them!)
*The guests will get to choose the DSP background ~ polka dots or stripes.
 

I'll share the other two cards we will make tomorrow, so come on back!

Wednesday, February 19, 2014

SS INK - happy day box

I needed a little sweet treat for a friend's birthday just to let her know I was thinking about her and it was the perfect chance to make a quick box using a simple tutorial by {the always fabulous} Julie Davison. It was just what I needed to whip together this box in a matter of minutes...and with only a 1/2 sheet of cardstock. Be sure to check out Julie's blog for the tutorial (and a video!)

Come visit Stylin' Stampin' INKspiration for more fun with BOXES!!


Tucked inside are matching pink and silver Hershey's Kisses of course!

Stamp Sets
Starburst Sayings
Ink
Bermuda Bay, Strawberry Slush
Paper
Whisper White, Bermuda Bay, Kaleidoscope DSP
Accessories
SNAIL Adheisve, Stampin’ Dimensional, Sticky Strip, 3/8" Strawberry Slush Ruffled Ribbon
Tools
Big Shot Die-Cutting Machine, Starburst Framelits

Friday, February 14, 2014

SS INK - freakin' love you!

Happy Valentine's Day friends! I hope that you and your family are wrapped in love today.

This first card is going to my hubby!

Stamp Sets
Language of Love, Yippee-Skippee!
Ink
Real Red
Paper
Whisper White, Pool Party, Red Glimmer Paper, Polka Dot Parade
Accessories
SNAIL Adheisve, Stampin’ Dimensionals
Tools
Big Shot Die-Cutting Machine, Banner Framelits, Small Heart Punch, Full Heart Punch

This next card I created for yesterday's blog hop, but decided to showcase it for today since it is covered in hearts!

Stamp Sets
Chalk Talk
Ink
Real Red
Paper
Whisper White, Real Red, Pool Party, I Am Me DSP
Accessories
SNAIL Adheisve, Stampin’ Dimensionals, Brights Candy Dots
Tools
Small Heart Punch, 1-1/4" Scallop Circle Punch, 1" Circle Punch, 1-1/4" Circle Punch, Two-Step Owl Punch, Banner Punch (SAB freebie!)

 We made these super cute treat bags at a workshop this past Wednesday. They come in a package of 12 and include the heart baggie, Pool Party twine, and banner. I cased the hearts and Happy Valentine's banner idea from Amy Koenders. The hearts are from the Language of Love stamp set as you see in the first card.


For more fun cards with hearts...visit the Stylin' Stampin' INKspiration blog!

 Have a wonderful Valentine's Day!

Wednesday, February 12, 2014

Stylin' Stampin' Squad Blog Hop - bundle up!

 
Thank you so much for joining us for our February Stylin' Stampin' Squad Blog Hop! Sale-a-Bration is in full swing and it's one of the BEST specials that Stampin' Up! provides every year! Each of the stops along our hop will give you a bundle of items that you can purchase that will total around $50 and give you a FREE Sale-a-Bration item!! 

You won't want to miss these exclusive Sale-a-Bration items: 


As you hop along, please be sure to comment and show some love on every blog! We are always excited to hear from our followers! You should have just left stop number 16 on the Stylin’ Stampin’ Squad blog hop – Pam of Stampin' in the Sun. If so, you are in the right spot. If a link doesn’t work or you get off track, you will find the full blog hop lineup below.
 
I created my own little “bundle” of goodies to share with you that you could purchase for just a little over $50 and then get a FREE Sale-A-Bration item!! There are many Sale-A-Bration items to choose from (see above)

I chose the clear mount Chalk Talk stamp set and coordinating Chalk Talk Framelits Dies to be used with the Big Shot die-cutting machine. (Did you know you can buy the stamp set and Framelits Dies as a bundle to save 15%?) I wanted to pair this stamp set and Framelits Dies with a fun pack of DSP and I just love the colors and patterns in the I Am Me Designer Series Paper, so that was my choice! With these three items, it didn’t quite hit $50 to get a free item, so you can add a pack of assorted coordinating cardstock or a pack of the Subtles Candy Dots, which is what I show in my bundle.

My FREE Sale-A-Bration item!! You'll notice I tried to incorporate this in all of my cards

It was my mission to create a card or project using each image in the Chalk Talk stamp set. I did, in fact, use all of them, but one of the cards you’ll have to come back tomorrow to see! I’ll be sharing a couple of cards and a project that use hearts…just perfect for Valentine’s Day!

Disclaimer: In a couple of these cards/projects I used some retired Pool Party ruffled ribbon which is no longer available (didn’t realize it before everything was done!) The best replacement for that is our Pool PartySeam Binding Ribbon

All colors used in today’s card and project are: So Saffron, Basic Gray, Real Red, Calypso Coral, & Pool Party


This is a fun pizza box I created that is the perfect size for some candy, jewelry, a gift card, etc. It would be fun to crinkle up some coordinating teeny strips of paper to go inside as “basket filler”. The tutorial to create this box can be found HERE. It is super easy and fun to decorate! HERE is one I created a few years ago.

The band slips off all intact. I created the band from a 1” x 11” piece of cardstock and then used Sticky Strip to adhere together. I wrapped a piece of Pool Party ribbon around and tied with a bow. The fun thing about this stamped framelit is that you can just tuck the “hole” under the bow without having to tie anything on.


http://stampinfunwithdiana.blogspot.com/2014/02/stylin-stampin-inkspiration-blog-hop.htmlI hope you were inspired by my cards and project today! Keep on hopping along to see more fun "bundles" and Sale-A-Bration freebies! Next on the hop is Stampin' Fun with Diana!


Blog Hop Participants:

  1. Diana E. of Stampin' Fun with Diana
  2. Cynthia R. of Ink-a-Doodle Creations
  3. Jennifer C. of Happy 2 Scrap 4 Life
  4. Kathy P. of Katrina P's Creative Corner
  5. Darcy J. of DJ's Stampin' Place
  6. Kim R. of Stamping with Kim
  7. Pamela W. of Stinky Tofu
  8. Erica B. of Stamping Starlette
  9. Donna S. of Organized Chaos
  10. Tonya B. of Stampin' with Tonya
  11. Kristina M. Mama's Sanity
  12. Bree R. of Craft-Somnia
  13. Dawn S. of Dawn's Creative Chalet
  14. Anastasia R. of Stampin' Blondie
  15. Darla R. & Nancy K. of Stampin with Darla and Sisters
  16. Pam S. of Stampin' in the Sun
  17. Heidi B. of Stuck on Stampin'

class valentines - 2nd grade style

My daughter really wanted to be the "creative planner" for her class valentines this year and I was all for it. She's in 2nd grade and LOVES to use her mama's craft room as her creative space, too! We searched Pinterest for a bit, but she never really fell in love with anything, so she got to planning something on her own. With a few suggestions from me (some she took, some she didn't), she ended up deciding on using lollipops and the Banner Framelits. She die cut all 30 banners, stamped each image (from the Delightful Dozen stamp set), punched out each red glimmer heart with the Small Heart Punch, and then put them all together. She is so proud of her work...and I am, too!


My son's class valentines were super easy to put together...and has nothing to do with Stampin' Up! (shocker!!) He has recently gotten into the Minecraft video game and when I came across these Sweethearts candy box wrappers on Pinterest, I knew they would be perfect for him...and I was right ~ he loved them!


 {Love his little signature.}

Come on back tomorrow for our monthly blog hop!!

Tuesday, February 11, 2014

label love

I was playing around in my craft room yesterday trying to come up with a clean and simple card to use at an event on Wednesday for a handful of new stampers. I wanted it to be something that each of the guests could feel comfortable with completing without too many steps or products, but just to get a feel for the ink, stamps, and paper! I used the Stylin' Stampin' INKspiration February card sketch (very loosely) to help with designing my card.

This was the card I came up with using the Label Love stamp set. I decided not to stop with just this one card and ended up creating three other cards using different images from this same set!

Colors: Strawberry Slush, Bermuda Bay, Crushed Curry
DSP: Kaleidoscope

Colors: Pool Party, Calypso Coral, So Saffron
DSP: I Am Me

Colors: Melon Mambo, Island Indigo, Pear Pizzazz
DSP: Gingham Garden

 Colors: Calypso Coral, So Saffron, Real Red
DSP: I Am Me

And, you're in luck! One of this week's WEEKLY DEALS is the Artisan Label Punch that I used on each of these cards!!You can also save 15% and order the Label Love stamp set & coordinating Artisan Label Punch as a bundle (clear bundle / $28.75 or wood bundle / $34.75)

Regular Price ~ $15.95
Sale Price ~ $11.96


Monday, February 10, 2014

"i dig you" valentines

Each year for Valentine's Day, I usually end up making handmade class valentines for more than just my own kids! Last year I had my Etsy shop open and made quite a few (83 to be exact!) of the monkey punch art toppers I had available for purchase. My punching hand sure got a work out! I was also asked by a friend last year to create some fun owl valentines for her son's class. And, then through word of mouth, I ended up making some more for her friend! My daughter and I made her valentines last year, as well. It was a fun mommy-daughter time! Although my pre-school son didn't get in on the action in making his valentines last year, I still had fun making his "Bugs & Kisses" valentines.

One of those same friends from last year asked me if I would be up for making some valentines for her Kindergarten & Preschool boys again this year! I was definitely up for it and got busy searching to see what I could come up with. I ran across quite a few inspiring things and ended up going with the retired stamp set I Dig You (which I was able to borrow from a friend!) and used the matchbook treat holder design that holds a fun size pack of M & M's. There were many different tutorials for the matchbook, but I ended up using this one by Melissa Stout, The Stamp Doc. She even has a video tutorial! One of the best things about this treat holder is that you can make 4 treat holders out of ONE SHEET OF CARDSTOCK! You can visit her blog for all of the measurements.

You can't really tell here, but underneath the sentiment "i dig you", you will see a staple. This is what holds the M & M's packet in and then you tuck the cardstock in the front to stay secured.

I used my Stampin' Markers (Daffodil Delight and Basic Black) to color in the dump truck (yes...all 40 of them!) and then the Small Heart Punch was used to punch the three hearts out of Red Glimmer Paper that are tucked in the truck. To get the hearts "inside" the back of the truck, I took my Paper Snips and made a slit to tuck them in, adhering with Snail Adhesive.


All 40 valentines ready to be hand delivered by two cute boys!

If you'd like to see other fun Valentine's Day ideas, visit more HERE.


Wednesday, February 5, 2014

create a birthday cupcake!

Today I wanted to share a super simple birthday card I created to send to my mother-in-law (sure hope she doesn't read this first!). I loved the colors from Stylin' Stampin' INKspiration this week and decided to go with this color scheme. It has been SO LONG since I have pulled out the Create a Cupcake stamp set and coordinating Cupcake Punch. Although I could have spent a little more time trying to "dress it up" some more, my first priority was to get it done and off into the mail before her birthday!! I really want to get better at sending out cards ON TIME!

http://ssinkspiration.blogspot.com/2014/02/february-color-challenge.htmlIf you want to play along with the color challenge this week, visit the Stylin' Stampin' INKspiration blog! We post a color challenge on the 1st Monday of the month. Many of our designers have shared some fabulous works of art this week using this color scheme. We'd love for you to come on by to link up your creation, too!!


Tuesday, February 4, 2014

2nd annual sale-a-brate our downline!

Last Saturday night we held our 2nd annual "Sale-A-Brate Our Downline" event. My direct upline, Andrea, and I co-hosted this fun get together for as many of our downline (and their downline) as could make it. Although our group is smaller in size, we still pack a mighty punch of ideas and inspiration for one another!

Last year we had a Sunday afternoon sundae bar, but this year we took it up a notch and decided to have a sit down dinner with lasagna, {homemade} breadsticks, and Caesar salad.


 At each of our seats was a wrapped water bottle and a cute little envelope pocket filled with a packet of M & M's. These were a little special touch from Andrea.

I made these cute little favor bags for each of our downline and placed them at their seats. They were made using the Sale-A-Bration Twisty Treats kit...which made them quick and easy! I filled them with sour gummy hearts and finished it off with the stamp set Starburst Sayings. The cute striped tags and twisty ties come with the kit.

The Sale-A-Bration Twisty Treats kit comes with all you see below and makes 12 kits. This is one of the options you can earn with your $50 purchase. If you'd like to see the complete Sale-A-Bration brochure, click HERE.

During our meeting we played a fun game. I pre-stamped images onto 10 squares of cardstock. Each guest had to write down the stamp set the image came from, as well as the color...all by memory! It was a lot harder than it sounds, but we all got a good laugh from some of the stamp set names they made up.

Andrea & I
 

Throughout the meeting, we had "prize patrol"...everyone loves a fun freebie!

To end the fun night, we had dessert - YUM!!
 

And some make n takes...

 This was my make n take card...one I had created a couple of weeks ago on my blog.

This was Andrea's make n take card. I think she said it was a CASE from Cindy Becker.


The ladies also brought card swaps!!


It was a fun night with a great group of gals!
// ADDED BY RYAN ON 1-3-14 // END ADDED BY RYAN 1-4-14