Showing posts with label Decor Elements. Show all posts

Tuesday, January 10, 2012

random projects

I've gotta get my groove back!! I feel like I have spent the last couple of weeks just looking at the piles of stuff I end up shifting from one room to the next! My craft room was taking a major "back seat" to all of the other projects I wanted to accomplish, but finally by Saturday night I think I actually have it cleaned and organized to be able to get back in there and start working again. I'll have to post craft room pics soon because my mom made some fun curtains for my closet (I removed the doors) and I feel like I have a great organization system going on. I purchased a 12 x 12 paper rack from a paper store closing out and snagged a card spinner, too! I still have a few more things to be hung, but I'm just waiting for my hubby on that one! ;)

So, in the meantime I thought I would share with you a few random projects I've worked on recently...

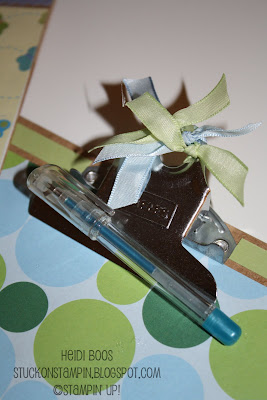
I covered these small clipboards (6x9) for the kids to keep in the car. My daughter is always wanting to write or draw on something, so I thought this would be perfect! I decided to attach the paper with adhesive and Sticky Strip instead of Mod Podge which is what I originally tried. For some reason the Mod Podge just warped the paper and I didn't like the way it looked. I was pretty proud of myself for not just scrapping the project all together, but instead I started over and tried something else. Such a concept, huh? ;)

I used the Timeless Type Alphabet Junior Sizzlits to die cut the letters for each of their names and used my "sticker maker" to add adhesive to the back of the letters. I liked the way it looked with their names on the bottom of the clipboard even though I'm sure they could guess whose belonged to who. I cut 8-1/2 x 11 white copy paper in half and a stack of paper is clipped to the clipboard ready to go. (Note: The paper is non-SU!...I have to use up some of that "contraband" paper somehow!! *wink*)


I also had in my stash (everybody has a "stash", right?) some short gel pens in different colors, so I found a gel pen that coordinated with each of the paper colors. I attached half of a Velcro circle on the clip part and the other part on the gel pen. Now they'll always have a pen to draw! I also decided to add some little bits of ribbon to each of the clipboards for an added flair.

* * * * * * * * * * * * * * * * * * * * * * * * * * *

Another little project I worked on this past weekend was making some hand sanitizer bottles. These make such great gifts! I purchased some hand sanitizers at The Dollar Tree and peeled off the front label, then added either some rub ons (retired) or a vinyl flower (which demonstrators have been able to buy in bulk in the past). Adding the ribbon finishes the project perfectly! You'll notice I also added a few pearls to some of the flowers on the front of the bottle. The bonus is that these are refillable, so you can reuse them for however long you need to!


* * * * * * * * * * * * * * * * * * * * * * * * * * *

We had MOPS (Mothers of Preschoolers) on Monday and just like each month I brought my group a little gift for January. I wanted each of them to have a little notebook to write down some of their goals for 2012...or just to use as a place to jot down anything they needed to! These are mini-composition notebooks I picked up in September on the school supplies clearance. Kind of wished I would have snagged some more! They were great quality notebooks and ended up only being $.25 a piece.

I covered each of the notebooks with retired Stampin' Up! DSP (Sweet Pea) and added some ribbon to tie around the notebook and ended it with a knot. I didn't take a picture of the back, but I also covered the back of the notebook using a coordinating color of DSP. I decided to use Mod Podge with this project and it worked great! With Mod Podge, I glued the paper to the notebook and then covered over it with another layer of Mod Podge that dried perfectly clear. This will help prolong the life of the notebook as it gets shoved in the purse or glove box of the car.


I added an initial for each of the ladies in the group using the Timeless Type Junior Alphabet Sizzlits (just as the same with the clipboards, but used the lower case this time).


* * * * * * * * * * * * * * * * * * * * * * * * * * *

I was able to spend some time in my craft room Tuesday to get ready for my upcoming card night next week, as well as to make a few cards to mail out to friends. I'm still sticking strong with my motto..."Don't over-think it. Just do it!" I found myself chanting that while in my craft room. It actually worked! ;)

Saturday, December 10, 2011

12 days of Christmas {projects} - day 10

Christmas Project #10
Jingle All the Way Shadowbox Frame

Hi there! I meant to get this posted before the busy weekend began, but for some reason I just couldn't squeeze it in! But, here I am (it's Sunday) and I'm now trying to catch up. Anyone else feel like they're always two steps behind during the Christmas season?

I wanted to share with you all a project I created about 2 years ago using the small Jingle All the Way vinyl from Stampin' Up's Decor Elements line. The small vinyl only costs $3.50!


This project included a square shadowbox frame, some jingle bells, a piece of Christmas paper, a piece of ribbon, and the vinyl above and they all combined to make a fun piece of Christmas decor.

I just knew I should have taken a picture of each of the four designs I made for this year's craft bazaar (I used different paper for each one). However, I didn't and all four sold out!! Here is one sample I caught a picture of. (This is NOT Stampin' Up! DSP in the background.)


Here is a picture of two others that I had for sale at last year's craft bazaar. Both of the DSP in the background are retired Christmas paper from Stampin' Up!


And here is the original frame I created 2 years ago. At that time they had black, red, and green vinyls available to purchase, so this one uses Old Olive. (The DSP in the background is NOT SU!)


For a "how to" for this frame, please visit my ORIGINAL TUTORIAL I put together 2 years ago on my personal blog. At that time, I hadn't started my Stampin' Up! blog yet.

Only 2 more days left of the 12 Days of Christmas {Projects} and definitely be sure to visit on Monday, the 12th for a giveaway and the final project in the series!

************************

Day 1 - M & M's Skinny Bag with Matching Tag
Day 2 - Rudolph Punch Art Gift Card Holder
Day 3 - Santa Suit Jars
Day 4 - Hershey Nugget Trays
Day 5 - Holiday Hand Sanitizer Ornaments
Day 6 - Wrapped Rolos
Day 7 - Merry Trees Glass Block with Snow
Day 8 - Snowman Kisses
Day 9 - Ghiradelli Chocolate Holder


Wednesday, December 7, 2011

12 days of Christmas {projects} - day 7

Christmas Project #7
Merry Trees Glass Block with Snow

For today's project, I wanted to share with you a fun Christmas decor item you could whip up in a matter of minutes. It's a great way to spruce up your holiday decor...or give as a gift!!

I'm sure many of you have seen the clear glass blocks that you can purchase at your local craft store. Last year around this time I found some on clearance at 50% off, so I snagged all they had left, (which, unfortunately was only four and yes, I would have gotten more if they had any!)

I wanted to come up with something that was a home decor item to have at least a little bit of variety on my craft bazaar table, so when I saw these clear blocks in my stash I just knew I had to use them!

Many people choose to put tiny lights inside, but I wanted to do something a little different, so I found some leftover "snow" (from my wedding almost 8 years ago...how resourceful is that?!) and poured some inside until it was about half way.

I used the SMALL "Merry Tree" vinyl (only $3.95!)...

...and adhered only the trees on the left. This means I have the rest of the vinyl to save for another project. Which, of course, I have yet to do, but I'll think of something I'm sure!


Wrap your favorite ribbon (I used retired Real Red 3/4" Polka Dot ribbon) around the block and voila! You now have a beautiful gift to give...or keep for yourself if you can't bear to part with it!

At the Holiday Shopping Party I participated in last Sunday, each of the vendors brought a gift to raffle off in some drawings. Below is the gift I chose to bring. I adhered the Merry Trees to this clear pail and filled it with some goodies...M & M's Skinny Bag with Tag, Hershey's Chocolate Bar Slider, baggie of misc. Christmas tags, and a Mini Holiday Catalog. I just love that you can adhere vinyl decor to just about any surface!!


Thank you for coming by and joining me for my 12 Days of Christmas {Projects}. I hope you've been feeling inspired to create!!

************************

Day 1 - M & M's Skinny Bag with Matching Tag
Day 2 - Rudolph Punch Art Gift Card Holder
Day 3 - Santa Suit Jars
Day 4 - Hershey Nugget Trays
Day 5 - Holiday Hand Sanitizer Ornaments
Day 6 - Wrapped Rolos

Wednesday, October 13, 2010

Definitively Decorative Home Decor

Tuesday night, I had a wonderful time being able to demonstrate some of Stampin' Up!'s Decor Elements at a friend's house. It was a great group of women to inspire!

This jar was the hostess gift (thanks, Tammy!). It uses the medium size of the Chalkboard Decor Elements Oval Labels. I used a chalkboard pen that I found at Michaels and it came with three other colors. This pen definitely helped with my perfectionism!! It wipes away clean with a little Windex and a paper towel (I probably re-wrote this 5 times!).


These next two were door prizes! Again, the chalkboard decal is part of the Chalkboard Oval Labels I linked to above. It is the smallest of the three sizes. The jar with the flower uses some of the bulk buy flowers demonstrators can purchase to demonstrate how easy the vinyls are to use. We also used these flowers for the make n take.


This was the make n take for the workshop. We used the flower decals mentioned above and adhered them to the front of a hand sanitizer bottle with the front label removed. Add some ribbon for a little extra accent and you have a cute little bottle of hand sanitizer for on top of your kitchen counter for the cold and flu season.


I had many items on display for all to see. A few of them I was even able to demonstrate in front of everyone. Please feel free to leave a comment with any questions if you see something you like! Click on the link provided for each sample that will take you to the Stampin' Up! product description.

This will be the perfect decor for a little added touch for Thanksgiving. It uses the Hem Your Blessings decal (small) in Chocolate Chip. I used some retired Pumpkin Pie DSP for the background. This is an 8 x 10 frame.

Perfect for creative gift packaging, I used the Merry Trees decal (small) in Real Red and applied it to the front of a clear pail I found at Craft Warehouse.

I found this jar last year at Target after Christmas...50% off! I used the Jingle All the Way decal (small) in Real Red, tied a bow around the lid using the 1/8" red ribbon, and added some round peppermint candies.

This one might look familiar to some. I created this last year and have a tutorial on my other blog. For this particular project, I used the retired Old Olive Jingle All the Way (small). This one got the most oohs and aahs of them all!
This is a sample of how you can take a decal and add a small touch. This uses one of the flowers from the retired Ginormous Flowers. I plan to use these in my craft room, so adding this to the inside of this clock seemed perfect. I found the clock at Target for inexpensive and the front cover just pops right off!
Again, I'm using the Chalkboard Oval Labels. This one uses the large size and is perfect for my retired ribbon jar. I love that I can get three projects out of one product purchase (3 oval labels cost $5.95). I had to add a few butterflies and a bow on top to add that extra touch.
I found this idea on someone's blog (I'll search for that and come back to link to it and give credit where credit is due!) who adhered the "eat" on the front of an album. I just so happened to have a photo album that holds 4x6 photos. Since I type up my recipes on 4x6 note cards, this will be the perfect recipe book to keep my recipes in. And, I can even display it in the kitchen as "art". This project uses the EAT decal (small) in Whisper White. I added the Old Olive striped grosgrain ribbon and tied a bow.
I took a 12 x 12 frame, removed the glass, and added a metal sheet (found at Craft Warehouse). I added the smallest of the images that come with the Flourish decals (which I can't seem to find the link to on Stampin' Up!'s page).
I love this little shadow box frame. This is a picture of my two kids, cut as a square. I added Certainly Celery DSP for the background and used the "love" out of the Faith, Hope, Love, Life decals (small) in black. The shadow boxes can be found at IKEA. I believe they were $4.99 each. I also used the same shadow box for the Jingle All the Way bells frame above.
This next project uses the "hope" from the same decals as mentioned above. I found this pink polka dotted plate at Tuesday Morning a long time ago. I pulled it out when I was looking for things to use to make for this event and felt the "hope" was perfect for the pink in representation of Breast Cancer Awareness.
I just love this little project! I really wanted to use the Her Majesty decal on something and when I saw this storage container at Target, I knew what I needed to make! I put all of my daughter's princess dolls and accessories in here. The pink is PERFECT with the Rose Red crown.
The last three pictures are some of the Decor Elements that I have put up around my home. For the workshop, I had a book of samples that the ladies could look through to get inspired. I included some of these pics, as well as some friends and things I have seen around the internet.

Wild Flower Bouquet (small) in Chocolate Chip
{I really wish I would have ordered the white!}
Life Milestones (medium) in black

Happily Ever After (medium) in Chocolate Chip

This was such a fun event and I plan on trying to book a few more! I have quite a few friends who might be a little more interested in the home decor part of Stampin' Up! I might even have one at my house, so I can get the word out about the Decor Elements. There are probably 3 or 4 more projects I never got around to making, so hopefully I'll post those as soon as they are finished!

My next event? I'm doing a couple of projects for a fairy-themed birthday party for a 7-year old and her friends. It will be so much fun!!
// ADDED BY RYAN ON 1-3-14 // END ADDED BY RYAN 1-4-14