Showing posts with label craft room. Show all posts

Friday, April 10, 2015

Storage Solutions - sneak peek of my craft room!

Back in November I decided to do a little switcheroo of my craft room. OK, let's be honest...it turned out to be a BIG switcheroo. I brought it all from an upstairs room to the downstairs office space right off the front entry. Now we have the office (and added some desks for the kids) upstairs where my old craft room used to be. It has made an AMAZING difference, especially with the events I hold in my home on a monthly basis. Having easy access to this room is so nice!

The color scheme of my new craft room is gray, aqua(ish), and yellow. Obviously you can't really see the color scheme in the picture below, but hopefully at some point I can give you a tour of the ENTIRE room, but for right now I wanted to share with you a couple of storage solutions (join us over at Stylin' Stampin' INKspiration for more storage solutions from some of the other desingers!)

One of my biggest storage solution saver has been using rods for the wall where I can store my punches on. The bottom (silver) row of rods can still be found at IKEA. The top two (black) rods have since been discontinued from IKEA. Those were my favorite ones!

You can also see to the right of the picture I have a 12x12 paper rack that holds all of my current Stampin' Up! DSP (on the top rows) and *some* of my retired DSP on the bottom rows (can't see in picture). I have another place for all the rest of my retired DSP...so don't be fooled that this is all! ;) It's hard to tell in the picture because I cropped it off, but it does go all the way to the ground. I keep the paper in the plastic to avoid any dust settling and I slip all of my loose scraps inside. I also write the name of each DSP on top of the plastic in Sharpie, so I can see it easily.

You can also see in the picture I have more of the large size punches in a shelf on the wall (on the left) and I use my ink pad carousel for all my ink pads and re-inkers.


A couple of other quick storage solutions...

I store all of my pre-made cards in this fun wire rack that I found at a garage sale. I made labeled dividers for each kind of cards, so I can easily see which card I need (I have a separate rack for holidays). I put this out at my events and it makes it easy for my guests to look through to find just the right card if they need to buy one!


And this is how I store my Framelits. Each set is placed in Clear Mount Cases (which you can purchase empty through Stampin' Up!). I have magnets in each of them to hold the Framelits in place. To the far right you will see my embossing folders. I keep them in a holder that can be used for pamphlets and such. I originally purchased it for our mini catalogs (back in the day) when they were that size, but when we upgraded to the larger size I found a new use for the holder!


Please let me know if you have any other questions or are curious about anything you see! I hope to create another post of my craft room in much more detail...and a look at the entire room...in the future!

Free shipping ends TODAY!
Visit my website at heidiboos.stampinup.net to place your order!

Tuesday, May 13, 2014

SSINK - craft room updo

Come on over to SSINKspiration today to take a tour of my craft room re-organization! I'm sharing a whole bunch of pictures over there, so click on the link and come on by for a visit! It's been over a year since my big craft room makeover and I decided I needed a mini "updo" to help keep my creative juices flowing...


P.S. I'm finally back from a 2-week blogging (and crafting) hiatus! One week at Disneyland with my family and last week was dedicated to the teachers at my kids' school for Staff Appreciation. I was in charge of this event this year, so all my attention (and time) went to spoiling the teachers and staff!!

Thursday, January 24, 2013

ribbon roll control giveaway winner!!

You all are so amazing!! Thank you so much for all of your kind comments with my craft room makeover, as well as my stamped creations here on my itty bitty blog...and of course, thank you for entering to win one of the Ribbon Roll Control ribbon holders I featured in this post. If only everyone could be a winner!!

Using random.org I chose one lucky comment!!
42. Bonnie from Virginia said...
Oh, I love these ribbon holders, I like that they can be hung too. Thanks for a chance to win and all the inspiration you share.
ridrea96@gmail.com


Bonnie, you will get an email from me shortly asking for your mailing address so that Trish can send you your choice of a petite or original ribbon holder!! Congratulations to you!

For all of you who didn't win, but would still like to order one of your own (oh, who are we kidding...two, three, or four of your own!), be sure to head on over to Ribbon Roll Control at www.ribbonrollcontrol.com. Tell Trish that Heidi sent you! *wink*

Have a wonderful day, stampers!!

Monday, January 21, 2013

ribbon roll control review -- and a giveaway!!

**Read through this post for a fun giveaway at the end!!**

A few weeks ago I finally completed my craft room makeover and for the past week and a half I have been "breaking it in" very well! Just soon after I shared the makeover on my blog, I was contacted through email by a sweet gal name Trish. She and her husband have designed a fabulous ribbon holder called Ribbon Roll Control (http://www.ribbonrollcontrol.com) and she offered to send me some free samples to try out in my new craft room and then share on my blog. Of course I was on board!! I'm always up for more ideas on how to organize my craft supplies!

I'll start out with saying...they really did think of everything on this ribbon holder!!

It came all neat and tidy in a box. All the pieces come separately...
...but that's no big deal because it's super easy to put together!!
 Although I had a pretty good system for my ribbon already (see below)...
 ...I had more than just what you see on the racks  
(come on...you all have tons of ribbon, too, right?!)
Some of my retired ribbon with larger spools I had in a container...
 ...that was stored underneath my desk. I often would forget that this kind of ribbon was an option because it was out of sight. 
 But it was too large to fit into the racks I had.

OK, back to the Ribbon Roll Control holders to the rescue! Trish sent me two petite holders and one original and the best thing about these is that you can stack them!
 Woo-hoo!! Doesn't it look so pretty?! I love that they are clear.
 And remember when I mentioned earlier they have thought of everything when they designed these ribbon holders?
Case in point: 
1. They created "spacers" that you can put on the end of the ribbon if it's not all the way full so the ribbon doesn't tip over. Love this feature!
 2. (Sorry...this picture isn't the best!) They also added inch measurements to the front of the holder so that you can measure your ribbon right there without having to grab a ruler.
 3. They even have a way for you to hang them on your walls! I chose to just have them stack on my tabletop workspace primarily because I couldn't bare to ask my hubby to take down all of the racks I asked for him to put up just a mere few weeks ago. *wink*
 They are right in front of my workspace and as you can see I have room for three more (gotta make things even)! I plan to order one more original and two more petites, which will finish it off perfectly! (Trust me...there's more ribbon waiting for a home!)
 And, soon I will share with you the new tabletop workspace organization because, I did, in fact re-purpose those bars I had installed to hold my ribbon in the first place, but I fell in love with the Ribbon Roll Control holders instead!

Now it's time for a giveaway!!
Trish from Ribbon Roll Control is so sweet that she is offering one ribbon holder to a lucky blog reader of mine! She will ship (for free!) one holder straight to your door! You can choose from an original or petite. For more information on sizes, check out their website HERE.

How about it, stampers? Want to try to win one of these fun ribbon holders? All you have to do is leave a comment on this post (any comment works!) and make sure to leave your email address so I can reach you if you are the winner! I will randomly draw a name on Thursday morning (January 24th), so be sure to have your comment written by Wednesday, January 23rd, at midnight (PST).

Good luck, stampers!!

{Thanks again, Trish, for the awesome ribbon holders!!}

Friday, January 4, 2013

my new craft room!

Happy Friday!!

I have cherished these last two weeks...not only because of the Christmas season, but also because my two kids have had their Winter Break off from school. And to make things even better, my husband was also able to take some time off, too! With these lazy days I have enjoyed sleeping in, spending time with family, relaxing, watching movies, organizing, cleaning (OK, maybe that's a stretch), but best of all getting started on my craft room makeover!!

I have been wanting to make over my craft room for a very long time now and after realizing that my hubby had some time off after Christmas, I thought this would be the perfect week to get it done. Because, let's face it - I needed his help!

I am lucky enough to have my own little 10x10 room filled with all of my crafting goodies and it has definitely changed its look throughout the 2 1/2 years we have lived in this house. Usually it's just me re-organizing this and that, cleaning, re-organizing, and then cleaning again. But it has NEVER been painted (we are the third owners of this house and this room still had the original flat paint from when it was built). I was also realizing how little space I had to work on my craft projects, so I knew that needed to change. However, I still wanted to keep my desk, so I separated my craft working space and my business work space. I LOVE how it turned out. And, although there are still a few things I'd like to do, I didn't want to put off any longer sharing with you my new space!

I really wanted to show you some before and after pictures, but many of my before pictures were taken awhile ago so it really didn't reflect the "right before". We got started on the project so quickly that I didn't think to take pictures before we cleared out the room! But, I did want you to have some sort of idea of what the room looked like, so here are a couple that might give you an idea...

BEFORE
{standing in the doorway}
 

BEFORE
{my tiny little space to work}

 * * * * * * * * * * * * * * * * * * * * * * * * * * * * * *
 Welcome to my new craft room!!

You will notice that I like clean lines and not much clutter. I didn't fill every corner of this room, but there are a lot of things "tucked away" out of sight. The color I chose for the walls is called Teal Zeal from Home Depots' Behr paint line.

I had this fun vinyl from last year's Sale-A-Bration, so I decided to put it on the craft room door because my craft room really does feel like my "home sweet home"! It's the place I go to use my creative juices and {most of the time} a place where I can de-stress.

When you first walk into the room through the doorway and turn to the RIGHT, you now see this. Last year I had taken the doors off of my closet and replaced it with this curtain (which was the inspiration for the color I chose to paint the walls) to have easy access to all of the things "hiding" away in there.

I kept my original desk because I love it so much and I wanted to have a separate space to work on my Stampin' Up! business stuff. Thankfully we had an extra computer I could use!! I added a shelf for a card display. Eventually, I might add a wall vinyl or a clock above the shelf to fill up the empty space.

One of my new fun purchases...love this lamp!

Continuing in a circle, next you will see my window which not only got new blinds, but my mom made me a valance using some leftover fabric from the curtains. I kind of wanted to leave the space underneath the window clean and without anything, but I quickly realized I needed some more storage space and a place to put my Cricut, so I rearranged some things in the kids' play room and took this cube organizer. It worked perfectly.

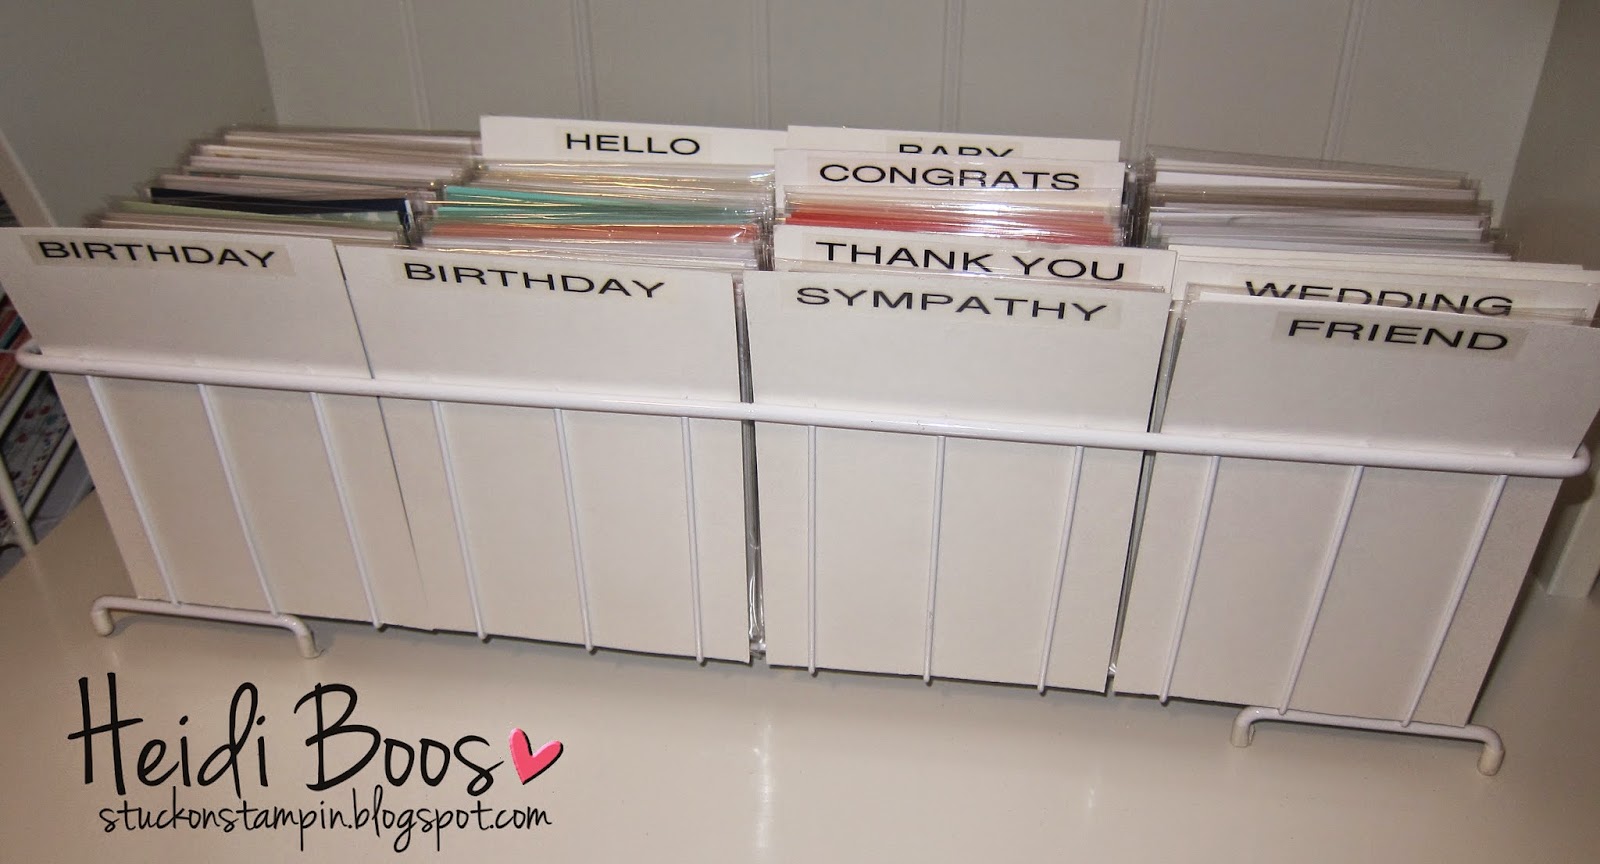
I've had this great hutch since moving into our house (found it in the Ikea "as is" section!) and it has been awesome for so much of my crafting storage. This is where my die cut station is and where I have my wood mount stamps stored. To the left of the hutch is my 12x12 DSP rack. More details on my paper storage can be found in a post I originally shared here.

I love my DVD racks which store my clear mount stamp sets perfectly, as well as my Framelits (which I put into clear mount cases). You can find thess for very inexpensive at Ikea. In the previous picture you will see they also hold my Original and Bigz dies.

And, now my favorite part of the room!! This is my new workspace!! Soon there will be a chair there, but I'm still on the hunt for the "right one".

The table is long and everything is within reach...exactly what I wanted! **Updated to add: The tabletop I purchased from Ikea. It is the 6-1/2 foot length. It comes in many different sizes. I wanted something already done (with laminate top), so I opted for not doing it myself! ;) I will eventually add a picture of my kiddos on either side of the shelf to get rid of the empty wall space above the punch storage.

I will be happy to answer any questions you have about my new space. I didn't take the time to take up close pictures of where I keep everything, but if people are interested I may do that in the future, so leave a comment to let me know if that's something you'd like to see. I figure I just wanted to get the overall pictures posted before it was too late!

Now that my room is put back together I hope to be able to actually start stamping again! Lots of fun things and events on the horizon!

Hope you all have a wonderful weekend!

Friday, July 27, 2012

paper storage


I haven't been in my craft room much to actually CRAFT, but I have been in there quite a bit over the last few weeks trying to get things organized! Many of you on my Facebook page (not a "fan" yet, check it out on the left side of my blog) were curious about my craft room organization and so I thought I would share a little bit of what it looks like. I am going to break it up into categories and today I wanted to start with paper storage. **Disclaimer: I am not a huge fan of lots of things that make clutter, so you'll see my space as simplified, which is the best way for me to work. I also haven't had the chance to paint or add decor to the walls yet. One day...

Since starting Stampin' Up! in 2009 I have pretty much gone exclusive to ordering only that kind of Designer Series Paper and 12x12 card stock. Just recently I whittled my non-SU! 12x12 paper collection way down because I wasn't using it enough and a lot of it didn't match, so I decided to let a lot of it go to create a clean slate in my room and not be burdened with too many choices while working, especially if it wasn't Stampin' Up! I did hold onto some paper for scrapbooking, which I will show you further down in the post.

When you walk into my room the first thing you'll see on the left is this 12x12 paper rack. I scored this beauty when Paper Zone was going out of business. I can't remember how much I paid for it, but I knew it was going to be a worthwhile buy, so I splurged. This rack sits to the left of my desk, so it's within easy reach or at least a short walk. Each of the slots holds Stampin' Up! only paper. The blue tags are all the current papers. Notice some of the holes? They are ready to be filled with the new Holiday Mini DSP that is on its way! The orange tags indicate retired card stock. Each of the tags have the name of the DSP on them.
Labels in black may have been a better idea...oops!
I also have some other 12x12 paper that is not on my paper rack. These dividers hold the bigger color collection patterned paper packs, as well as Simply Scrappin' Kits, Glimmer Paper, Window Sheets, etc. Basically anything that is 12x12.
You'll notice that I have two slots that are completely empty! This means I have room to expand and add other things in the future. If you can believe it, at one point all four slots were full. I either got rid of the paper or moved it to the paper rack shown earlier. Can you tell I am trying to simplify my choices? I decided if the paper is 3+ years retired (unless I LOVE it), then I am going to resell it so I can buy new current paper!

Now onto 8-1/2x11 paper... I have a 2-drawer filing cabinet that holds all of my Stampin' Up! cardstock. This sits to the right of my workspace and it is within an arms reach. I have a file folder for each color and they are organized by color collection. As you can see...I love my label maker! This makes it so easy to grab exactly what I need and keep tabs on when I am running low on a color. I laugh when I think back to when I first started Stampin' Up! 3 years ago and just how little Stampin' Up! cardstock I started with! Now, I can't imagine not having a backup pack of paper for when I run out of a color.
{top drawer}
 {bottom drawer}
And, this is my back up paper for when I run out of a color. When I see that a color in the file folders above is starting to run low, I order a pack to have ready to go when I need it! These are located in the big hutch unit that I will show you a picture of in a future post.
On the other side of the cupboard of the hutch holds my Stampin' Up! 12x12 card stock. So far I haven't done scrapbooking with the business side of things (only for personal and even that is not much!). I also have a couple of files on the right that holds my "contraband" non-SU! scrapbook paper. Again, it has been whittled way down to what it was before!
This is what the right of my workspace looks like with the 2-drawer filing cabinet and 12x12 paper file...both that I showed above. You'll see in the picture a sneak peek of some of the other elements of my room. Hopefully it will whet your appetite for more. ;)
Hopefully I have been able to help inspire you a little bit and that you'll want to come back for more pictures of my craft room soon!
// ADDED BY RYAN ON 1-3-14 // END ADDED BY RYAN 1-4-14