Showing posts with label Tuesday Tip. Show all posts

Tuesday, May 31, 2011

Tuesday Tip - how to make clear mount stamps stick

Have you been having troubles getting your clear mount stamps to stick to your clear blocks?

Here's a quick tip (literally...quick!) that might help solve it.

Take the clear block and rub it against your jeans really fast...


Sometimes I also take the cling part of the stamp and rub it also...


To get a good stick, I put the stamp on my desk and then put the clear block on top and put a lot of pressure.


This picture shows the "bubbles" (at the top where "happy" is) which gives you a good idea that it has a good stick...


Something to note: The clear mount stamps from Stampin' Up! are made of the same high quality rubber as their wood mount stamps. They have been adapted for clear block mounting with self-clinging labels. The clear mount stamp sets not only help save space because of their thin case, but they are also economical in the long run since you don't have to pay for new blocks with every set once you have collected each of the blocks.


* * * * * * * * * * * * * * * * * * * * * * * * * * * * *

Visit my other Tuesday Tips HERE.

Disclaimer: Many of the "Tuesday Tips" I share each week have been gathered through my experience as a Stampin' Up! demonstrator and crafter. I do not necessarily claim any of them as my original idea (unless it really is!), but rather things that I have seen here and there through blogging, surfing the web, attending events, and such. If there is a specific idea I have seen and want to share, I will be sure to give credit where credit is due. Hope you enjoy my "Tuesday Tips"!

Tuesday, May 17, 2011

Tuesday Tip - do it yourself punch templates

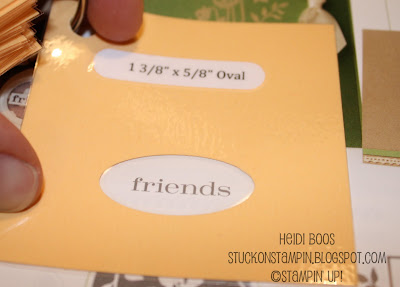
This week's Tuesday Tip is a "do it yourself" punch template tool that I made with my stamp club at our last meeting.

Here is the final product...


I thought I would run through real quick how I made this tool and then further down, I will share with you how to use it effectively.

Start out with typing up the name of each punch that you are going to include (I have most of the punches, just missing a few)...


Punch each of them out with the Word Window punch...


Cut 3x3 squares out of your choice of cardstock and then punch each of them to create the shape outlines...


Adhere the labels to each of the squares...


Laminate them (if you own a laminator) for durability...


Punch a small hole in the corner of each square and add a ring to keep them all together...


This punch template will be helpful as you are trying to create a card and you want to use a certain punch, but you want to find the right sentiment that fits inside. If you take your punch template, you can go through the catalog and find the stamp sets you own to find a sentiment that fits!


It also works for images...


* * * * * * * * * * * * * * * * * * * * * * * * * * * *

One more quick tip as you are looking through the catalog you might notice that on some images there is a red outline around them. These red outlines indicate that it coordinates with a punch that Stampin' Up! sells. Thought you might like to know if you didn't already!


**If you're looking for more Tuesday Tips, check them all out HERE

Tuesday, May 3, 2011

Tuesday Tip - 2 stamps make 1 (and a sketch challenge!)

I've taken off a few weeks from my weekly Tuesday Tips (anyone notice? *wink*)

This week's Tuesday Tip is a simple little trick that brings together two separate "sentiment" stamps to make your own greeting. My daughter just celebrated her 5th birthday with a princess party and I have been needing to get out her thank you notes! I have this cute little stamp set called "Princess Time" which I used for her party invitations. One of the stamps in the set I really liked and said...


But I really needed something that said thank you and then I thought why not combine two stamps into one? So, I found just the right "thank you" from the stamp set Teeny Tiny Wishes.


Using a marker, I colored in the part that said princess using Melon Mambo and then used Elegant Eggplant for the thank you.

And, the final product...


* * * * * * * * * * * * * * * * * * * * * * * * * * * * * * * *

Yesterday, I was working on a card for a new sketch challenge blog I just found called A La Card Monkey. I needed a stamp that would fit just right in a small circle, as well as coordinate with the other stamp I was using.

I took this stamp and colored in the "hello" part only with Rich Razzleberry marker...


And combined it with this stamp (minus the s) using a Pear Pizzazz marker...


The finished product...


Hello friend was the perfect sentiment I was looking for! Wondering how I was able to get these two sentiments to come together just right? I used my Stamp-A-Ma-Jig (LOVE!). It is a fun little tool and if you're interested in watching a video on how to use this tool, view a great one HERE.

This week's sketch for the A La Card Monkey...


And, my take on the sketch...


This is my first time joining in, and I had a good time piecing together this and that to complete the sketch. If you want to join in, you have until Thursday at midnight...so head on over to join!

* * * * * * * * * * * * * * * * * * * * * * * * * * * * * * * *

And, don't forget to enter to win in my giveaway that will continue through until Friday! Click HERE to enter! You'll have the chance to win this new stamp...

Tuesday, April 12, 2011

no new Tuesday Tip today!

Such a busy, crazy, run around all over the place kind of week...and it's only Tuesday!

So, therefore, there is no Tuesday Tip this week, but if you're new to my blog then here are the last 5 editions to my weekly "Tuesday Tips".


I hope to have something NEW for next week's Tuesday Tip!

Check back soon as I'll be sharing some cards from my latest card making night and my daughter's princess-themed birthday invites!

Tuesday, April 5, 2011

Tuesday Tip - storing 12x12 paper

Just a quick post today (tonight) for my Tuesday Tip! I was gone all weekend and you know how that works when coming home already behind on things...playing catch up is quite the task!

I love Stampin' Up! DSP (Designer Series Paper). I'm pretty picky, however, when it comes to buying it. I don't want to be too overwhelmed with choices (kind of like my embellishments I shared last week), but there are often days I say "I wish I had that paper!" I have a certain taste in the patterns of my paper, and often I don't go outside the box. I'm trying to work on that, but I also want to have paper in my supply that I KNOW I will use!

I love these 12x12 paper holders. Stampin' Up! sells them for $7.95 and you can purchase 4 dividers separately at $5.95, (the ones you see below in the pictures are a little bit bigger than the ones SU! sells, but I purchased these before I became a demonstrator). These are the perfect holders for storing 12x12 DSP and saving yourself from all those bent corners! I personally would love to own a rack where I could lay my 12x12 paper and have it all displayed on the walls, but that's only in my dreams! For now, I'm content on this method to help save on a little room...and it works for me. I'm already noticing that I will be needing another one soon!


Of course, labels are a must so that you are able to find the right paper just that much quicker!


Another tip I have just discovered is to keep the DSP in its clear plastic packaging that it comes in. Not only will it help save you on those bent corners, but then you are able to put the scraps right inside and it will help contain them...because we know how we keep every little scrap!


Also...because I love to coordinate, I make sure I have the names of the cardstock colors that coordinate with the DSP in the package written on the back of the thin cardboard piece that comes behind the sheets of paper. This will help you quickly find the coordinating color without having to thumb through the catalog to see what's listed there, especially if the DSP has retired. Then you won't have to go finding the correct catalog it can be found in.


For other Tuesday Tips, visit HERE.

Disclaimer: Many of the "Tuesday Tips" I share each week have been gathered through my experience as a Stampin' Up! demonstrator and crafter. I do not necessarily claim any of them as my original idea (unless it really is!), but rather things that I have seen here and there through blogging, surfing the web, attending events, and such. If there is a specific idea I have seen and want to share, I will be sure to give credit where credit is due. Hope you enjoy my "Tuesday Tips"!

Tuesday, March 29, 2011

Tuesday Tip - storing your embellishments

Welcome to this week's "Tuesday Tip"! I've been doing these weekly "Tuesday Tip" posts for one month now and I hope you have enjoyed reading...I have really enjoyed sharing! (Check out the last three week's "Tuesday Tips" HERE)

I'm pretty conservative (in comparison) when it comes to purchasing embellishments for my card or scrapbooking projects, and I often will take my supplies "on the go" to different places to either scrapbook or make cards. Because of this, it was always a little more difficult to take with me the small round containers that Stampin' Up! embellishments come in. I wanted to grab them ALL because I didn't want to be without something, but they weren't the easiest to keep organized when I was packing up everything (there were too many!) or when I was out working on projects trying to find the right embellishment.

I don't own the Stack & Store Caddy (on the left), which is perfect for these little round containers, and would be perfect for my craft room at home, but...with me being on the go so much, I needed something a little different that would work better for me.

So, to help with my dilemma, I purchased some bead storage container boxes and began organizing!

{SU! exclusive brads}

{SU! exclusive buttons}

{SU! exclusive misc. embellishments & brads}
These boxes stack and store neatly on my shelf in my craft room. When I need them, I just grab and go! As you can see, I also have "non-Stampin' Up!" (gasp!) embellishments that I often will use in my scrapbooking.
There are many embellishments out of the Stampin' Up! catalog that I haven't purchased yet (I've only been a demo for 2 years, so I have many more years to collect!). I try to keep with simple choices as to not overall myself (well, that and I wouldn't be able to afford it!). However, I'd be lying if there weren't days that I wish I had "that one embellishment" I saw on "that one project". If my embellishment collection begins to grow, it just means my non-SU! collection will have to find a new home! I have lots of room to expand with these storage boxes.

Now, what to do with all of these empty round containers...


Turn them into treat holders, of course!


Disclaimer: Many of the "Tuesday Tips" I share each week have been gathered through my experience as a Stampin' Up! demonstrator and crafter. I do not necessarily claim any of them as my original idea (unless it really is!), but rather things that I have seen here and there through blogging, surfing the web, attending events, and such. If there is a specific idea I have seen and want to share, I will be sure to give credit where credit is due.

Tuesday, March 22, 2011

Tuesday Tip - faux knot

I'm posting today's "Tuesday Tip" just a little bit later (or a lot later) than I had hoped (busy day!)...I have a little over 2 hours to spare until the clock hits midnight and it's Wednesday, so I'll make it quick.

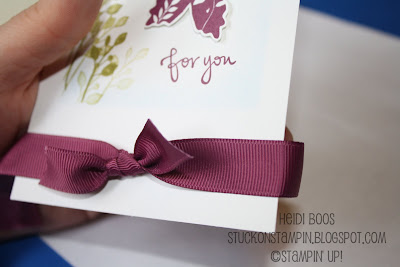
This week's tip is to share how to create a "faux knot". This helps a little with saving on the amount of ribbon you need to use, as well as helping you tie a knot without all of the fumbling fingers.

My faux knot

Start with two lengths of ribbon, measuring the longer piece long enough to wrap around the piece of paper you are attaching the ribbon to.


Taking the smaller piece, form the two pieces of ribbon into a "T'.


Tie a knot. (excuse the need for a manicure!)


Place adhesive on the back of the ribbon.


Then wrap around your cardstock you would like to attach it to.


View from the back.


I took the Old Olive cardstock and adhered it to the Whisper White to cover up the ribbon pieces on the back.


Completed card...


*Note: This "faux knot" works best when you will be covering the back of the pieces up.

More Tuesday Tips:
Storing your clear mount stamps inside their cases
Punching out small scraps of paper easily
// ADDED BY RYAN ON 1-3-14 // END ADDED BY RYAN 1-4-14