Showing posts with label Create a Cupcake. Show all posts

Friday, May 20, 2011

Birthday Card Sketch Challenge (A La Card Monkey #57)


I am honored to be a guest designer again at A La Card Monkey! I was an honorable mention a couple of weeks ago with this card I created, along with a couple of other stampers. Each of us was asked to be a guest designer for Monkey Sketch #57 (Birthday Card + Sketch).

Here is the sketch for this week...


And, here is my card I created...


Stamp Set:
Create a Cupcake

Paper: Whisper White, Baja Breeze, Pink Pirouette, Early Espresso, Melon Mambo (heart)

Ink: Pink Pirouette, Early Espresso

Accessories: Dimensionals, Basic Rhinestone Jewel Accents, 1" Pink Pirouette Grosgrain ribbon (retired), pink brad (retired)

Tools: Decorative Label punch, Swirls & Scribbles Sizzlits Die (used with Big Shot), Perfect Polka Dots Impressions Embossing Folder (used with Big Shot)

Friday, March 25, 2011

crazy for {clean & simple} cupcakes!

I played with the Create a Cupcake stamp set (in clear mount) and Build a Cupcake punch the other day and had so much fun creating a few cards to put into my card stash and also to have some all designed and ready to go if I needed a last minute workshop or "card night" card.


Stamp Set: Create a Cupcake

Paper: Real Red, Bashful Blue, Pacific Point, Whisper White, Certainly Celery DSP (stripes)

Ink: Real Red, Bashful Blue, Certainly Celery

Accessories: Dimensionals, 5/8" Real Red satin ribbon

Tools: Build a Cupcake punch

* * * * * * * * * * * * * * * * * * * * * * * * * * * *


{up close to show you the background polka dot texture}

Stamp Set: Create a Cupcake

Paper: Chocolate Chip, Wild Wasabi, Pretty in Pink, Whisper White

Ink: Wild Wasabi, Pretty in Pink, Melon Mambo, Chocolate Chip

Accessories: Dimensionals, 1/4" Chocolate Chip grosgrain ribbon

Tools: Build a Cupcake punch, Backgrounds 1 Texturz Plate (polka dot background) used with Big Shot

* * * * * * * * * * * * * * * * * * * * * * * * * * * *


{I added a jewel accent on top of the flower brad to add a little extra bling!}
Stamp Set: Create a Cupcake, Dot, Dot, Dot (single stamp)

Paper: Whisper White, Crumb Cake, Melon Mambo, Melon Mambo DSP (polka dots)

Ink: Melon Mambo, Crumb Cake

Accessories: Dimensionals, pink flower brad, rhinestone jewel, 5/8" Pretty in Pink satin ribbon

Tools: Build a Cupcake punch

* * * * * * * * * * * * * * * * * * * * * * * * * * * *


Stamp Set: Create a Cupcake, Punch Bunch (SAB exclusive set)

Paper: Whisper White, Poppy Parade, Peach Parfait, Sunny Garden DSP

Ink: Poppy Parade

Accessories: Dimensionals, 1/2" Poppy Parade poly-stitched ribbon

Tools: Build a Cupcake punch

* * * * * * * * * * * * * * * * * * * * * * * * * * * *

{I made this card for a friend whose birthday is on St. Patty's Day!}
~ card measures 4.25" x 4.25" ~

Stamp Set: Create a Cupcake, So Happy For You (shamrock - SAB exclusive)

Paper: Wild Wasabi, Whisper White, So Saffron, Melon Mambo, Ice Cream Parlor DSP (SAB exclusive)

Ink: Melon Mambo, So Saffron, Early Espresso, Wild Wasabi

Accessories: Dimensionals, Basic Pearls Jewel Accents

Tools: Build a Cupcake punch, Modern Label punch, Decorative Label punch, Scallop Trim Border punch

* * * * * * * * * * * * * * * * * * * * * * * * * * * *

Interested in purchasing the Create a Cupcake stamp set and Build a Cupcake punch? Add them to an order totaling $50 anytime now until March 31st, and you can get a free gift through the Sale-A-Bration promotion! Visit HERE to shop now!!

Wednesday, March 16, 2011

3/$6 Card Making Night - March (let's make cupcakes!)

This past Monday night, I held a card making event at my home. I try to offer a monthly card night where stampers are invited to come make 3 cards for only $6. I design each of the three cards and prepare the supplies in advance, so all the stampers have to do is come and stamp away...leaving with three cards to give to someone special! It is a popular night for those who really love to stamp and be crafty, but don't have the space to get out all of their card making supplies or the finances to purchase their own supplies. They can come use my "toys" and if they find something they would love to own, they can put it on their wish list for the future!

This month's theme was cupcake birthday cards using the Create a Cupcake stamp set and Build a Cupcake punch. These are both out of the Occasions Mini Catalog which runs through the end of April. It took me awhile to finally decide to purchase these two products (not sure why), but now I'm so happy that I have them! they are awesome! (Word of advice...I opted for the clear mount for the cupcake set, but because of all the little pieces, I may have been better off with the wood mount, especially because most everything you will punch out anyway.)


Stamp Set: Create a Cupcake

Paper: Real Red, Early Espresso, Pumpkin Pie, Whisper White, Summer Picnic DSP (retired), Pawsitively Prints DSP

Ink: Early Espresso, Real Red, Pumpkin Pie

Accessories: Dimensionals

Tools: Build a Cupcake punch, Two Step Owl punch (used for the tiny heart), Bigz Scallop Square Duo Die used with the Big Shot, paper piercing tool and mat pack (to make the holes around the white square)

* * * * * * * * * * * * * * * * * * * * * * * * * * *


Stamp Set: Create a Cupcake

Paper: Bashful Blue, Chocolate Chip, Whisper White, Certainly Celery, Certainly Celery DSP (the striped cupcake "liner")

Ink: Chocolate Chip, markers - Rose Red, Certainly Celery (to create the cherry on top)

Accessories: Dimensionals, 1/4" Chocolate Chip grosgrain ribbon (retired),

Tools: Build a Cupcake punch, Dotted Scallop Ribbon Border punch

* * * * * * * * * * * * * * * * * * * * * * * * * * *


Stamp Set: Create a Cupcake

Paper: Melon Mambo, Crumb Cake, Chocolate Chip, Whisper White

Ink: Chocolate Chip, Pretty in Pink, Chocolate Chip, markers - Melon Mambo, Wild Wasabi (used to color flower)

Accessories: Dimensionals, 3/8" Pretty in Pink taffeta ribbon, Basic Pearls Jewel Accents, pink glitter (non-SU!) used with 2-way glue pen

Tools: Build a Cupcake punch

For this particular card above, I decided to stamp and punch each of the cupcake pieces, so that all the stampers had to do was assemble the cupcakes and add the tiny details. I heard many of the gals say they wanted to give this particular card to someone who would appreciate all of the work and detail it took to create! With only having one punch and one stamp set to share amongst 10 stampers, I had to do some creative thinking and I figure my guests would appreciate me doing a little more of the "grunt work"...and they did appreciate it! (Just picture me on Saturday afternoon stamping and punching out enough pieces to make 20 card kits!)

* * * * * * * * * * * * * * * * * * * * * * * * * * *

And the event wouldn't be complete, without some cupcakes for a treat! Nothing gourmet or too fancy, but just a little something to add to the fun!

I felt like the evening was a success and there were many ladies who couldn't come, but who decided to purchase the card kits and then would assemble the cards at home. This is an option I began offering a few months ago and it's nice for those who can't always make it, but still would like to put together a couple of cards. I will stamp/punch anything necessary and leave the assembly to the person buying the kit. It works great! I even made a couple of sets of cards for those who didn't necessarily want to put them together, but still wanted to buy the cards we were making!

Want to see more of the kinds of cards we create at my monthly card nights? Check them all out HERE.

Tuesday, March 8, 2011

Tuesday Tip - clear mount stamps

I've decided that Tuesdays will be Tuesday Tip day here on my stamping blog! I plan to try and share one simple little tip or trick every Tuesday (or as often as I realistically can) that will help in some little way with your Stampin' Up! products.

* * * * * * * * * * * * * * * * * * * * * * * * * * *

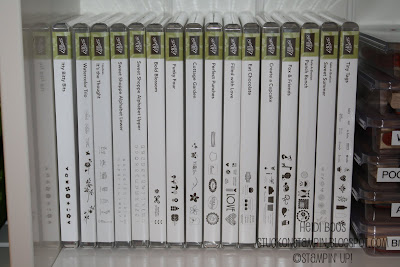
Have you purchased any clear mount stamps yet? Stampin' Up! is well known for their wood stamps, but about a year ago Stampin' Up! introduced clear mount stamp sets into their list of products. There are many advantages to clear mount stamps...one of them being their sleek and compact storage. The case size is the same as a DVD case. You'll notice how these fit on the shelves compared to the wood mount stamp sets. Now you can have room for double the stamp sets! (*wink*)


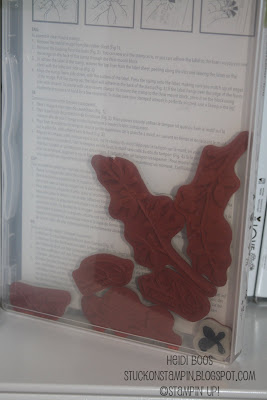
When I received my first few clear mount stamp sets, I didn't know any better and put them together like I would wood stamps by punching out each rubber stamp and then throwing away the leftover rubber. I then put all the loose stamps back in the case. They then looked like the pictures below and the stamps would shake free in the case, which I really didn't care for, especially if it was a stamp set that had lots of small stamps, like the second picture below.


However, I learned very quickly a little trick that would help keep the stamps in one place while inside the clear mount stamp case.

Just recently I got the new Create a Cupcake stamp set in clear mount. LOVE it!!


I knew it came with a lot of pieces...


After punching out each rubber stamp and putting the picture on top of the rubber, I pulled off the backing of the leftover rubber...


...and stuck it into the inside of the case.


Then I took the individual pieces of the rubber stamps and put them back into the leftover rubber like a puzzle. Now they don't shake free and stay put just right inside the case.


This is the view from the back of the case.


I can't leave you without sharing at least one card! This card is made using the Create a Cupcake stamp set and Build a Cupcake XL punch. This card is a CASE of a card I found on Stampin' Connection (a demonstrator only website) created by Sylvia Christina Evert. A few things I added (like the ribbon), but mostly everything I loved just as is!


I will be holding a Cupcake Birthday Card class next Monday using the Create a Cupcake stamp set and Build a Cupcake XL punch. Come back soon to see what other cards we create!

// ADDED BY RYAN ON 1-3-14 // END ADDED BY RYAN 1-4-14