Monday, March 14, 2011

fox & friends play time

A couple of weeks ago I got out my Fox and Friends stamp set to play a little just for fun! Fox and Friends was one of my first clear mount stamps I decided to invest in. It was nice because I only had to purchase one clear block to be able to use it. I didn't have a lot of time to "play" (seems like that's the trend these days with two pre-schoolers), but I wanted to see if I could come up with a couple of clean and simple cards in the time I had. Both of these cards were inspired by something I saw on Stampin' Connection (a demonstrator only website).

Fox & Friends
{clear mount - $14.95}

* * * * * * * * * * * * * * * * * * * * * *


Stamp Set: Fox & Friends, Teeny Tiny Wishes

Paper: Wild Wasabi, So Saffron, Whisper White

Ink: So Saffron, Early Espresso

Accessories: yellow gemstone brad, Dimensionals, 1/2" Wild Wasabi striped grosgrain ribbon (retired), hemp twine

Tools: Corner punch, mat pack & piercing tool

* * * * * * * * * * * * * * * * * * * * * *


Stamp Set: Fox & Friends, Teeny Tiny Wishes

Paper: Pumpkin Pie, Whisper White, Sweet Pea DSP (retired)

Ink: markers - Pumpkin Pie, Taken with Teal (retired)

Accessories: orange gemstone brad, Dimensionals

Tools: Perfect Polka Dots Textured Embossing Folder, Scallop Edge Border punch


* * * * * * * * * * * * * * * * * * * * * *

You can find some of my other Fox & Friends card samples HERE.

Sunday, March 13, 2011

for you "make n take"

On Friday night, my upline and I co-hosted a downline meeting. She led the meeting with the agenda and I hosted it at my home with light snacks and created a "make n take'. We meet about every 2 or so months and have decided to rotate homes between the two of us. Unfortunately, none of my downline could make it this time, but she had some of her downline in attendance, so it was a great evening to talk Stampin' Up! business and share inspiration with each other! Now that we both have a few gals each in our downline, we are looking forward to doing some more things together in the future. I am so thankful that my upline and I are very similar in style, organization, and much more! It's nice to know she's always on my side and whenever I need something, she's always there and willing. Thanks, Andrea!!

Here is the "make n take" card I put together for us.


Stamp Set: Punch Bunch (2011 Sale-A-Bration exclusive set), On Your Birthday

Paper: Peach Parfait, Whisper White, Pear Pizzazz, Ice Cream Parlor DSP (2011 Sale-A-Bration exclusive)

Ink: Not Quite Navy, markers: Peach Parfait, Pear Pizzazz, Not Quite Navy

Accessories: orange gemstone brad, Dimensionals, 1/2" Pear Pizzazz Poly-Stitched Ribbon

Tools: 1 3/4" Scallop Circle punch, 1 1/4" Circle punch, 1 3/8" Circle punch, Two Tags Bigz Die

Saturday, March 12, 2011

good luck CASE

This card is 95% CASEd because I love it that much. I found this adorable card made by the fabulously talented Heather Klump at Downstairs Designs. Her card was inspired by a card found in Stampin' Success (a SU! demonstrator only publication). The one in the magazine used hearts and it was super cute, as well! Heather designer her card to be used as a St. Patrick's Day card, but I changed it into a good luck card.

I have a handful of girlfriends running in the 2011 Shamrock Run in Portland. Some of them are entering in this run for the first time. I am so very proud of each of them and wanted to send them a good luck card for the run on Sunday. Time got away from me and I was unable to get a card in the mail to each of the girls, so I sent them a virtual one on Facebook. Not quite what I had planned, but I just knew this would be the perfect card to say...I'm sending you GOOD LUCK!!


Stamp Set: So Happy For You - sentiment & shamrock (2011 Sale-A-Bration exclusive set), Create a Cupcake

Paper: Whisper White, Wild Wasabi, Ice Cream Parlor DSP (2011 Sale-A-Bration exclusive)

Ink: Early Espresso, Daffodil Delight, Wild Wasabi

Accessories: Dimensionals, 1/4" Daffodil Delight grosgrain ribbon

Tools: Build a Cupcake XL punch

Friday, March 11, 2011

stamp club card kits "to go"

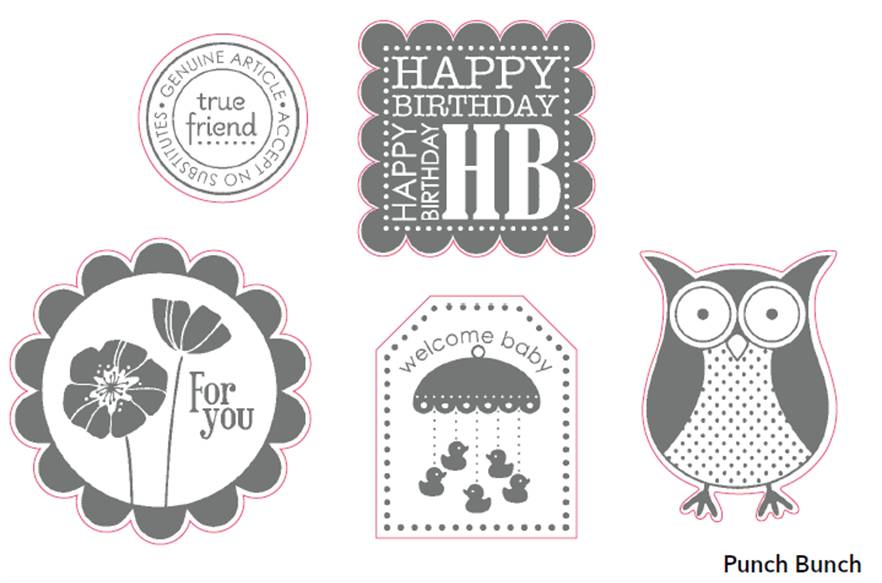
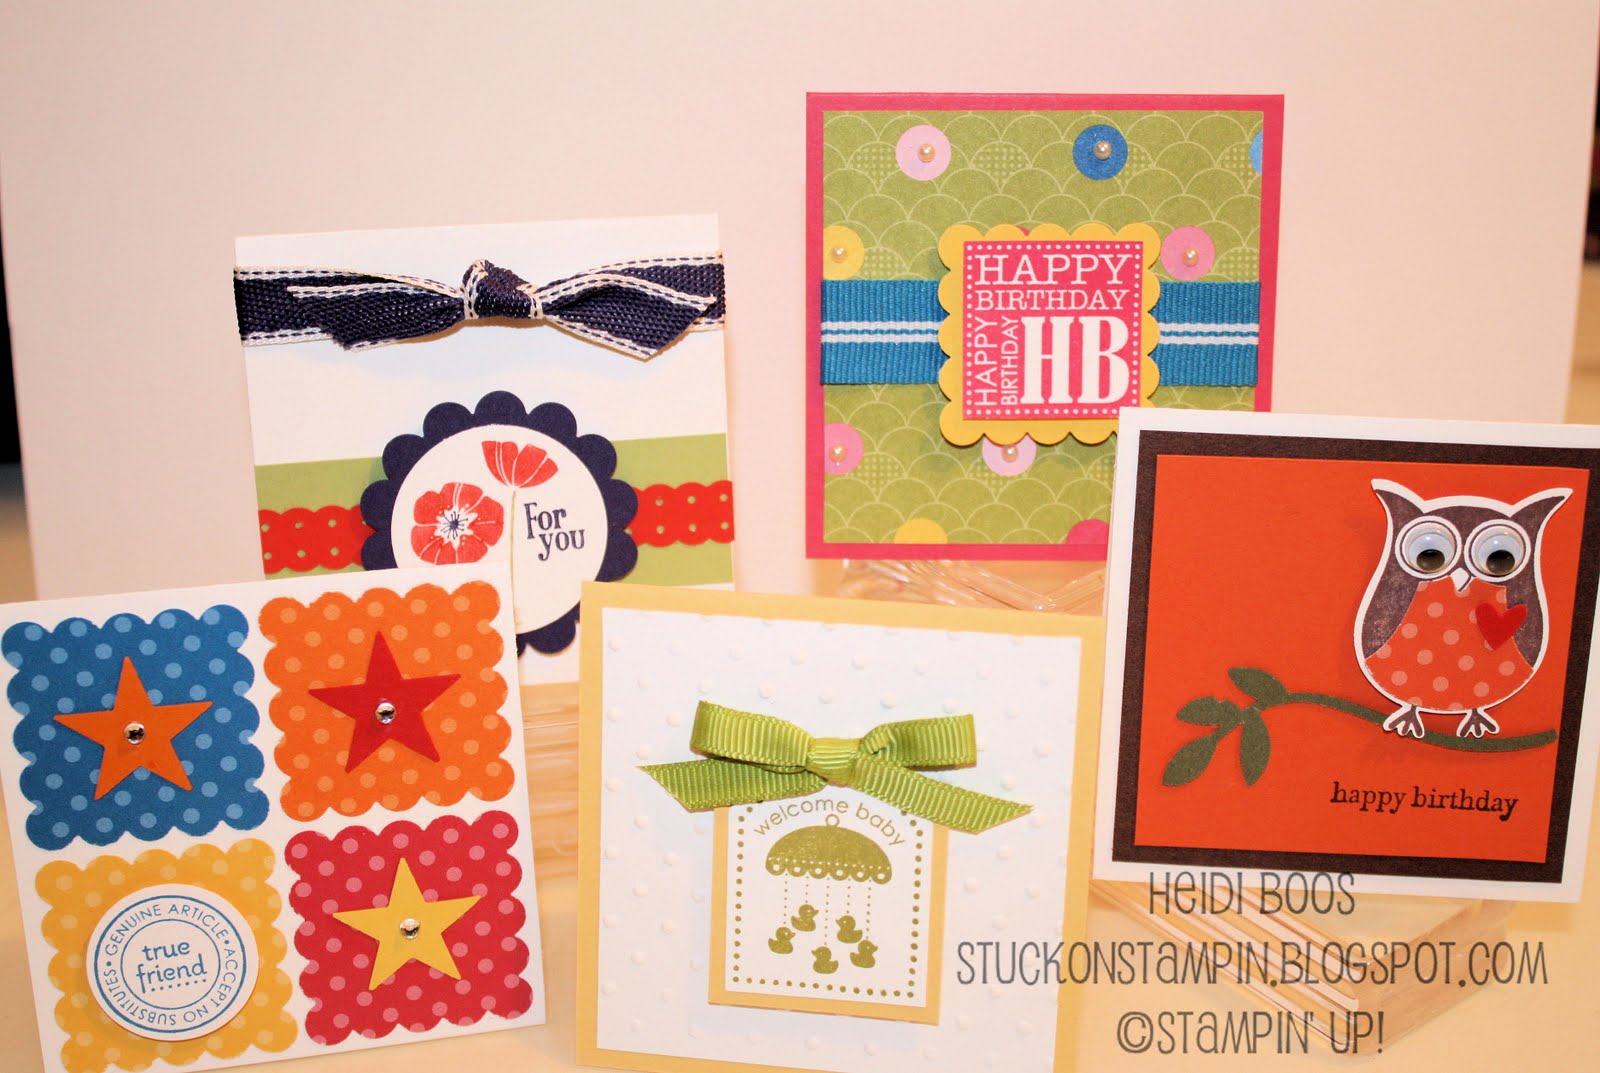
I had to cancel our regular "First Friday" Stamp Club meeting for March last week because of an overloaded weekend (I'm trying to work on that "balance" thing). However, I told my club members that with the delivery of their ordered stamping goodies, I would have a couple of card kits for them to put together in their free time. I decided to design some 3x3 cards instead of the regular sized cards we normally do. And, better yet...I decided to focus on a Sale-A-Bration exclusive stamp set for each of the cards. You're probably already familiar with this fun stamp set, but I haven't really used it much, so this was the perfect time to play with it a little to see what I could come up with.


{One card for each image in the set}


Stamp Set: Punch Bunch (2011 Sale-A-Bration exclusive set), Teeny Tiny Wishes

Paper: Whisper White, Chocolate Chip, Tangerine Tango, Always Artichoke, Real Red, Tangerine Tango DSP (polka dots)

Ink: Chocolate Chip

Accessories: Dimensionals

Tools: Two-Step Bird punch, Two-Step Owl punch

* * * * * * * * * * * * * * * * * * * * * * * * * * * *


Stamp Set: Punch Bunch (2011 Sale-A-Bration exclusive set)

Paper: Melon Mambo, Daffodil Delight, Ice Cream Parlor DSP (Sale-A-Bration exclusive)

Ink: Melon Mambo

Accessories: Dimensionals, 1/2" Pacific Point striped ribbon (retired), Basic Pearls Jewel Accents

Tools: Scallop Square punch

* * * * * * * * * * * * * * * * * * * * * * * * * * * *


Stamp Set: Punch Bunch (2011 Sale-A-Bration exclusive set)

Paper: Whisper White, Poppy Parade, Pear Pizazz, Concord Crush

Ink: markers: Poppy Parade, Concord Crush

Accessories: Dimensionals, 1/2" Concord Crush Poly-Stitched ribbon

Tools: 1 3/4" Scallop Circle punch, 1 3/8" Circle punch, Dotted Scallop Ribbon Border punch


* * * * * * * * * * * * * * * * * * * * * * * * * * * *


Stamp Set: Punch Bunch (2011 Sale-A-Bration exclusive set)

Paper: So Saffron, Whisper White

Ink: Old Olive

Accessories: Dimensionals, 1/4" Old Olive Grosgrain ribbon, mini glue dots

Tools: X-Large Tag punch, Large Tag punch, Perfect Polka Dots Textured Impressions Folder

* * * * * * * * * * * * * * * * * * * * * * * * * * * *


Stamp Set:
Punch Bunch (2011 Sale-A-Bration exclusive set)

Paper: Whisper White, Pumpkin Pie, Real Red, Daffodil Delight, Brights Paper Pack - Pacific Point, Daffodil Delight, Pumpkin Pie, Real Red

Ink: Pacific Point

Accessories: Dimensionals, Basic Rhinestones Jewel Accents

Tools: 1" Circle punch, Scallop Square punch, small star punch (retired)

* * * * * * * * * * * * * * * * * * * * * * * * * * * *

3x3 note cards make a great replacement to a regularly sized card when all you need is a quick tag to add to a gift. Want to earn this FREE stamp set? Purchase $50 in catalog product and this can be yours free, but only until March 31st! Let me know how I can help!

Thursday, March 10, 2011

silent auction with tart & tangy

My good friend Sarah asked if I wanted to be a part of a silent auction to help raise money for her daughter's school. I figured it would be a great way for me to get my name out there a bit and do something good along the way by helping to support the private school her daughter attends.

I put together a basket of goodies...
  • 8 handmade greeting cards
  • 2010-2011 Idea Book & Catalog
  • 2011 Occasions Mini Catalog
  • Level 1 Hostess Stamp Set
  • Spool of Real Red Polka Dotted ribbon
  • Gift certificate for a free card night at my home (3 cards for $6)
  • Box in a bag filled with chocolate treats

I packaged it up nicely in cellophane wrapping and a white bow...


Here are the 4 cards I created to include in the basket. There were 2 of each design, so a total of 8 cards.


Stamp Set: 2011 Sale-A-Bration set: So Happy For You (sentiment), Tart & Tangy

Paper: Bashful Blue, Old Olive, Whisper White, Summer Picnic DSP (retired)

Ink: Real Red, markers: Real Red, Old Olive

Accessories: 1/2" Striped Old Olive Grosgrain ribbon (retired), Dimensionals

Tools: none

* * * * * * * * * * * * * * * * * * * * * * *


Stamp Set: Occasional Quotes (Level 3 Hostess set), Tart & Tangy

Paper: Old Olive, Whisper White, Summer Picnic DSP (retired)

Ink: Pumpkin Pie, Early Espresso (sentiment)

Accessories: 1/4" Bashful Blue Taffeta ribbon (retired), Dimensionals

Tools: 1 1/4" Circle punch, Piercing Tool & Mat Pack

* * * * * * * * * * * * * * * * * * * * * * *


Stamp Set: On Your Birthday, Tart & Tangy

Paper: Bashful Blue, Real Red, Whisper White, Old Olive, Summer Picnic DSP (retired)

Ink: Real Red, markers: Real Red, Old Olive

Accessories: Dimensionals

Tools: 1 1/4" Circle punch, 1 3/8 " Circle punch, 1 3/4" Scallop Circle punch, Scallop Edge Border punch

* * * * * * * * * * * * * * * * * * * * * * *


Stamp Set:
Teeny Tiny Wishes, Tart & Tangy

Paper: Real Red, Whisper White, Old Olive, Summer Picnic DSP (retired)

Ink: Early Espresso, markers: Real Red, Chocolate Chip, Old Olive

Accessories: Dimensionals, 5/8" Real Red Satin ribbon

Tools: 1 1/4" Circle punch, 1 3/8 " Circle punch, 1 3/4" Scallop Circle punch, Perfect Polka Dots Textured Impressions Folder with Big Shot die cutting machine

* * * * * * * * * * * * * * * * * * * * * * *

Do you love the Tart & Tangy set that I used with each of these cards? If you spend $50, you can get it for FREE because it is one of your choices during Sale-A-Bration! You have until March 31st to take advantage of getting this set for FREE! How about you add some ink, coordinating papers, and some ribbon to your order, and maybe a punch or two, then you can get this stamp set for FREE and start making cards today! This is a very versatile and fun set that can be used for many greeting card occasions. Take a peek HERE at some of the other cards I've created using this stamp set.


Start shopping today with one click HERE.

Wednesday, March 9, 2011

feeling scrappy?

Raise your hand if you're known to keep every little last scrap of paper, especially quality paper like Stampin' Up! cardstock and Designer Series Paper? Both of my hands are raised for sure!! Yesterday I had an urge to do a little something with some of these scraps just for fun! I found a few cute ideas online at Stampin' Connection (a demonstrator only website) and went to work.

I just love the simplicity of the two cards below. With just a few scraps of paper you can make a clean and simple card, but yet still have that "wow" in there! The first card design (in purples and green) I CASED from a card created by Kristin Moore. I kept everything the same, except for I used a different sentiment and added a button instead of the filigree and rhinestone brad she used.

Stamp Set: retired birthday greeting

Paper: Old Olive, Whisper White, Cottage Wall DSP (retired)

Ink: Rich Razzleberry

Accessories: Rich Razzleberry button (adhered with mini glue dot)

Tools: 1 1/4" Square punch

* * * * * * * * * * * * * * * * * * * * * * * * * * * * * *

I loved this card so much that I had to make another one using the current Sunny Garden DSP. Did I mention how quick and simple these cards were to make?!

Stamp Set: retired birthday greeting

Paper: Poppy Parade, Whisper White, Sunny Garden DSP

Ink: Poppy Parade

Accessories: Daffodil Delight button (adhered with mini glue dot)

Tools: 1 1/4" Square punch

* * * * * * * * * * * * * * * * * * * * * * * * * * * * * *

I had so much fun using up some of my scraps that I decided to make another card from an idea I found on Stampin' Connection. This technique I have seen a lot lately with various kinds of Designer Series Paper. I used retired DSP called Cottage Wall.

First I started with my pile of scraps...


I used my 1 1/4" Square Punch to punch out 12 squares of various patterns...


On a 4 x 5 1/4" piece of white cardstock, I arranged my squares until I liked the pattern...


I adhered each of the squares onto the white cardstock...


Then I lined the paper up using my Top Note Die (one of my favorites!) and the Big Shot...


Here is what it looks like after being cut out...


And, here it is made into a card...


Stamp Set: Perfect Punches (clear mount)

Paper: Old Olive, Cottage Wall DSP (retired)

Ink: Rich Razzleberry

Accessories: Dimensionals, 1/4" Old Olive grosgrain ribbon

Tools: Top Note Die, Wide Oval punch

* * * * * * * * * * * * * * * * * * * * * * * * * * * * * *

My mom and I were doing a little stamping together, so while I was finishing up my card, she made herself one using the current DSP called Sunny Garden.


Stamp Set: Perfect Punches (clear mount)

Paper: Poppy Parade, Sunny Garden DSP

Ink: Poppy Parade

Accessories: Dimensionals, 1/8" Daffodil Delight taffeta ribbon

Tools: Top Note Die, Wide Oval punch

* * * * * * * * * * * * * * * * * * * * * * * * * * * * * *

Hope you all have a wonderful day and enjoy digging into your pile of scraps to come up with a fun card for someone special!

Tuesday, March 8, 2011

Tuesday Tip - clear mount stamps

I've decided that Tuesdays will be Tuesday Tip day here on my stamping blog! I plan to try and share one simple little tip or trick every Tuesday (or as often as I realistically can) that will help in some little way with your Stampin' Up! products.

* * * * * * * * * * * * * * * * * * * * * * * * * * *

Have you purchased any clear mount stamps yet? Stampin' Up! is well known for their wood stamps, but about a year ago Stampin' Up! introduced clear mount stamp sets into their list of products. There are many advantages to clear mount stamps...one of them being their sleek and compact storage. The case size is the same as a DVD case. You'll notice how these fit on the shelves compared to the wood mount stamp sets. Now you can have room for double the stamp sets! (*wink*)


When I received my first few clear mount stamp sets, I didn't know any better and put them together like I would wood stamps by punching out each rubber stamp and then throwing away the leftover rubber. I then put all the loose stamps back in the case. They then looked like the pictures below and the stamps would shake free in the case, which I really didn't care for, especially if it was a stamp set that had lots of small stamps, like the second picture below.


However, I learned very quickly a little trick that would help keep the stamps in one place while inside the clear mount stamp case.

Just recently I got the new Create a Cupcake stamp set in clear mount. LOVE it!!


I knew it came with a lot of pieces...


After punching out each rubber stamp and putting the picture on top of the rubber, I pulled off the backing of the leftover rubber...


...and stuck it into the inside of the case.


Then I took the individual pieces of the rubber stamps and put them back into the leftover rubber like a puzzle. Now they don't shake free and stay put just right inside the case.


This is the view from the back of the case.


I can't leave you without sharing at least one card! This card is made using the Create a Cupcake stamp set and Build a Cupcake XL punch. This card is a CASE of a card I found on Stampin' Connection (a demonstrator only website) created by Sylvia Christina Evert. A few things I added (like the ribbon), but mostly everything I loved just as is!


I will be holding a Cupcake Birthday Card class next Monday using the Create a Cupcake stamp set and Build a Cupcake XL punch. Come back soon to see what other cards we create!

Wednesday, March 2, 2011

one month left of Sale-A-Bration!


March is here...I don't know how already, but it's here!! And, lucky for you this means you still have one month left to take advantage of Stampin' Up!'s biggest celebration of the year!! Sale-A-Bration will continue through March 31st offering a free gift for every $50 you spend in catalog product! Click HERE to learn more about how you can take advantage of this great Sale-A-Bration, or HERE to start shopping from my online website.

There are many products available to choose from for FREE that can be found in the 2010-2011 Idea Book & Catalog, but there are also some products you can choose from that are limited edition products only available through the promotion (see below). Ask me if you'd like to see a hard copy of the Sale-A-Bration brochure, but enjoy the images below!


I haven't had as much time as I would hope to play with the stamp sets I have earned so far (Sweet Summer & Punch Bunch), but I hope to in the next couple of days so I can post some fun samples. Come back to see!!

Tuesday, February 22, 2011

pocket silhouettes

A month or so ago, I received a new stamp set called Pocket Silhouettes and figured it was about time to ink it up! I found a couple of cards online that I really liked and decided to use these for some inspiration and start my motivation of using this stamp set by CASEing these cards.


Stamp Set:
Pocket Silhouettes, Teeny Tiny Wishes (sentiment)

Paper: Concord Crush, Daffodil Delight, Crumb Cake, Whisper White

Ink: markers ~ Concord Crush, Wild Wasabi

Accessories: Dimensionals, Rhinestone Jewel Accents

Tools: Word Window punch, Modern Label punch

* * * * * * * * * * * * * * * * * * * * * * * * * * * * * * * * *


Stamp Set: Pocket Silhouettes

Paper: Old Olive, Early Espresso, Whisper White

Ink: Old Olive, Really Rust (retired), Early Espresso

Accessories: Dimensionals, Old Olive brads

Tools: Modern Label punch

* * * * * * * * * * * * * * * * * * * * * * * * * * * * * * * * *

This one is an HB Original {*wink*}
I wanted something Clean & Simple...so this is what I came up with.

Stamp Set: Pocket Silhouettes, Teeny Tiny Wishes (sentiment)

Paper: Whisper White

Ink: markers - Old Olive, Rose Red, So Saffron, Pink Pirouette

Accessories: Dimensionals, Pearls Jewel Accents

Tools: flower from the Punch Pack

* * * * * * * * * * * * * * * * * * * * * * * * * * * * * * * * *

Do you own the Pocket Silhouettes stamp set? I would LOVE to see what you have made using it...leave me a comment with a link to your site!
// ADDED BY RYAN ON 1-3-14 // END ADDED BY RYAN 1-4-14