Thursday, May 26, 2011

fun with color!

It was {another} rainy day here in Oregon, which meant time in my stamp room! I decided to play along with a couple of color challenges and a sketch challenge.

First challenge was over at The Color Dare, where we were encouraged to use:

So Saffron
Concord Crush
Neutral of Choice


Stamp Set:
Tiny Teacup, Best Wishes & More (retired)

Paper: Whisper White, So Saffron, Concord Crush, Crumb Cake, Concord Crush DSP (from Hostess Level 1 pack)

Ink: Concord Crush

Accessories: Itty Bitty Buttons, white floss (non-SU!), 1/2" Concord Crush Poly-Stitched ribbon

Tools: 1 1/4" Circle punch, 1 3/8" Circle punch, Itty Bitty Punch Pack


* * * * * * * * * * * * * * * * * * * * * * * * * * *

For this next card I used a sketch challenge and a color challenge to create it!

The sketch was from The Paper Players (PP48)...


The colors are from Create with Connie & Mary (CCMC152)...


And, here is my card...

Here is an up close view to see the polka-dotted textured background on the Baja Breeze and the ears of the elephants in 3-D.
Stamp Set: Baby Steps, Teeny Tiny Wishes (sentiment)

Paper: Baja Breeze, Riding Hood Red, Peach Parfait, Peach Parfait DSP (from Hostess Level 1 pack)

Ink: Baja Breeze, Riding Hood Red, white gel pen (dots on scallop circle)

Accessories: 1/2" Peach Parfait Poly-Stitched ribbon, Dimensionals, Riding Hood Red brads,

Tools: 3/4" Circle punch, Heart to Heart punch, Scallop Circle Die (used with Big Shot), Texturz Plate (polka dot)

Monday, May 23, 2011

a cut above!

I came home from a weekend away to find out that I was 1 of 6 cards chosen as a "Cut Above" at The Paper Players! A couple of weeks ago, I participated in a color challenge at The Paper Players using Not Quite Navy, Cherry Cobbler, and Early Espresso. Most of the cards created were masculine, but because I don't own any masculine style stamps, I went with something I thought might still work with the colors we were asked to use.

Here is the card I created...


Thanks to Rita, this month's guest designer, for choosing my card!!

Head on over to The Paper Players to participate in this week's sketch challenge...I hope to find some time to play along!

Friday, May 20, 2011

Birthday Card Sketch Challenge (A La Card Monkey #57)


I am honored to be a guest designer again at A La Card Monkey! I was an honorable mention a couple of weeks ago with this card I created, along with a couple of other stampers. Each of us was asked to be a guest designer for Monkey Sketch #57 (Birthday Card + Sketch).

Here is the sketch for this week...


And, here is my card I created...


Stamp Set:
Create a Cupcake

Paper: Whisper White, Baja Breeze, Pink Pirouette, Early Espresso, Melon Mambo (heart)

Ink: Pink Pirouette, Early Espresso

Accessories: Dimensionals, Basic Rhinestone Jewel Accents, 1" Pink Pirouette Grosgrain ribbon (retired), pink brad (retired)

Tools: Decorative Label punch, Swirls & Scribbles Sizzlits Die (used with Big Shot), Perfect Polka Dots Impressions Embossing Folder (used with Big Shot)

Wednesday, May 18, 2011

Card Making Night - May

On Monday night this past week, I held my 3 for $6 card night. I had three new stampers who had never been before and they really enjoyed it! I think I got them addicted already! *wink*

This first card below, I posted on Monday, so it might look familiar.


Stamp Set: Apple Blossoms (Hostess Level 2 set)

Paper: Whisper White, Baja Breeze, Rose Red, Sahara Sand

Ink: Baja Breeze, Rose Red, Sahara Sand

Accessories: 1/8" Whisper White Taffeta ribbon, 5/8" Rose Red Double-Stitched ribbon (retired), Basic Pearls, Dimensionals

Tools: Beautiful Wings Embosslits Die, Modern Label punch, Scallop Square Duo Bigz Die (used with Big Shot)

* * * * * * * * * * * * * * * * * * * * * * * * * * * *

For this next card, I was inspired by a card I had seen HERE. I changed up the colors and made a few of my own touches, but I just love the bright colors and the way the party hats stand out!


Stamp Set: Party Hearty (currently 30% off until May 30, 2011), So Happy For You (2011 SAB - no longer available)

Paper: Whisper White, Pacific Point, Pumpkin Pie, Melon Mambo

Ink: Melon Mambo, markers - Pacific Point, Pumpkin Pie, Melon Mambo

Accessories: 5/8" Pumpkin Pie Grosgrain ribbon, Dimensionals

Tools: Paper Snips (to cut out the party hats), 3/4" Circle punch, Perfect Polka Dots Embossing Folder (used with Big Shot)


* * * * * * * * * * * * * * * * * * * * * * * * * * * *

I just love this Father's Day that I found at Lesley's blog when I participated in a color challenge last week with the Paper Players. I switched up a few things by re-arranging the colors and adding an embossing folder, as well as adding some brads in the corners. I'm just a fan of clean and simple!


{inside greeting}
Stamp Set: Best Dad Ever (in the 2011 Summer Mini Catalog)

Paper: Whisper White, Not Quite Navy, Cherry Cobbler, Early Espresso

Ink: Cherry Cobbler, markers - Not Quite Navy, Cherry Cobbler, Early Espresso

Accessories: Dimensionals, Night of Navy brads

Tools: Square Lattice Embossing Folder (used with the Big Shot)

Tuesday, May 17, 2011

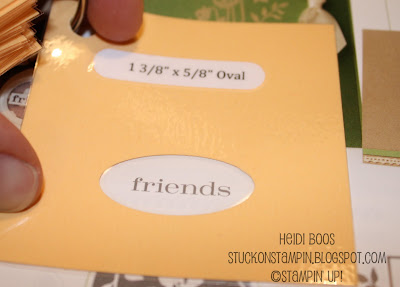
Tuesday Tip - do it yourself punch templates

This week's Tuesday Tip is a "do it yourself" punch template tool that I made with my stamp club at our last meeting.

Here is the final product...


I thought I would run through real quick how I made this tool and then further down, I will share with you how to use it effectively.

Start out with typing up the name of each punch that you are going to include (I have most of the punches, just missing a few)...


Punch each of them out with the Word Window punch...


Cut 3x3 squares out of your choice of cardstock and then punch each of them to create the shape outlines...


Adhere the labels to each of the squares...


Laminate them (if you own a laminator) for durability...


Punch a small hole in the corner of each square and add a ring to keep them all together...


This punch template will be helpful as you are trying to create a card and you want to use a certain punch, but you want to find the right sentiment that fits inside. If you take your punch template, you can go through the catalog and find the stamp sets you own to find a sentiment that fits!


It also works for images...


* * * * * * * * * * * * * * * * * * * * * * * * * * * *

One more quick tip as you are looking through the catalog you might notice that on some images there is a red outline around them. These red outlines indicate that it coordinates with a punch that Stampin' Up! sells. Thought you might like to know if you didn't already!


**If you're looking for more Tuesday Tips, check them all out HERE

Monday, May 16, 2011

card night sneak peek!

Tonight is my final 3 for $6 card night before I take a break for the summer. I have other Stampin' Up! events planned for each month, but my normal "once a month card night" will be on hiatus.

I wanted to share a sneak peek of one of the cards we will be making. It was inspired by a couple of challenges. One being the color challenge over at the Color Dare (CD100). The colors we were encouraged to play with were Baja Breeze, Rose Red, and Sahara Sand. I thought it was a tough color combo to work with, especially adding in Sahara Sand, but I really do like the finished product!

The sketch for this card came from Stamping 411 (Challenge 203)...


Stamp Set: Apple Blossoms (Hostess Level 2 set)

Paper: Whisper White, Baja Breeze, Rose Red, Sahara Sand

Ink: Baja Breeze, Rose Red, Sahara Sand

Accessories: 1/8" Whisper White Taffeta ribbon, 5/8" Rose Red Double-Stitched ribbon (retired), Basic Pearls, Dimensionals

Tools: Beautiful Wings Embosslits Die, Modern Label punch, Scallop Square Duo Bigz Die (used with Big Shot)

Sunday, May 15, 2011

National Scrapbooking Month!


May is National Scrapbooking Month and Stampin' Up! is offering 30% off select stamp sets...perfect for making some fun scrapbook pages. These stamps are also perfect for making cards, so take advantage now before the promotion ends...you have 2 more weeks! SHOP NOW at my online website or if you're local (Portland-Metro, Oregon) send me an e-mail (contact info on the right hand side of the page) if you would like to order something. I'll be placing an order on Tuesday!

Party Hearty
{wood mount only}
Sale Price - $18.87
Regular Price - $26.95

Grunge Rock
Wood Mount - Sale Price - $14.67 (reg. price $20.95)
Clear Mount Sale Price - $11.17 (reg. price $15.95)

Animal Stories
{wood mount only}
Sale Price - $11.17
Regular Price - $15.95


Printed Petals
Wood Mount - Sale Price - $13.97 (reg. price $19.95)
Clear Mount Sale Price - $10.47 (reg. price $14.95)


Simple Friendship
{wood mount only}
Sale Price - $18.17
Regular Price - $25.95

Word Play
Wood Mount - Sale Price - $29.37 (reg. price $41.95)
Clear Mount Sale Price - $20.27 (reg. price $28.95)


Sweet Shoppe Alphabet Lower
Wood Mount - Sale Price - $22.37 (reg. price $31.95)
Clear Mount Sale Price - $16.77 (reg. price $23.95)


* * * * * * * * * * * * * * * * * * * * * * * * * * * * *


And...if you're interested in Digital Scrapbooking, Stampin' Up! is also having a promotion on their digital downloads. Click HERE to see the bundles they are offering at 30% off! Plus, during the month of May join Stampin' Up! buy purchasing the Digital + Starter Kit for only $122.50 (a $320 value). Contact me for more details!

Saturday, May 14, 2011

Kid + Sketch Challenge (A La Card Monkey #56)


I am so excited to share that I am one of this week's guest designers at A La Card Monkey! It was an honor for my card to be chosen last week and to make things even MORE exciting, I just found out that the card I submitted this week was also chosen and I will be guest designing next week, too!! So fun...I love sketch challenges!

This week's challenge (#56) is Kid+Sketch and here it is...


And, here's my take on the sketch...

It's purely ironic that I chose to do kids in a RED innertube just like the sketch. I promise I didn't take the sketch literally. *wink* I just really wanted to use the new Sunny Fun stamp set from the 2011 Summer Mini Catalog. My sister actually ordered the stamp set, and while she is in Disneyland with her family (lucky!) her order came. I figured she wouldn't care about me being the first to ink it up!


Here is an up close shot of the Dazzling Diamonds glitter I added to the water...I just love how it sparkles!
{click on picture to see an even more up close view}
Stamp Set: Sunny Fun

Paper: Whisper White, Tempting Turquoise, Poppy Parade, Pawsitively Prints DSP II

Ink: Early Espresso, markers - Poppy Parade, Tempting Turquoise, So Saffron, blender pens with markers - Tempting Turquoise, Blush Blossom

Accessories: 5/8" Poppy Parade Poly-Stitched ribbon, Dimensionals, red brads, Brights button pack (adhered with glue dots), Dazzling Diamonds Glitter

Tools: Dotted Scallop Ribbon Border punch, paper piercing tool & mat, circles cut with non-SU! circle cutters


Friday, May 13, 2011

color challenges!!

I had some extra time yesterday to play in my stamp room. There was absolutely NOTHING on the calendar, so I knew I could play a little. Of course, this meant avoiding some housework...but playing in my stamp room sounded much more fun, and housework can ALWAYS wait! *wink*

I played with two different color challenges this week and ironically they both used Not Quite Navy as one of their colors. I'll have to admit I haven't been playing much with the Regals or Neutrals. I'm more of a Brights or Subtles fan, so it's nice to be "encouraged" to use other color collections.

The first challenge was over at Create with Connie & Mary.

This card reminds me of myself (the "momma" bird) with my two kiddos behind me just chatting away with each other. I have a 5 year-old girl and 3 1/2-year old boy and they are the best of friends!


Stamp Set: Happy Together, Tiny Tags ("friends" sentiment)

Paper: Whisper White, Not Quite Navy, Sahara Sand, Poppy Parade, Poppy Parade DSP (hostess pack)

Ink: Night of Navy, Poppy Parade

Accessories: 5/8" Poppy Parade Poly-Stitched ribbon, Dimensionals

Tools: Jewelry Tag punch, 1 3/8" Circle punch, 1 3/4" Circle punch, 2 3/8" Scallop Circle punch


* * * * * * * * * * * * * * * * * * * * * * * * * * * * *

The other color challenge comes from The Paper Players, which I just found this week!!


These colors would be so perfect for a masculine card, but looking at my collection...I don't have much (if anything) to choose from. Looks like I need to find something in the new catalog coming up in July!


Stamp Set:
Pocket Silhouettes, Thank You Kindly

Paper: Whisper White, Not Quite Navy, Early Espresso, Cherry Cobbler, Crumb Cake

Ink: Cherry Cobbler, Early Espresso

Accessories: Cherry Cobbler seam binding (from 2010 Holiday Mini), mini library clip, Dimensionals,

Tools: Dotted Scallop Ribbon Border punch

* * * * * * * * * * * * * * * * * * * * * * * * * * * * *

I had a great time playing along with these challenges...
I look forward to the next one!

Thursday, May 12, 2011

sweet treats!

Before the school year was over, I wanted to have a few teacher treats for an end of the year thank you. As a former teacher, I always enjoyed getting just a little something to say thank you and having something handmade was always a little more special! I sell my greeting cards at a local consignment store, so I thought these treats would be something that might sell fairly well, also, since the end of the school year is wrapping up and people might be on the hunt for a handmade treat to give.

I made little treat bags using peppermint patties sandwiched between 2 scallop circles and placed in a skinny pretzel bag. I used the Tart & Tangy stamp set (which has been getting a lot of use lately!). The colors are Real Red & Glorious Green (retired). I used some SU! red gingham ribbon (retired) and some other green ribbon I had in my non-SU! stash.


I also wanted to use the little IKEA jars I have been holding onto (for a very long time!). I bought some Apple Jelly Belly candies in bulk to put inside the jars. I stamped the Tart & Tangy apple using Real Red, Chocolate Chip, and Glorious Green (retired). I tied a little ribbon around the jar using red gingham ribbon (retired) and added a little "for you" tag from the Tiny Tags stamp set, punching it out with the Jewelry Tag punch. This makes for a fun little treat for a teacher and after all the candy is gone, it would be perfect to hold little things like safety pins, paper clips, push pins, etc.


But, I didn't stop there, I thought while I was at it, I would make another kind of candy jar with Lemonheads inside. Again, I used the Tart & Tangy set, but this time I inked up the lemon (or orange...whichever color you want to use to make it either or). I used Yo-Yo Yellow (retired) and then added some Dazzling Diamonds glitter to make it sparkle. I punched out a little heart using the Heart to Heart punch and then tied the jar with a 1/4" white grosgrain ribbon. Using the "sweet treats" from the Teeny Tiny Wishes stamp set, I made a tag and punched it out with the Small Oval punch.
// ADDED BY RYAN ON 1-3-14 // END ADDED BY RYAN 1-4-14