Showing posts with label birthday cards. Show all posts

Monday, May 21, 2012

card making night - May 2012

Last Thursday I hosted my monthly 3/$6 card making night. It was a great group of stampers and I was even able to get in a little stamping fun myself!

CARD #1
Stamp Set: Happy Everything (retired)
Paper: Pool Party, So Saffron, Not Quite Navy

Ink: Not Quite Navy, Pool Party

Accessories: Dimensionals, silver brads

Tools: Stamp-A-Ma-Jig, Small Star punch (retired), 1" Circle punch, Paper Piercing Tool & Mat
 * * * * * * * * * * * * * * * * * * * * * * * * * * * * * *
CARD #2
I just loved this card by Jen at Simple & Sincere. I CASED it almost to the T except for the ribbon. I am SUCH a huge fan of Jen's work!! 
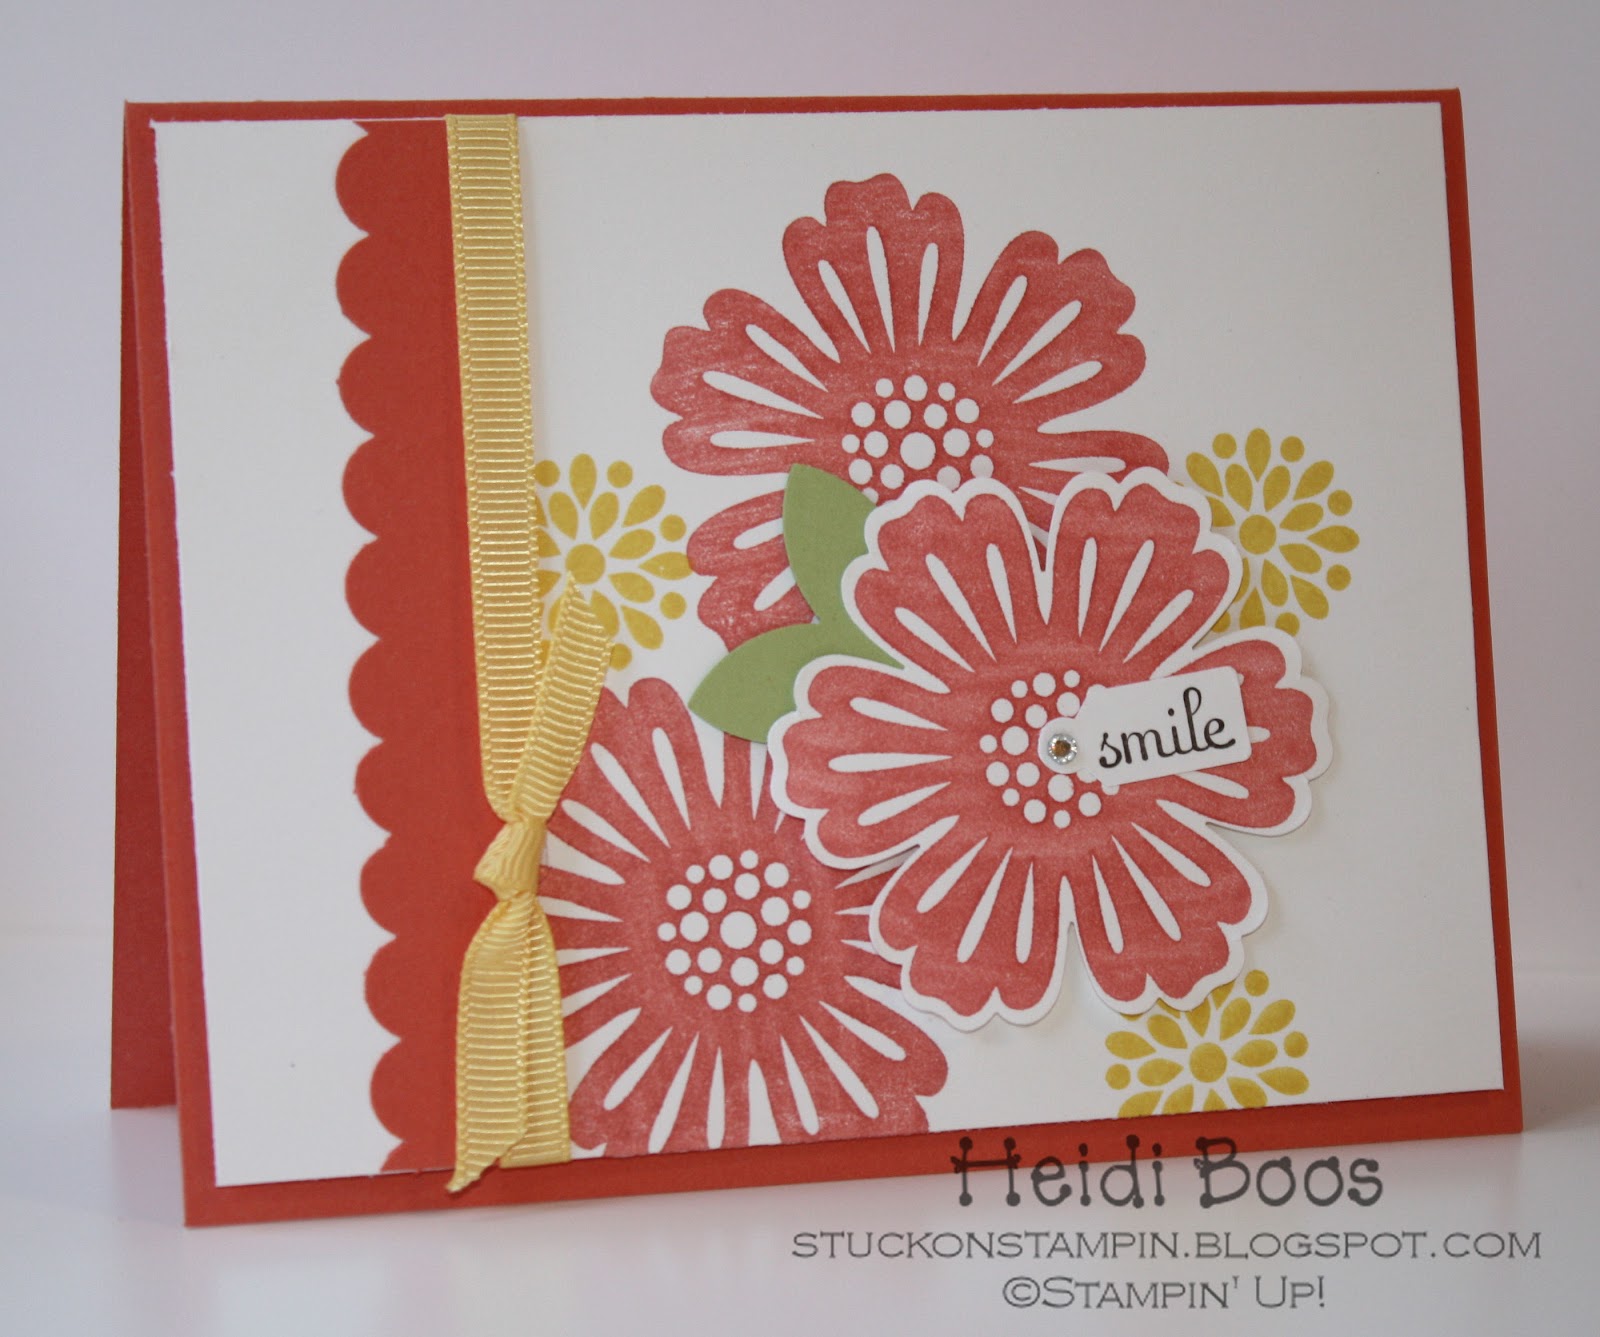
Stamp Set: Mixed Bunch, Fabulous Phrases
Paper: Calypso Coral, Whisper White, Certainly Celery

Ink: Calypso Coral, Daffodil Delight, Early Espresso

Accessories: Dimensionals, 1/4" Daffodil Delight Grosgrain ribbon, Accent Jewel Rhinestones

Tools: 5 Petal Flower punch (for the leaves), Blossom punch, Scallop Edge punch, Jewelry Tag punch
 * * * * * * * * * * * * * * * * * * * * * * * * * * * * * *
CARD #3
Stamp Set: Flight of the Butterfly, Teeny Tiny Wishes
Paper: Whisper White, Concord Crush, Melon Mambo, Lucky Limeade
, Cheerful Treat DSP (retiring hostess)
Ink: Concord Crush, Melon Mambo

Accessories: Dimensionals, 1/2" Concord Crush Poly-Stitched ribbon

Tools: Word Window punch, 1-1/4" Circle punch, 1" Circle punch, Big Shot Die-Cutting Machine, Perfect Polka Embossing Folder
 * * * * * * * * * * * * * * * * * * * * * * * * * * * * * *
One more card making night on June 14th before I take a break for July & August! Would love for you to join me at my home in Sherwood, Oregon!

Thursday, May 17, 2012

more card night fun


Last Tuesday I held another card making event at my mother-in-law's home. We made three cards and I wanted to keep each of them a bit more simple this time around since many of the women who attend these nights are new to stamping and card making. The event started at 6:30 PM and I was in my card loaded up and heading out at 8:15 PM...maybe the cards were a little TOO simple? *wink*
CARD #1
I used the sketch from stamp club for this Mother's Day card.
Of course, I had many sentiments available in case they didn't need/want to make a Mother's Day card.
 
Stamp Set: Mixed Bunch, misc. sentiments
Paper: Whisper White, Baja Breeze, Island Indigo, Rich Razzleberry, Twitterpated DSP
Ink: Rich Razzleberry, Island Indigo
Accessories: 1/4" Rich Razzleberry Grosgrain ribbon, Dimensionals
Tools: Blossom punch, 1" Circle punch

CARD #2 
My mother-in-law had the single stamp called Sail Away (now retired) and she had been wanting to use it and I told her that I would be happy to put together a card with the stamp that everyone could recreate at the card night. Once I saw this card by Lisa Vale at Ink Inspired, I knew it would be perfect! I avoided the ribbon and brads, but I definitely kept the fun technique of adding the bright orange sun.
 Stampers could either make a Father's Day card or masculine Happy Birthday.
 
Stamp Set: Sail Away, Happiest Birthday Wishes, Delightful Dozen
Paper: Whisper White, Crumb Cake, Chocolate Chip, Not Quite Navy, More Mustard, Pumpkin Pie
Ink: Chocolate Chip, Not Quite Navy
Accessories: Dimensionals
Tools: Stripes Embossing Folder, Square Lattice Embossing Folder, Big Shot Die-Cutting Machine

 CARD #3
I have really been enjoying playing with DSP lately and let the fun patterns do the talking. I saw this fun card by Dawn Olchefske that looked like a great layout. She used the Summer Smooches DSP, but I ended up using a variety of different papers to create this card.
 
The stampers could make it Congratulations (for graduation) or Happy Birthday.
Stamp Set: Delightful Dozen, retired sentiment
Paper: Pacific Point, Whisper White, Real Red, Summer Smooches DSP, Big Top Birthday DSP, Pacific Point DSP, retired DSP
Ink: Real Red
Accessories: Dimensionals, silver brad
Tools: Big Shot Die-Cutting Machine, Star punch (retired), Small Star punch (retired)
 
 It was a fun night, especially because my mom always comes along for the ride! It gives us a chance to chat and spend some quality time together without the kiddos wanting something from either of us. We are going to meet again at my mother-in-law's next month and then take a break for summer. 

My next monthly card night (3/$6) that I host at my home is tonight! Only two more of these nights before I take July & August off for summer fun! I bet I will miss not having a reason to play with my stamping stuff, so I hope that I can still find time during the summer to get in my craft room!

Sunday, May 13, 2012

let's make a cake (pp95-color challenge)

What beautiful weather we are having this weekend...such a great Mother's Day gift!

This week's theme at The Paper Players is a color challenge and Ann has created a bright and cheery combination for all of us to play with!
It took me a little bit to get started, especially because I couldn't decide which NEW "sneak peek" stamp set to play with! I ended up choosing a set that will be in the up and coming new catalog called Make a Cake. I earned this set for FREE (along with some paper and ribbon) for recruiting a new demonstrator during Sale-A-Bration. Just another fun perk of being a demonstrator...I love it! I also used a new stamp set called Itty Bitty Banners and used the new Bitty Banners Framelits to cut it out perfectly! You're going to love this new catalog!
I kept with my go to style of keeping things clean and simple. The Make a Cake stamp set has separate pieces that I stamped on top of each other to make one complete cake (hence the name: Make a Cake). I used my Stamp-A-Ma-Jig to get everything perfectly placed. What would I do without that great tool?! I wanted to add a little sparkle to my cake, so I added Dazzling Diamonds on the top of each layer of cake (stands out much more in person!). I pierced each of the two corners on the right to give it a little something extra and of course added some jewel accents to add some more dazzling factor.
Stamp Set: Make a Cake (coming soon in the NEW 2012-2013 catalog), Itty Bitty Banners (coming soon in the NEW 2012-2013 catalog) 
Paper: Whisper White, Baja Breeze, Daffodil Delight, Just Add Cake (retiring May 31)  
Ink: markers - Poppy Parade, Daffodil Delight, Baja Breeze 
Accessories: Jewel Accents, Dazzling Diamonds Glitter 
Tools: Scallop Dotted Ribbon Border punch, Stamp-A-Ma-Jig, Bitty Banners Framelits (coming soon in the NEW 2012-2013 catalog), Two-Step Owl punch (heart)

I hope you can come join us at The Paper Players this week and while you are there, be sure to check out the inspiration from the design team! Link up your card before Friday, May 18th at NOON.

Wednesday, April 25, 2012

card making night - April

Last Thursday I held my monthly card making night! I really enjoy the opportunities each month for me to host these events, so that I am always using my products by creating cards. Some months the attendance is higher than others, but I love a big group and I love a small group, so I'll take either!

As many of you know already, the retiring list came out on April 15th. (Visit HERE to take a peek of what stamp sets will be retiring on May 31st and click HERE to take a peek of what accessories will be retiring). Not only will there be many, many stamp sets retiring, but we are saying goodbye to the 2010-2012 In-Colors, as well. Because of this, I wanted to get some extra play time in with some of the retiring products. So, with my first card I did just that by using the retiring colors Concord Crush, Pear Pizzazz, and Peach Parfait. I also used the retiring stamp set Pocket Silhouettes. This is a simple design, but a classic!


Stamp Set: Pocket Silhouettes (retiring)
Paper: Pear Pizzazz, Concord Crush, Peach Parfait, Whisper White
Ink: markers - Pear Pizzazz, Concord Crush
Accessories: Dimensionals, Pearl Accents, 1/2" Pear Pizzazz Poly-Stitched ribbon (retiring)
Tools: Word Window punch, Modern Label punch, Beautiful Wings Embosslits Die, Perfect Polka Dots Embossing Folder, Big Shot Die-Cutting Machine

* * * * * * * * * * * * * * * * * * * * * * * * * * * * * * * * 

The second card we made was a CASE by the wonderfully talented Jen Sannes of Simple & Sincere. This is not the first time I have cased one of Jen's cards. I love, love, love her clean and simple style so much! I changed a couple of things in an attempt to add my own personal flair by snipping some banners at the bottom of each of the strips of paper. I also added a brad in the middle of the flower instead of a button. Thanks, Jen, for the inspiration! This card uses the Summer Smooches Designer Series Paper that Stampin' Up! is offering right now (through April 30th) as a promotion for upcoming products in the new catalog.


Stamp Set: Bold Blossom
Paper: Whisper White, Summer Smooches DSP
Ink: Real Red
Accessories: Dimensionals, Island Indigo polka-dotted brad
Tools: Triple Layer Bouquet punch, Paper Piercing Tool & Mat, Paper Snips

* * * * * * * * * * * * * * * * * * * * * * * * * * * * * * * * 

The final card was something I saw on Pinterest created by Lorraine. I pinned it 9 weeks ago, but it wasn't until I saw Karen Graff-Povis's take on the same card that I remembered I had pinned it. I felt like this month was the right month to go for it and so I did, adding my own choice of colors and DSP. The candle flames are made using the Two-Step bird punch. How clever is that?!


{a little Dazzling Details for some sparkle on the flames}

Stamp Set: Happiest Birthday Wishes 
Paper: Whisper White, Poppy Parade, Wild Wasabi, So Saffron, Just Add Cake DSP 
Ink: markers - Poppy Parade, Wild Wasabi, Peach Parfait 
Accessories: Dimensionals, red brads, Wild Wasabi striped ribbon (retired)
Tools: Paper Piercing Tool & Mat, Two-Step Bird punch


* * * * * * * * * * * * * * * * * * * * * * * * * * * * * * * * 

Stampin' Up! just announced the Retired Accessories list TODAY!!
Some accessories are discounted up to 60% off, but don't wait too long to order since all accessories and Decor Elements are available only while supplies last! Click on the picture below to order straight from my website.


Thursday, April 12, 2012

just a little random assortment of craftiness

This is going to be quite the random hodge-podge of projects kind of post, but I wanted to share, so here goes...short and sweet.

Valentine's Day treats for my MOPS (Mothers of Preschoolers) group
{heart shaped marshmallows with a packet of hot cocoa}

I get the pleasure of being my daughter's classroom coordinator.
This is the craft I planned for the kids to make for their Valentine's Day party.
{disclaimer: when I took the picture, I didn't realize the kitty's ear was bent back - oops!}

A little "happy baby" treat for a sweet friend of mine who had her THIRD girl in February.

I was asked to make 40th birthday party invites in Masters (golf) colors. I designed the invitation through Paint Shop Pro, printed them off, and then backed them onto coordinating colors of card stock (non-SU!). You can't tell in any of the pictures I took, but the white ball in the bottom right hand corner is textured with polka dots to represent a golf ball. I used the Junior Alphabet Sizzix dies to create the "40".

My daughter's teacher had her birthday at the end of March and I wanted to put together a little frame of a class picture as a little keepsake.

Just this past weekend, the kids had a birthday party for two little friends of ours that are sisters. I decided to make the same card in two different girly colors. The card base is made using the Top Note Die.

I am getting ready to go out of town for the weekend, so my descriptions are a little shorter than usual. If you have any questions about anything that you see, just leave me a comment and I'm happy to help!

Have a great weekend!

Friday, February 17, 2012

february 2012 card making night!

Last night I held my monthly 3 for $6 card making night ("Third Thursday" of each month, January - June). It came so fast...I feel like we just wrapped up January card night! It was a much smaller group than last month, but fun nonetheless! I enjoyed having a few more personal conversations since I was also able to stamp with the ladies. I really like both sides of the spectrum...lots of stampers or a small group. They both have their advantages. We were kind of chuckling last night because this time around we could hear my kids running around and playing upstairs, whereas last month, there were so many of us downstairs having conversations and such, it drowned out the chaos upstairs! ;)

Card #1
I had originally made this card over a crafting weekend (just for fun!) at the beginning of February and later on decided it would be a great one for a card making night. I originally had buttons in place of the flowers, but to make my supplies stretch a little further I changed it up by using a small flower punch and adding a rhinestone.

I love the Petite Pairs stamp set...I put the other half of the greeting on the inside of the card.

Stamp Set: Best of Everything, Petite Pairs (both sets available in clear or wood mount)
Paper: Whisper White, Melon Mambo, Wild Wasabi, Pretty in Pink
Ink: Wild Wasabi, Chocolate Chip, markers - Melon Mambo, Chocolate Chip, Pumpkin Pie (coloring in the bird)
Accessories: 1/2" Melon Mambo Polka-Dotted Ribbon (retired), Rhinestones Jewel Accents, Stampin' Dimensionals
Tools: 2-1/2" Circle punch, Itty Bitty Shapes punch pack (small flower), Eyelet Border punch, Big Shot Die-Cutting Machine, Perfect Polka Dots Embossing Folder


Card #2
This one might look familiar since I shared it last week. The only thing I changed was the size of the ribbon. This was a quick, but fun card!

Stamp Set: Friendly Phrases, Sweets for the Sweet (available in clear or wood mount)
Paper: Real Red, Whisper White, Big Top DSP
Ink: Real Red, Daffodil Delight, Old Olive
Accessories: 1/4" Real Red Grosgrain ribbon, Dazzling Diamonds Glitter, Stampin' Dimensionals
Tools: 1" Circle punch


Card #3
For the last card of the night, I used the Freshly Made Sketch #22.


I have been wanting to ink up my new Mouthwatering stamp set from the Occasions Mini Catalog, so I decided to go with the popsicle image and created a "sweet" card.


Stamp Set: Mouthwatering, Fabulous Phrases, (both sets available in clear or wood mount)
Paper: Whisper White, Lucky Limeade, Elegant Eggplant, Sweet Shop Specialty DSP
Ink: Lucky Limeade, markers - Wisteria Wonder, Soft Suede
Accessories:
Rhinestones Jewel Accents, Stampin' Dimensionals, Lucky Limeade Baker's Twine
Tools: Small Heart punch,


* * * * * * * * * * * * * * * * * * * * *

Hope you can join me next time!! For any of you who live in the Portland-Metro, Oregon area, mark your calendars for "Third Thursday" Card Making Nights...3 cards for only $6!
March 15
April 19
May 17
June 21

Contact me for more information if you're interested...

Sunday, February 12, 2012

birthday bash cards!

On Saturday night, my upline and friend Andrea and I co-hosted a Birthday Bash Card Making Night that was held at my home. Both of us have birthdays in February and we thought it would be fun to hold an event to help celebrate with what we love to do...card making!! All of our guests made 8 cards for only $15 (2 each of 4 designs). I designed two and Andrea designed two. We wanted to showcase products from the Mini Occasions Catalog and Sale-A-Bration products, so our cards mainly highlighted those products. We also had an ice cream bar with lots of toppings! It was a great turn out of 14 stampers. We prepared for just a few more, so I have a handful of cards to make, but I love having a chance to do more stamping!

My first card was inspired by a sketch from a blog I recently found called Freshly Made Sketches. The designers encourage clean-lined creations with lots of "white space" and clean edges, but also encourages lots of details and embellishments, avoiding distressing and torn edges. Yippee...my kind of cards!!

This is the sketch...


And, my take on the sketch...


Stamp Set: Friendly Phrases, Mouthwatering (available in clear or wood mount)
Paper: Whisper White, Calypso Coral, Old Olive, Sweet Shop Specialty DSP
Ink: markers - Lucky Limeade, Calypso Coral
Accessories: Lucky Limeade Baker's Twine, Calypso Coral Baker's Twine, Stampin' Dimensionals, Mini Glue Dots (for Baker's Twine bow), Rhinestones Jewel Accents
Tools: Big Shot, Stripes Textured Embossing Folder, Dotted Scallop Ribbon Border punch


* * * * * * * * * * * * * * * * * * * * * * * * * * * * * * * * *

This second card was inspired by a card I saw here. I just changed up a few things, but loved the design layout and mostly the colors!!! Adding the butterflies with the pearls was a fun little accent.


Stamp Set: Outlined Occasions (SAB product!)
Paper: Very Vanilla, Calypso Coral, Pool Party, Poppy Parade, Lucky Limeade (polka dots), Everyday Enchantment DSP (SAB product!)
Ink: Early Espresso (inking edges), Black Stazon, markers - Lucky Limeade, Calypso Coral, Pool Party
Accessories: Pearls Jewel Accents, Stampin' Dimensionals
Tools: Big Shot, Beautiful Wings Embosslits Die, Scallop Trim Border punch


* * * * * * * * * * * * * * * * * * * * * * * * * * * * * * * * *

These are Andrea's cards she brought to the party...aren't they adorable??


Wednesday, February 8, 2012

sweets for the sweet & big top birthday

I was blessed with a couple days away last weekend (thanks, Sarah!). I was going to bring scrapbooking because I rarely get the chance to pull it out, but after looking through the pictures on the computer I got too overwhelmed and decided I would bring my card stuff instead. I really went into the weekend as a chance to relax, enjoy myself, and put no pressure on the amount I was going to get done. On my last craft weekend in the Fall, I spent too much of the weekend trying to be in work-work-work mode and didn't enjoy just being away. This time was different and I had more fun!!

I decided to make four cards of each design. My intention was to come away with as many cards as I could just to have on hand...I am always needing cards either to use myself or people are interested in buying. To make it easier, I tried to grab a couple packs of DSP and then any coordinating colors, stamp sets, etc. that went with it.

Here are a few of the cards I made using the Big Top DSP and Sweets for the Sweet stamp set...

With this first card, I was inspired by something I saw in the 2011-2012 Idea Book & Catalog.


Stamp Set: Sweets for the Sweet (available in clear or wood mount), Petite Pairs (sentiment-available in clear or wood mount)
Paper: Whisper White, Tempting Turquoise, Peach Parfait, Big Top DSP
Ink: markers - Peach Parfait, Poppy Parade, Daffodil Delight, Early Espresso
Accessories: 1/2"" Poppy Parade Taffeta ribbon, Rhinestones Jewel Accents, Stampin' Dimensionals
Tools: 1" Circle punch, Itty Bitty Shapes punch pack (smallest circle), Perfect Polka Dots Embossing Folder, Big Shot


* * * * * * * * * * * * * * * * * * * * * * * * * * *

I fell in love with Melissa Stout's "sweet" card (found here) and knew it was a great layout. I changed the sentiment and used Dazzling Diamonds Glitter instead of Dazzling Details, but just couldn't resist those cute lollipops!


Stamp Set: Friendly Phrases, Sweets for the Sweet (available in clear or wood mount)
Paper: Real Red, Whisper White, Big Top DSP
Ink: Real Red, Daffodil Delight, Old Olive
Accessories: 5/8" Real Red Satin ribbon, Dazzling Diamonds Glitter, Stampin' Dimensionals
Tools: 1" Circle punch


* * * * * * * * * * * * * * * * * * * * * * * * * * *

This one was a little more of a process as I cut out each of the three pinwheels using my Paper Snips.

Stamp Set: On Your Birthday (let's celebrate!)
Paper: Tempting Turquoise, Real Red, Daffodil Delight, Big Top DSP
Ink: Real Red, Tempting Turrquoise
Accessories: 1/8" Daffodil Delight Taffeta ribbon, 1/2" Real Red Taffeta ribbon (retired), sponges, Tempting Turquoise brads, Stampin' Dimensionals
Tools: Large Oval punch, Paper Snips, Dotted Scallop Ribbon Border punch, 1-1/4" Circle punch, 1" Circle punch


More cards to come!!

Monday, January 23, 2012

anything goes challenge

I have been preparing for the start up of Stamp Club coming up on Friday, but I needed a little break and some inspiration for making my nephew's birthday card, so I headed to the A La Card Monkey Challenge #92 where "anything goes" this week.


I don't have very many boy stamp sets, so this card is about as boy-ish as I could get with what I could find in my stash and because my nephew is only turning six...I can still get away with "cutesy". I decided to play with the pinwheels again, but opted for cutting them out of the Big Top Birthday DSP instead of stamping.


I added some dimension with the "Happy Birthday" curled up a little. I probably could have added another pinwheel now that I see the extra white space, but the card is already in the hands of the six-year old, so I can't do anything about it now! :)


Stamp Set: On Your Birthday
Paper: Whisper White, Real Red, Tempting Turquoise, Daffodil Delight, Big Top Birthday DSP, Brights DSP Pack (Tempting Turquoise dots)
Ink: Real Red
Accessories: Tempting Turquoise brads, Real Red button, Stampin' Dimensionals
Tools: Big Shot, Scallop Square Duo Bigz Die

Friday, January 20, 2012

january 2012 card making night!

WOW!

This is one word I can use to describe last night's card making night at my home. I was over-joyed to have 24 stampers come stamp with me at my first event since the beginning of October. I was so happy to have such an awesome turn out to start off the New Year with gusto! My biggest group of stampers before this was 18 in attendance and that was about a month after we moved into our new house (almost 2 years ago), so at that time I thought most of my friends who came just wanted to see my new house! ;)

I had 9 new stampers who hadn't been to one of my card making events before and the enthusiasm in the room was contagious. Crafting nights are always so thrilling and enjoyable when there are so many stampers having such a great time! It was a tight fit, but we made it work. If the attendance continues like this (or if it grows!), I will need to find another location, but for now I like the coziness of having it in my home. We'll see as time moves on...

I designed and prepared supplies for everyone to make three cards each. Some stampers requested two sets, and I also had an "add on" project that I am offering, which is new this year! It was a lot to prepare, but with my New Year's goal of having things planned ahead of time, I felt pretty good about it when the day came. It also helped that my parents watched my kids for the day, so I could focus on my "job" and be 100% ready for the evening...snacks, treats, drinks, and all!

Enough jibber-jabber...here are the cards we made!

{card inspired by Mary Fish...from 2009!}

Even though it was a tedious process, I really wanted the hearts to pop off the page, so I added a Stampin' Dimensional to each of them. Let's just say I used A LOT of Dimensionals on this card, but it's worth it (and they really are a pretty inexpensive way to add a little "wow" to a card). Because it was going to be such a large group I didn't want to have everyone trying to share one punch, so I ended up pre-punching the hearts in different patterns of paper and then they could choose how they wanted their own tree to look.

Stamp Set: Season of Friendship, Delightful Dozen (available in wood or clear mount)
Paper:
Real Red, Whisper White, Brights DSP Pack (some of the hearts and background), Red Glimmer Paper
Ink: Real Red
Accessories: 3/8" Real Red Taffeta Ribbon (retired), Dimensionals
Tools
: Heart to Heart punch, Extra-Large Oval Punch

* * * * * * * * * * * * * * * * * * * * * * * * * * * * *

Since birthday cards are the most commonly requested card, I decided to make the other two cards birthday-themed!

Aren't these pinwheels so cute?! And I love that just by adding a few different sizes of circles it gives it that playful, but simple look! The pinwheels are made with two separate stamped images put together with a brad. And they actually spin if you want them to (not on their own, of course!)


Because Rich Razzleberry is such a dark color, I cut a piece of Whisper White card stock to fit inside of the card and then stamped the coordinating stamp to finish off the birthday greeting. The stamp set I used is called Petite Pairs and it's so fun because it has two little greetings that are meant to go together if you'd like, but they are separate stamps.

Stamp Set: Sweets for the Sweet (available in both wood and clear mount), Petite Pairs (available in wood and clear mount)
Paper:
Whisper White, Rich Razzleberry, Old Olive, Brights Pack DSP (Tempting Turquoise stripes & Pumpkin Pie polka dots)
Ink: Rich Razzleberry, Old Olive, Pumpkin Pie, Tempting Turquoise
Accessories: Silver Brads, Dimensionals
Tools
: Paper Snips (used to cut the intricate pinwheels with ease), 2-1/2" Circle punch, 1-3/8" Circle punch, 1-3/4" Circle punch, Heart to Heart punch, Extra-Large Oval Punch

* * * * * * * * * * * * * * * * * * * * * * * * * * * * *

Party hats make me happy, so this next card is such a bright and cheery one! And, again, because there was such a big group, I had the party hats pre-stamped because it was only one stamp which needed four different colors. Can you imagine the chaos that would be with everyone sharing one stamp...oh the mess of those poor ink pads! :)


Another card with lots of Stampin' Dimensionals...and some Dazzling Diamonds glitter, of course!
When I first designed the card, I cut each little party hat topper with my Paper Snips, but then I imagined 20+ people doing that and decided to try a different way!
Thankfully the circle from the Itty Bitty Shapes punch pack fit perfectly!
Stamp Set: Pennant Parade (available in both wood and clear mount), **upcoming Sale-A-Bration set called Outlined Occasions (sentiment)
Paper: Whisper White, Melon Mambo, Daffodil Delight, Marina Mist, Pretty in Pink
Ink:
Melon Mambo, Daffodil Delight, Marina Mist, Pretty in Pink, (markers in all four colors to color in confetti around "Celebrate"), Staz-On Black
Accessories: Rhinestone Jewel Accents, Dazzling Diamonds glitter, Dimensionals
Tools
: Itty Bitty Shapes punch pack, 1-1/4" Square punch, 1-3/8" Square Punch, Petite Pennants Builder punch

* * * * * * * * * * * * * * * * * * * * * * * * * * * * *

New this year at my card making nights is an "add on" project for anyone who might want to make a 3D project. Some like to do more than cards, so I thought adding this option would be a good change of pace. This is optional and I usually ask that the guests tell me ahead of time if they'd like to make one (or more!). I decided that I would prepare more than who had said they wanted to make them just in case there were others who might have changed their mind once they got here. It's a good thing I did make extras, I almost sold out of all of them...and I made 19 kits!

This project is made using two of the Scallop Envelope Bigz Die cut outs to create a "pocket". For a quick look at how to make one of these, head on over to Julie Davison's blog. This is similar to a project she posted back in 2009!


Inside the pocket, you can slip a fun size pack of M & M's (or Ghiradelli chocolate, among other kinds of candy). The little note card slips right behind the pack of M & M's.

Paper: Whisper White, Pretty in Pink, Real Red, Subtles DSP Pack (Pretty in Pink stripes), Play Date DSP (retired, but still in the Clearance Rack for only $1.99!), Red Glimmer Paper
Ink:
Real Red
Accessories: Sticky Strip (to secure the two pieces together), 1/8" Pretty in Pink Taffeta ribbon (retired), Dimensionals
Tools
: Heart to Heart punch, Full Heart punch, Small Heart punch, Big Shot, Scallop Envelope Bigz Die


* * * * * * * * * * * * * * * * * * * * * * * * * * * * *

Such a fun time with some great ladies...looking forward to the next "Third Thursday" card night already!

And, now it's time to get ready for "Fourth Friday" Stamp Club starting next week!
// ADDED BY RYAN ON 1-3-14 // END ADDED BY RYAN 1-4-14