Christmas Project #8
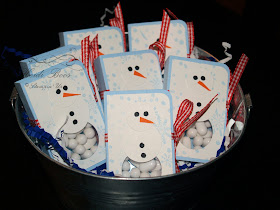
Snowman Kisses
Anybody wondering when Day 8 was going to appear? ;)
For today's project I wanted to do a "revamp" of a little project that I have done for the past two Christmas seasons, but this time using a current stamp set. By no means is this project something I came up with all on my own (I have seen it a little here, there, and everywhere for the last couple of years), but I did figure out the dimensions and made my own design and so I would like to pass those on to you to make it easier for you to re-create!
I present to you my little Snowman Buddy bringing you some snowman kisses...

You'll need to start with a Tic Tac "Big Pack" in white...
Cut a piece of Baja Breeze card stock 3" x 4-1/2" and round all four corners with the 3/16-inch Corner Rounder punch.


Score at 1-15/16" and 2-10/16"

Cut a piece of Whisper White card stock 1-6/8" x 2-13/16" and round two of the corners on the right. (please note: do not adhere it to the blue yet as shown below...I am just showing you how the white fits inside the front cover)

Sponge edges with Baja Breeze ink. Using the snowflake from the Season of Friendship stamp set, stamp off some of the snowflakes to make them lighter. I stamped once on a scrap piece of paper and then again on the cut piece making a softer look. If desired, stamp more snowflakes with full ink on top.

Using the snowman from the Button Buddies stamp set, ink up the image with markers...Basic Black, Chocolate Chip (for arms), Pumpkin Pie (for carrot nose). Stamp onto the white card stock near the top. Set aside.

With a 14" piece of ribbon (I used retired Red Gingham), fold the scored piece of Baja Breeze and line up your ribbon to be even on the right.

With SNAIL adhesive, adhere the ribbon ONLY TO THE FRONT "COVER" (not the spine or back).

With SNAIL adhesive, adhere the finished snowman to the front cover (over the ribbon). You'll notice I have already added the special details to the snowman (Dazzling Diamonds glitter, scarf, and Rhinestone on hat). I had to "retake" this picture, but my first attempt I added all of those details last.

Using your 1" Circle punch, punch a hole at the bottom, overlapping a little on the second circle.


Attach Sticky Strip to the spine of the pack of Tic Tacs.

Adhere to the inside spine of the card stock.

I added a fun tag with my Tiny Tags stamp set and coordinating Jewelry Tag punch.

To make it complete, on the inside I added this poem (I wish I could say I made this up, but I didn't!)...

I have made these for the last couple of years for the annual craft bazaar I participate in...
2009

2010

Although I didn't have these at my craft bazaar this year, I just knew I needed to share him with you, but update it a little. It's funny how the snowman has progressed over the years.
Thanks for hanging in there with me on Day 8 coming a bit late. Sometimes life just gets in the way of my stamping...how dare it?! ;)
Hope you are all enjoying a beautiful Christmas season. The weather here in Oregon has been gorgeous so far! I am loving the blue sky days and even though there's cold air...there's no rain and gloominess! I could do this all winter...and maybe add a little snow in there, too!
Only 4 more days of my 12 Days of Christmas {Projects}...and I'll see you on the 12th for a giveaway! Please forward this to a friend if they're interested in some quick, fun, and cute ideas as Christmas draws nearer.
************************
Day 1 - M & M's Skinny Bag with Matching Tag
Day 2 - Rudolph Punch Art Gift Card Holder
Day 3 - Santa Suit Jars
Day 4 - Hershey Nugget Trays
Day 5 - Holiday Hand Sanitizer Ornaments
Day 6 - Wrapped Rolos
Day 7 - Merry Trees Glass Block with Snow


TFS the great directions. This is a great little somethin somethin for my team at the office.
ReplyDeleteYour projects are soooooo adorable!!! Thank you so much for sharing each and everyone!!! You are a blessing!
ReplyDeleteThat is too stinking cute!
ReplyDelete