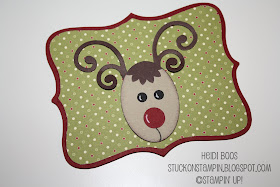
Christmas Project #2
Rudolph Punch Art Gift Card Holder

{back}
The quick and simple "how to"...
You will need:

Trim the edge of the DSP top note piece. You will see a perforated line where you will need to cut off.

Using SNAIL adhesive, adhere the DSP to one of the top note pieces. Then cut the other piece straight across a little more than half way up.
Picture not shown: If you want a stamped greeting on the back of the holder, make sure to stamp something before moving onto the next step.
Place Dimensionals on the sides and bottom of the cut top note. I used a gift card to help me see where I needed my Dimensionals to be. You want to make it a tight fit so the gift card doesn't slip out once it's assembled, but you also don't want it too tight that the gift card won't fit!

Attach the two top notes together...and your gift card holder is complete!
 ...except for the decorating part!
When I saw this Rudolph last year, I just knew I needed to create him (much like the snowman punch art I made a few weeks ago)
Gift cards seem to be the most popular item on Christmas wish lists these days! So, if you're going to give a gift card...at least make a fun gift card holder to add that extra special handmade touch!
This cute little gift card holder was one that I made last November with my stamp club girls! I used the inspiration behind the actual gift card holder from the talented Kerry at Kerry's Craft Blog. The Rudolph punch art morphed itself from a couple of things I had seen on the web, but mostly this little guy was inspired by the Rudolph seen on Angie Kennedy Juda's My Chic 'N Scratch (love her style!) I decided on different antlers, but most everything else stayed the same!
{front}This cute little gift card holder was one that I made last November with my stamp club girls! I used the inspiration behind the actual gift card holder from the talented Kerry at Kerry's Craft Blog. The Rudolph punch art morphed itself from a couple of things I had seen on the web, but mostly this little guy was inspired by the Rudolph seen on Angie Kennedy Juda's My Chic 'N Scratch (love her style!) I decided on different antlers, but most everything else stayed the same!

{back}

The quick and simple "how to"...
You will need:
- 2 top note die pieces out of the card stock of your choice (I used Cherry Cobbler)
- 1 DSP top note die piece (I chose the retired Jolly Holiday...love that DSP!!)

Trim the edge of the DSP top note piece. You will see a perforated line where you will need to cut off.

Using SNAIL adhesive, adhere the DSP to one of the top note pieces. Then cut the other piece straight across a little more than half way up.
Picture not shown: If you want a stamped greeting on the back of the holder, make sure to stamp something before moving onto the next step.
Place Dimensionals on the sides and bottom of the cut top note. I used a gift card to help me see where I needed my Dimensionals to be. You want to make it a tight fit so the gift card doesn't slip out once it's assembled, but you also don't want it too tight that the gift card won't fit!

Attach the two top notes together...and your gift card holder is complete!
 ...except for the decorating part!
When I saw this Rudolph last year, I just knew I needed to create him (much like the snowman punch art I made a few weeks ago)
You will need the following...
- 1/2" Circle punch (Cherry Cobbler "nose")
- Boho Blossoms punch (large flower...Chocolate Chip)
- Extra Large Oval punch (Crumb Cake sponged with Chocolate Chip)
- 2 black eyes using a regular hole punch
- Scribble, Swirls Sizzlets die (Chocolate Chip)
- Uni-Ball Signo gel pen

But one helpful hint...
Place the Chocolate Chip flower on top of the Crumb Cake wide oval as seen in the picture below (please note: it is already sponged with Chocolate Chip ink).
Place the Chocolate Chip flower on top of the Crumb Cake wide oval as seen in the picture below (please note: it is already sponged with Chocolate Chip ink).

Turn it over and trim the part hanging over the edge.
Now he has a little tuft of "hair" in the front!

Now he has a little tuft of "hair" in the front!
I sold these along with a couple of other gift card holders at a local Holiday Bazaar I participated in. They were $2.00 each.

Thanks for coming by and I hope you find time to do some Christmas crafting!
Be sure to come back each day for 10 more days of Christmas project ideas...and on December 12th there will be a GIVEAWAY!!
************************
Day 1 - M & M's Skinny Bag with Matching Tag
Be sure to come back each day for 10 more days of Christmas project ideas...and on December 12th there will be a GIVEAWAY!!
************************
Day 1 - M & M's Skinny Bag with Matching Tag


No comments:
Post a Comment
Thank you so much for your encouraging words! Each and every comment is read with delight and very much appreciated! I hope you are inspired to come back for more!