I am so glad to be back hopping with the Control Freaks after a break last month! My creative juices haven't been flowing as freely as I have wanted (and needed) them to, but hopefully with the change of weather (we're seeing sunny days here in Oregon!) I can turn my inspiration into production again while the bright light shines through my window! We are so excited to CELEBRATE with you all for this month's tour as we showcase cards and projects meant for celebrating...birthdays, graduation, Mother's Day, and more!
If you've already been hopping along then you just came from the wonderful Melissa Davies' blog. If this is your first stop, then welcome, sit back, and enjoy!
I wanted to share with you a Mother's Day card I created using the Circle Card Thinlits. I love how this simple thinlit creates such a fun and unique card design lickety-split with the creases made for you and everything. With this card I wanted to go a step above and create an extended part of the card (on the right side). I'll show you a quick "how to" for that below. This is definitely not my own idea! I am so thankful for other stampers who encourage me to do things differently!
Here is the card closed (sorry, don't mind my fingers...ha! ha!)
I wanted to take a picture of the card at a different angle, so this is what it looks like propped up. You can see the middle circle start to swing open.
And this is what the card looks like when you open the flap on the right. It reveals the rest of the stamped sentiment! There is also a place for you to write a little message...or at least write who it's from! If you were to pull the left part of the card all the way open the circle in the middle swings all the way open revealing the back side of the circle and then it can lay flat.
Stamp Sets
|
Mother's Love
|
Ink
|
Garden Green
|
Paper
|
Pistachio Pudding, Calypso Coral, Crisp Cantaloupe, Gold Soiree Specialty DSP
|
Accessories
|
SNAIL
Adhesive, Stampin’ Dimensionals, Pearl Accents, Rhinestone Accents, Candy Dots (Regals)
|
Tools
|
Big
Shot Die-Cutting Machine, Circle Card Thinlits, Bitty Butterfly Punch, Elegant Butterfly Punch
|
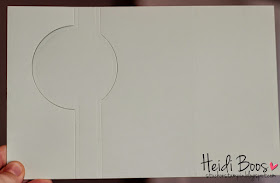
Start with a piece of cardstock that is 8-1/2" x 5-7/16" (this is just shy of 5-1/2"). This way the left side of the paper can fit just right under the left part of the thinlit and then you can slip it through the thinlit so it goes on the top on the right side. I hope that helps!
It will look like this when cut out.
Fold the left creases...
Fold the right crease...
Now design your card to your heart's content!
 Thanks for stopping by today! Continue on the tour for more great ideas to help CELEBRATE all of the wonderful people in our lives! Next up is the inspiring Debbie Henderson.


Beautiful card and lovely paper choice. This is just so elegant and feminine.
ReplyDeleteHeidi ~
ReplyDeleteAs always, I LOVE your card!! How do you cut your designer paper to fit the card? I LOVE the Circle Card Thinlits, but I am frustrated that Stampin' Up did not include a template for easily adding designer paper to the card. Any help you can provide would be greatly appreciated!!
Thank you!!
Judy