Pages

Monday, June 30, 2014

ssink - quick & easy

Today at Stylin' Stampin' INKspiration some of the designers are sharing Quick & Easy cards! These are always a favorite of our readers because cards don't always need a lot of extra fuss and crafters need to see that once in awhile! Don't get me wrong...I love a card decked out bottom to top with all the glitz and dimension, but there are also times when you just need something simple and quick.

I have a friend who is well deserving of this card because of a major accomplishment on her bucket list and I needed her to know how awesome I thought she was in accomplishing it! The best part about a "quick & easy" card is that you can create it, write on the inside, and pop it in the mail all in less than an hour!

http://freshlymadesketches.blogspot.com/2014/06/freshly-made-sketches-142-sketch-by.htmlOf course having a little inspiration is always a good thing, so I turned to Freshly Made Sketches to help get me moving in the right direction!


Stamp Sets
Big News
Ink
Tempting Turquoise
Paper
Daffodil Delight, Melon Mambo, Whisper White, Sweet Taffy DSP
Accessories
SNAIL Adhesive, Stampin’ Dimensionals, Rhinestones, 1/4" Melon Mambo Taffeta Ribbon
 Tools
Corner Punch


Come on by to see what the other designers have shared today for their Quick and Easy Cards!
http://ssinkspiration.blogspot.com/2014/06/quick-easy-cards.html

Friday, June 27, 2014

friday favorites - all abloom

It's Friday Favorites at Stylin' Stampin' INKspiration and my favorite right now is the colorful Designer Series Paper in the All Abloom DSP Stack. I love these little stacks of paper as they come with so many varieties of paper ~ 24 sheets (4 each of 6 double-sided designs) in 4-/12 x 6-1/2. So many fun options!!


To help with the layout, I used The Paper Players Sketch #201.

A quick and easy card with a great pop of color with the All Abloom DSP!

Stamp Sets
Sweet Stuff
Ink
Strawberry Slush, Memento Ink, Daffodil Delight Blendabilities, Basic Black Stampin' Write Marker
Paper
Strawberry Slush, Mossy Meadow, Pistachio Pudding, Daffodil Delight, Blushing Bride, Whisper White, Dazzling Diamonds Glimmer Paper, All Abloom DSP Stack
Accessories
SNAIL Adhesive, Stampin’ Dimensionals
 Tools
Big Shot Die-Cutting Machine, Circle Framelits

Check out more favorites from our designers at SSINK!
http://ssinkspiration.blogspot.com/2014/06/june-friday-favorites.html

Thursday, June 26, 2014

iPod touch birthday card

Well...I might be 5 years too late on this one (as technology is a lot more advanced now than an "old school" iPod, which is how my husband lovingly put it), but I had fun making these iPod Touch birthday cards for my two nephews. We had a little get together to celebrate both of the boys turning 9 years (today!) and 7 years (in July). Our gift to each of them was an iTunes gift card and their favorite candy wrapped in a baggie. I did NOT come up with this punch art all on my own...it was a CASE from Dawn Olchefske. However, I didn't have the dimensions of the actual iPod, so I think mine might be a little too short and squatty, but you get the point, right?! ;)

Directions for this punch art card can be found on Dawn's blog.

Here are the birthday boys opening up their gifts!
Happy Birthday Riley & Parker!

Tuesday, June 24, 2014

stamp into summer with sea street

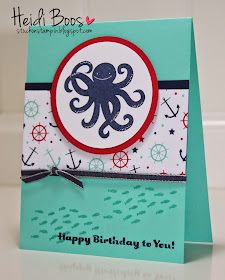
Last Saturday night I got together with a group of fellow demonstrators for a "Stamp into Summer" event. We try to get together every couple of months for "business talk", make n takes, and card swapping. This time around we thought it would be fun to each create a card design and set up supplies for each other to "stamp a stack" of cards. We rotated through each station and stamped a total of 9 cards!! It was a lot of fun to laugh, eat yummy food, and make cards! I'll show you the cards my fellow demos created coming up soon (still need to finish assembling some of them!), but I wanted to share with you the quick and easy card I brought for everyone to make.

Unfortunately you can't tell in the photo, but I did use Iridescent Ice Embossing Powder on the fishes at the bottom of the card. They sparkle in person! I wanted to keep the card simple and I am pretty sure I accomplished that as many of them whipped right through it! I used some retired Night of Navy ribbon (my box of new catalog goodies hadn't come yet), but this would look good with the new 1/4" Real Red Cotton Ribbon if you were wanting to use all current products!

Stamp Sets
Sea Street, Cycle Celebration (sentiment)
Ink
Night of Navy, Versamark
Paper
Real Red, Night of Navy, Coastal Cabana, Whisper White, Maritime DSP
Accessories
SNAIL Adhesive, Stampin’ Dimensionals, Night of Navy 1/4" Taffeta Ribbon (retired), Iridescent Ice Embossing Powder
 Tools
Big Shot Die-Cutting Machine, Circle Framelits, 2-1/2" Circle Punch, Embossing Tool


Thursday, June 19, 2014

control freaks tour - new catalog goodness


It's time for another blog hop tour with the Control Freak Stampers...I hope you enjoy what you see today on our blogs! If you started from the beginning of the hop, you should have come from Justin Krieger's blog. Doesn't he always blow you away with his attention to detail?

This month's theme is "New Catalog Goodness". The catalog has been out for a little over 2 weeks now and there are so many awesome products just waiting to be played with! There was so much to choose from in what I wanted to share today, but I decided to set my focus on the exciting new Project Life products by Becky Higgins...now available through Stampin' Up! I have really been wanting to get back into scrapbooking and I am excited for Project Life to help kick start that!

I created today's layout using some of the products from the Everyday Adventure Project Life Card Collecton & Accessory Pack. I also used a couple of images from the Project Life Day to Day Photopolymer Stamp Set and Project Life Point & Click Photopolymer Stamp Set.


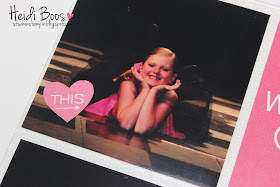
My daughter had her dance recital last weekend and I thought these would be the perfect pictures to put a layout together. I kept it pretty simple, but as I get a little more used to this way of scrapbooking I look forward to adding more embellishments and extra touches to my pages.


I knew I wasn't done with just one scrapbook page, so I decided I would use the Project Life Card Collection to create a quick card, too! I have been wanting to make a shaker card for awhile now and when I saw this card from the collection...


...I just knew I had to make a confetti card! 

I also used a card from the Accessory Pack (forgot to take a picture of just that!). It already had a heart pre-cut from the middle, so I knew that all it took was a piece of Window Sheet and a Shaker Frame. I cut apart the largest circle of the shaker frame and "molded" it around the heart after adhering the window sheet to the back of the card.


I then used my handheld hole punches (1/4" & 1/8") to punch out coordinating colors that would match the confetti card and made my own "confetti"! I used the colors Pear Pizzazz, Bermuda Bay, Strawberry Slush, Pumpkin Pie & Crushed Curry.


I put the "confetti" inside the heart then I peeled the adhesive backing of the shaker frame. Make sure to do that part last, so everything doesn't stick to it!


This picture shows you the back of the card I was using (it's 2-sided so you always have options!). I placed onto the back of where the shaker frame was so the confetti stayed in one place.


I adhered it to a Strawberry Slush base and added a trio of rhinestones and bow of Strawberry Slush thick Baker's Twine to finish it off! 

{Shake that confetti!}

Thank you again for taking the time to hop along today. I hope you were inspired! Keep in mind that the Project Life cards can be used for more than just scrapbooking! As you can see, they work for a quick card in a pinch!

http://judystamps.blogspot.com/Please continue to hop along with the Tour de Freaks. Next stop is Judy DiScipio at Judy Stamps.


Control Freaks Blog Hop List
  1. Wendy Weixler at Wickedly Wonderful Creations
  2. Mary Brown at Stamper Camper
  3. Patty Bennett at Patty Stamps
  4. Cindy Elam at Heart's Delight Cards
  5. Debbie Henderson at Debbie's Designs
  6. Melissa Davies at Rubberfunatics
  7. LeeAnn Greff at Flowerbug's Inkspot
  8. Julie Davison at Julie's Stamping Spot
  9. Justin Krieger at JK Cards
  10. Heidi Boos at Stuck on Stampin' (you are here!)
  11. Judy DiScipio at Judy Stamps
  12. Connie Babbert at Inkspired Treasures

Sunday, June 15, 2014

the creation station - first comes love then comes marriage

It's the 3rd Sunday of the month which means it's blog hop time with The Creation Station. We're a group of 12 Stampin' Up! demonstrators who come together for a hop twice a month (1st & 3rd Sunday) showcasing specific stamp sets or products to help show you, our readers, different ways to use these products!

Today's pick was to create something using one (or more!) of these products or themes:
1) Wedding themed cards, gifts, scrapbook pages, etc.
2) Traveler and/or World Map Stamp Set
3) Gift Card Enclosure Pack (pg. 194 of the catalog ~ I wish I had these to show you!!)

Now, it might come as a shock, but I still have yet to make my big new catalog order! I have been so swamped with end of school stuff, class gifts, dance recital, and on and on that I just haven't had the chance to sit down with my wish list and figure out what to order! With that said, I decided to go ahead and play with some of the current products I do have that would be perfect for a wedding theme! Many of these products started out in the Occasions Catalog and have since carried over to the 2014-2015 Annual Catalog!

It seems that the trendy yellow/gray combination is a fun one for weddings and so I kept with this combo in both of my creations today. This first card is super simple and showcases the Petite Petals Punch (first debuting in the 2014 Occasions Catalog).

The card base is Basic Gray followed by Daffodil Delight and then Whisper White. I stamped the background image using Gorgeous Grunge. I used the Petite Petals Punch to punch out nine flowers popping them up on Dimensionals. In the center I added a pearl. You will see that my pearls are colored yellow to match...this is because I used the new Blendabilities to color them (available to all of our customers soon!). This was a technique I showed last month. I finished off the card with the sweet little sentiment "happy together" from A Dozen Thoughts.


My one little trick for creating dimension with the flower petals was taking a marker and putting it inside the flower and pulling up the petals. This helped with not creasing too much on the folds, but making it look more natural.

OK, next is a cute little favor box I thought would be adorable at the place of where each guest would sit for a formal dinner (obviously it would take a lot of assembly for that many people!). Or this Could hold a special gift, like matching key chains, cash, etc. It's not large enough for a gift card as the box only measures 2-1/2" x 2-1/2". Or maybe even better yet, this could be used for a fun bridal shower favor box...then you don't have to make as many for all your wedding guests!

This favor box showcases the Spiral Flowers Original Die (first debuting in the 2014 Occasions Catalog). You can find this die on pg. 233 of your catalog. I also kept with the color scheme of Daffodil Delight and Basic Gray. I will admit these flowers did take a little practice, but THIS VIDEO put together by Stampin' Up! helped with the basics of using this die.  These flowers are still not perfect by any means, but after the third flower I finally got the hang of it! To hold the flowers together I used my hot glue gun. The petals are created from Wild Wasabi cardstock punched out with the Large Oval Punch and then creased down the middle. I adhered them to the box using Glue Dots. The sentiment is from Label of Love and punched out with the coordinating Artisan Label Punch.


The box was created using these directions by Jill Franchett. However, I opted for a larger-sized box than the one she talks about, so I scored the lines for the box a bit differently. I also used the scallop square from the Square Framelits as the die she used has since retired. Please leave a comment if you would like specific instructions for how I created this one differently.


http://jenniferfrost.blogspot.com/2014/06/love-and-marriage-creation-station-blog.htmlThank you so much for stopping by! I hope that you will continue on through the hop and stop by to Jennifer Frost's blog by clicking the next button. If you are wanting to go backwards, click on the back button to visit Sara Levin. Happy hopping!


http://theartfulinker.com/creation-station-wedding-tour/
 

Friday, June 13, 2014

beach themed favor tags

A couple of weeks ago a friend of mine asked if I would be interested in making some favor tags. She had these cute foot scrubbers in the shape of fish and starfish to go with her beach-themed bridal shower (her sister is getting married in Hawaii!). Of course I was happy to help!


I printed out what she wanted the tags to say on a word document, which included the date of the wedding. I could fit 8 on a page and I was planning to make 35 in total. The font is Jenna Sue (a favorite of mine!)

I knew I wanted to use the new Tag Topper Scalloped Punch, so the width needed to be two inches. I pulled out my Paper Trimmer and got to work at cutting up all 35 tags.

Next step was punching the edge of each...

OK, all done with that part!

 Time to stamp!
I wanted to stick with the beach theme, so I used one of the stamps from Work of Art to resemble the water and stamped each tag using Pool Party. I wanted it softer, so I stamped off each time before stamping on the tag.

 The starfish image from Sea Street was the perfect accent to the tag, so I stamped it in Sahara Sand in the corner of each tag.

I had quite a bit of leftover Pool Party satin ribbon from Sale-A-Bration a couple of years ago and this was the perfect color/texture for this tag!


It's so fun to be able to create for others!

Wednesday, June 11, 2014

Stylin' Stampin' Squad Blog Hop - new catalog inspiration


Today we are so excited to share with you some NEW CATALOG INSPIRATION as we hop along with the Stylin' Stampin' Squad. Now it is a little bittersweet today as this is our last hop together as a "squad". Some blog hop designers we are saying goodbye to, but there are others who are planning to join us on our design team blog at Stylin' Stampin' INKspiration where we will continue to hop monthly as a group with our new design team! Yippee!!

As you hop along, please be sure to comment and show some love on every blog! We are always excited to hear from our followers! You should have just left stop number #9 - Rose of Stampin' with Rose. If so, you are in the right spot. If a link doesn't work or you get off track, you will find the full blog hop lineup below.

The new catalog has been out for almost 1-1/2 weeks now, so I am sure many of you have already had time to look through it (maybe more than once...or even more than twice!) We thought it would be fun for us to highlight some of the new products so that you can decide what you want to put on your wish list! Today I am using the Sea Street stamp set and Maritime Designer Series Paper to show you a simple card and gift card holder. This set is great for kid birthdays ~ especially in the summer! And the DSP coordinates perfectly with the fun images!

{SEA STREET}
Clear Mount - #133988 / $16.95
Wood Mount - #133985 / $22.95

 {MARITIME DESIGNER SERIES PAPER}
#133696 / $10.95

 This card is super simple, but is perfect for a little "hello" or "happy birthday"! I just love how the background DSP makes a fun statement behind the layers of circles with the octopus.
Stamp Sets
Sea Street
Ink
Night of Navy
Paper
Real Red, Night of Navy, Coastal Cabana, Whisper White, Maritime DSP
Accessories
SNAIL Adhesive, Stampin’ Dimensionals, Coastal Cabana Thick Baker's Twine
 Tools
Big Shot Die-Cutting Machine, Circle Framelits

This next project is a fun one! It uses so many pieces of the Maritime DSP! I used the tutorial for this gift card holder from Heather Van Looy at Handcrafting with Heather.

Here is the gift card holder when it's wrapped up in its belly band. 

Slip off the belly band and open up the first flap. I added some of the fun paper to both of the inside flaps.

 Then open it up one more time and it reveals a place for you to write a little message and a spot to put the gift card on the right. (Bet you'll never guess where that gift card is to!)

I will be using this gift card holder design A LOT this summer as we have many birthdays lined up. In fact, this particular one here will be used for a birthday on Friday. My son will be bringing it to his friend's birthday party with a $10 gift card in it...and attached to a water soaker! :)

http://stampindj.blogspot.com/2014/06/new-stampin-up-favorites.htmlThank you so much for taking the time to hop through and check out our projects. I would love to hear from you, so leave a comment or send me an email to stuckonstampin{at}gmail{dot}com if you have any questions or comments!

Next on the hop is Darcy at DJ's Stampin' Place. Hop on over to check out her new catalog projects!


Blog Hop Participant List:
  1. Darcy J. of DJ's Stampin' Place
  2. Cynthia R. of Ink-A-Doodle Creations
  3. Diana E. of Stampin' Fun with Diana
  4. Tonya B. of Stampin' with Tonya
  5. Donna S. of Organized Chaos
  6. Kim R. of Stamping with Kim
  7. Pam S. of Stampin' in the Sun
  8. Bree R. of Craft-Somnia
  9. Rose C. of Stampin' with Rose
  10. Heidi B. of Stuck on Stampin'