Wednesday, April 27, 2011

3 for $6 Card Making Night - April

Another month has flown by!! I felt like I just blogged about March's card making night! April has definitely been a busy month for me, but even though I had to reschedule my first card making night this month due to an overwhelming weekend/week for me and my family, it was a great turn out of 9 women who came to stamp with me this past Monday! I enjoyed listening to all the fun and laughter that was taking place while they made cards. This is why I host the card nights. For women who just want to sneak in a little fun into their busy schedules and feed the crafty itch! This month's 3 for $6 cards were all birthday cards. These seem to be the most popular, so I decided to stick with all birthday.


{a close up to show off the Dazzling Diamonds glitter}
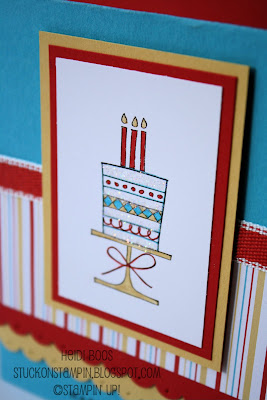
Stamp Set: A Slice of Life (Hostess Level 1 from Occassions Mini)

Paper: Poppy Parade, So Saffron, Tempting Turquoise, Whisper White, Pawsitively Prints II DSP

Ink: Early Espresso, markers - Poppy Parade, Tempting Turquoise, So Saffron

Accessories: Dimensionals, 1/2" Poppy Parade poly-stitched ribbon, Dazzling Diamonds Glitter (adhered using 2-way glue)

Tools: Scallop Edge Border punch, paper piercing tool

* * * * * * * * * * * * * * * * * * * * * * * * * * * *

This card I CASEd (Copy And Share Everything) from the Stampin' Up! "demonstrator only" website called Stampin' Connection. It is a card by Andrea Munro. I used a different polka dotted paper and added some rhinestones, but most everything else is just the same! It means I really, really liked if I don't need to change much!

Stamp Set: Party Hearty (the banner is actually made up of party hats turned upside down!) Teeny Tiny Wishes (happy birthday)

Paper: Crumb Cake, Melon Mambo, Whisper White, Bold Brights Pattern Pack (Pumpkin Pie - polka dots)

Ink: Melon Mambo, markers - Regal Rose, Melon Mambo, Pumpkin Pie

Accessories: Dimensionals, Rhinestones Jewel Accents, Pumpkin Pie brads

Tools: Perfect Polka Dots Textured Impressions Embossing Folder (used with Big Shot), Modern Label punch, Word Window punch, Paper Snips (for cutting all those party hats!)

* * * * * * * * * * * * * * * * * * * * * * * * * * * *

I guess I needed a little inspiration for Monday's card night because this is another card I found on Stampin' Connection by Karen Graff-Povis. Her original design is also found on her blog HERE. I used some different colors and DSP, but was pretty much in love with her design, so I kept it "as is". It's a great a layout for using so many different stamp sets and for keeping it simple.

Stamp Set: Party Hearty

Paper: Pumpkin Pie, Pacific Point, Old Olive, Daffodil Delight, Whisper White, Ice Cream Parlor DSP (from the most recent SAB)

Ink: Pumpkin Pie, Pacific Point

Accessories: Dimensionals, 5/8" Pumpkin Pie grosgrain ribbon

Tools: 1 3/8" Square punch, Corner punch, 3/4" Circle punch (to punch out birthday present)

Saturday, April 23, 2011

Easter treats!

Easter is tomorrow! Do you need a last minute treat idea?

I gave these little scallop envelope boxes to my daughter's pre-school teachers for Easter. They are actually the same as what we created for April's Stamp Club except I used a "Happy Easter" sentiment. They were the perfect size to add in a couple of Cadbury eggs for something sweet.

If you're looking for an easy to follow tutorial, you can find it HERE.

Stamp Set:
Well Scripted (retired)

Paper: So Saffron, Poppy Parade, Whisper White, Pawsitively Prints II DSP

Ink: markers - Tempting Turquoise, Poppy Parade

Accessories: Dimensionals, Basic Pearls Jewel Accents, 1/2" Poppy Parade Poly-Stitched ribbon, sticky strip

Tools: Beautiful Wings Embosslits Die, Scallop Rectangle Clearlits Die, Small Oval punch

* * * * * * * * * * * * * * * * * * * * * * * * * * * * * * * * * *

What about these cute little bunnies?
Punch art is so fun...and easy!

Last year I made these cute Easter gifts for neighbors using this bunny.

The original idea for the bunny came from HERE.

To add an extra little something,
I attached a package of jellybeans to the back of each bunny.
It would make a great little Easter gift!

List of punches needed:

Top Note Die

Wide Oval Punch

Oval Punch

1 3/8" Circle Punch

1" Circle Punch

3/4" Circle Punch

1/2" Circle Punch

Heart to Heart Punch

Thursday, April 21, 2011

happy birthday princess!

My daughter's birthday is on Friday, but we are celebrating with friends today (Thursday). She invited 6 of her little girlfriends over to have a Disney princess party. Each of the little girls are dressing up as their favorite Disney princess. I look forward to all the fun things we have planned and I know that she is super excited!

I wanted to show you the simple, but cute invitations I made. The stamp set is called "Princess Time", but unfortunately it retired last year. I was glad to snag it up at a local consignment sale a month or so ago. The colors used are Rose Red (XL scallop circle) and Regal Rose (ink & DSP). The polka-dot DSP is from the Brights Collection Patterns Pack (Regal Rose). I love the collection paper packs...I use them all the time! The added "bling" on the princess crown are the Rhinestones Jewel Accents.


It's been a busy month, but I hope to be back soon with lots more to share!

Saturday, April 16, 2011

birthdays and Springtime!

Last Tuesday night, I was able to head on over to my mother-in-law's home about an hour from where I live to hold a 3 for $6 card night at her house for her and her friends. I normally host these once a month at my own home. There has been some interest among her friends to attend card nights here, but they do not want to have to travel. I offered that I would come out there way once every other month to hold a card night at my mother-in-law's home. It was a great turn out of 16 ladies and it seemed like everyone had a good time! I hope to see many, if not all of them, again in June!

I created a similar version of the card below and shared it a couple of weeks ago after I was playing around with my Create a Cupcake set. The first card was created with blue, green, and red.
Stamp Set: Create a Cupcake

Paper: Whisper White, Certainly Celery, Perfect Plum, Pale Plum (retired), Perfect Plum DSP

Ink: Certainly Celery, Perfect Plum

Accessories: Dimensionals, Pearls Accents (inside small flower), 5/8" Certainly Celery satin ribbon

Tools: Dotted Scallop Ribbon Border punch, Build a Cupcake punch, Punch pack (itty bitty flower)

* * * * * * * * * * * * * * * * * * * * * * * * * * * * * * *


Stamp Set: Tart & Tangy, So Happy For You (no longer available)

Paper: Rose Red, Whisper White, Bashful Blue, Regal Rose, Old Olive, retired DSP (not sure!)

Ink: Chocolate Chip (for sentiment), markers - Old Olive, Rose Red

Accessories: Dimensionals, 1/4" Old Olive grosgrain

Tools: 1 3/4" Scallop Circle punch, 1 1/4" Circle punch, 1 3/8" Circle punch, mat pack & piercing tool (holes on the scallop circle), Perfect Polka Dots Embossing Folder

* * * * * * * * * * * * * * * * * * * * * * * * * * * * * * *


up close view of the textured background

Stamp Set: Easter Blossoms (clear mount)

Paper: Baja Breeze, Pink Pirouette, Whisper White, Early Espresso

Ink: Crumb Cake, Early Espresso, marker - Pink Pirouette (colored in eggs)

Accessories: Dimensionals, 5/8" Whisper White Organza ribbon (adhered with mini glue dot), Basic Pearls

Tools: Backgrounds 1 Texturz Plates

Tuesday, April 12, 2011

no new Tuesday Tip today!

Such a busy, crazy, run around all over the place kind of week...and it's only Tuesday!

So, therefore, there is no Tuesday Tip this week, but if you're new to my blog then here are the last 5 editions to my weekly "Tuesday Tips".


I hope to have something NEW for next week's Tuesday Tip!

Check back soon as I'll be sharing some cards from my latest card making night and my daughter's princess-themed birthday invites!

Thursday, April 7, 2011

thank you to our troops!


A month or so ago, my friend Sarah had mentioned that she would love to get a group of ladies together to make some cards to say thank you to our soldiers. She has been helping to support a new organization called Thanks For Our Freedom and wanted to have a large stack of cards she could give to them to use. Sarah asked if I would be willing to design the cards if she took care of gathering together the "helping hands"! Of course I wanted to do my part in helping support in any way that I could.

We had our card making night on Monday night and whoever was able to come, simply came to help at no cost to them (other than through donations, which everyone so graciously pitched in). Each of the guests took home a card of their choice as a thank you. Overall we made 12 cards of each design...with 3 designs each that totaled 36 cards! We whipped these cards out in a matter of an hour and a half! It was so fun to see everyone working the "assembly line" and piecing together each card. Thanks, ladies, for coming on over! And, with the donations we received, we plan on making another set of cards to add to the stack.

I wanted to keep each of the cards a little on the simpler side, so that we could get them put together quickly! I also didn't want to have too much dimension on the card to avoid extra postage on the envelope.


Stamp Set:
Classic Stars Jumbo Wheel, So Happy For You (sentiment - no longer available)

Paper: Whisper White, Real Red, Brilliant Blue (retired)

Ink: Real Red, Brilliant Blue (retired)

Accessories: Dimensionals, red adhesive gemstones (non-SU!), red gingham ribbon (retired)

Tools: 1 3/4" Scallop Circle punch, 1 3/8" Circle punch, Scallop Edge Border punch, Stars #2 Originals Die (used with Big Shot), Small Star punch (retired)

* * * * * * * * * * * * * * * * * * * * * * * * * * * * *


Stamp Set: Occasional Quotes (Hostess Level 3 set)

Paper: Pacific Point, Real Red, Whisper White, Celebrations DSP

Ink: Real Red

Accessories: Dimensionals, light blue adhesive gemstones (non-SU!), sponges

Tools: Stars #2 Originals Die (used with Big Shot), Small Star punch (retired)

* * * * * * * * * * * * * * * * * * * * * * * * * * * * *


Stamp Set: Thank You Kindly

Paper: Real Red, Whisper White, Brilliant Blue (retired)

Ink: Brilliant Blue (retired)

Accessories: 1/8" Real Red taffeta ribbon, dark blue adhesive gemstones (non-SU!), clear adhesive gemstones (non-SU!),

Tools: Dotted Scallop Ribbon Border punch, Stars #2 Originals Die (used with Big Shot), Small Star punch (retired)

* * * * * * * * * * * * * * * * * * * * * * * * * * * * *

**All of these cards would also make great 4th of July cards if you changed up the sentiments!

Tuesday, April 5, 2011

Tuesday Tip - storing 12x12 paper

Just a quick post today (tonight) for my Tuesday Tip! I was gone all weekend and you know how that works when coming home already behind on things...playing catch up is quite the task!

I love Stampin' Up! DSP (Designer Series Paper). I'm pretty picky, however, when it comes to buying it. I don't want to be too overwhelmed with choices (kind of like my embellishments I shared last week), but there are often days I say "I wish I had that paper!" I have a certain taste in the patterns of my paper, and often I don't go outside the box. I'm trying to work on that, but I also want to have paper in my supply that I KNOW I will use!

I love these 12x12 paper holders. Stampin' Up! sells them for $7.95 and you can purchase 4 dividers separately at $5.95, (the ones you see below in the pictures are a little bit bigger than the ones SU! sells, but I purchased these before I became a demonstrator). These are the perfect holders for storing 12x12 DSP and saving yourself from all those bent corners! I personally would love to own a rack where I could lay my 12x12 paper and have it all displayed on the walls, but that's only in my dreams! For now, I'm content on this method to help save on a little room...and it works for me. I'm already noticing that I will be needing another one soon!


Of course, labels are a must so that you are able to find the right paper just that much quicker!


Another tip I have just discovered is to keep the DSP in its clear plastic packaging that it comes in. Not only will it help save you on those bent corners, but then you are able to put the scraps right inside and it will help contain them...because we know how we keep every little scrap!


Also...because I love to coordinate, I make sure I have the names of the cardstock colors that coordinate with the DSP in the package written on the back of the thin cardboard piece that comes behind the sheets of paper. This will help you quickly find the coordinating color without having to thumb through the catalog to see what's listed there, especially if the DSP has retired. Then you won't have to go finding the correct catalog it can be found in.


For other Tuesday Tips, visit HERE.

Disclaimer: Many of the "Tuesday Tips" I share each week have been gathered through my experience as a Stampin' Up! demonstrator and crafter. I do not necessarily claim any of them as my original idea (unless it really is!), but rather things that I have seen here and there through blogging, surfing the web, attending events, and such. If there is a specific idea I have seen and want to share, I will be sure to give credit where credit is due. Hope you enjoy my "Tuesday Tips"!
// ADDED BY RYAN ON 1-3-14 // END ADDED BY RYAN 1-4-14